
- 🚀 Set Up the PostgreSQL Upgrade Sandbox
- 🔎 Pre-Upgrade Assessment — Know Your Cluster First
- 🚀 Step 3 — Install PostgreSQL 18 Binaries
- 🏗️ Step 4 — Initialize the New PostgreSQL 18 Cluster
- 🧩 Step 5 — Install extension shared object files
- 📚 Step 6 — Check Custom Full-Text Search Dictionaries
- 🔐 Step 7 — Adjust Authentication
- ⏸️ Step 8 — Stop Both PostgreSQL Servers
- 🔄 Step 9 — Prepare for Standby Server Upgrades
- 🚀 Step 10 — Run pg_upgrade
- 🔄 Step 11 — Upgrade the Streaming Replication Standby
- ⚙️ Step 12 — Restore PostgreSQL Configuration
- ▶️ Step 13 — Start PostgreSQL 18
- 🛠️ Step 14 — Post-Upgrade Processing
- 📊 Step 15 — Statistics
- 🗑️ Step 16 — Delete the Old PostgreSQL 16 Cluster
- ↩️ Step 17 — Reverting to PostgreSQL 16
- 🧹 Lab Cleanup — Stop or Destroy the Sandbox
🚀 Set Up the PostgreSQL Upgrade Sandbox
1 Install Oracle virtual box – Virtualbox
2 Install Vagrant – vagrant
3 Install putty – putty
Once you have completed the software installation defined , follow these steps to create your Vagrant configuration files and prepare the machines for startup.
To follow the hands-on upgrade, you can spin up the same PostgreSQL Primary/Standby environment used in this guide.
📥 1. Get the Lab Code
Open windows powershell and traverse to your directory as show in below example.
cd D:\sandboxes\postgres\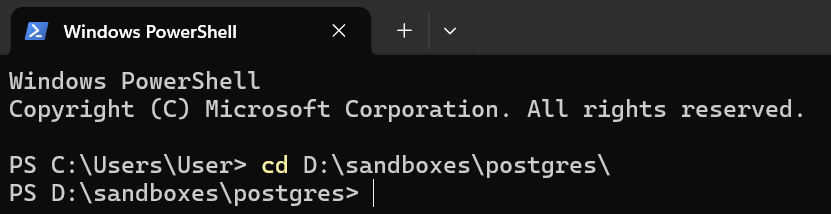
Clone the repository using Git:
git clone https://github.com/tejaswikt/postgres-upgrade.git
cd postgres-upgradeOr, if you don’t use Git:
- 📦 Download the repository as a ZIP from GitHub
- 📂 Extract it to a directory of your choice
- 💻 Open PowerShell from the extracted directory
⚙️ 2. Customize the Lab
All important lab settings are kept in one file:
config/vagrant.ymlEdit it to match your environment.
For example:
shared:
  box: "oraclebase/oracle-9"
  postgres_version: "16"

nodes:
  - name: "pg-primary"
    role: "primary"
    ip: "192.168.56.170"
    mem: 2048
    cpu: 3

  - name: "pg-standby"
    role: "standby"
    ip: "192.168.56.171"
    mem: 2048
    cpu: 3
🔧 Things you can customize:
- 🐘 PostgreSQL version
- 🌐 Primary and Standby IP addresses
- 🧠 Memory
- ⚡ CPU
- 🧩 PostgreSQL extensions
For this guide, we start with PostgreSQL 16.
▶️ 3. Build the Lab
That’s it. Start the environment with:
vagrant upVagrant will automatically build and configure the PostgreSQL Primary and Standby environment.
☕ Build time: On my test system, a clean build took approximately 40 minutes. Your time may vary depending on system resources and download speeds.
Once it completes:
vagrant statusYou should see:
pg-primary    running (virtualbox)
pg-standby    running (virtualbox)
✅ Sandbox ready.
🔐 4. Login to the Sandbox
Once the VMs are running, you can connect using PuTTY.
Primary Server
Host     : 192.168.56.170
Username : vagrant
Password : vagrant
Standby Server
Host     : 192.168.56.171
Username : vagrant
Password : vagrant
After connecting, switch to the PostgreSQL OS user:
sudo -iu postgres🔎 Pre-Upgrade Assessment — Know Your Cluster First
Before starting the upgrade, capture a quick baseline of the existing PostgreSQL environment.
🔄 Record Replication Slots
If your environment uses replication slots, record them before starting the upgrade.
📌 Run on: pg-primary
👤 OS User: postgres
psql -d postgres -c "SELECT slot_name, slot_type, active, restart_lsn FROM pg_replication_slots ORDER BY slot_name;"slot_name | slot_type | active
-----------------+-----------+--------
pg_standby_slot | physical | tFor a physical standby, verify which slot the standby is using.
📌 Run on: pg-standby
psql -d postgres -c "SHOW primary_slot_name;"primary_slot_name
-----------------
pg_standby_slot💡 Production Tip: Save the replication-slot inventory before shutting down PostgreSQL. It may be required when rebuilding replication after the major upgrade.
The sandbox includes a pre-upgrade assessment script that collects useful information such as:
- 🐘 PostgreSQL version and cluster details
- 💾 Database and cluster size
- 🧩 Installed extensions and versions
- 📦 Tablespaces
- 🔄 Replication information
- ⚙️ Important PostgreSQL settings
- 🔍 Other items useful for upgrade planning
📌 Run on: pg-primary
👤 OS User: postgres
/vagrant_scripts/pg_upgrade_assessment.sh 5432Replace 5432 with the port of the PostgreSQL instance you want to assess.
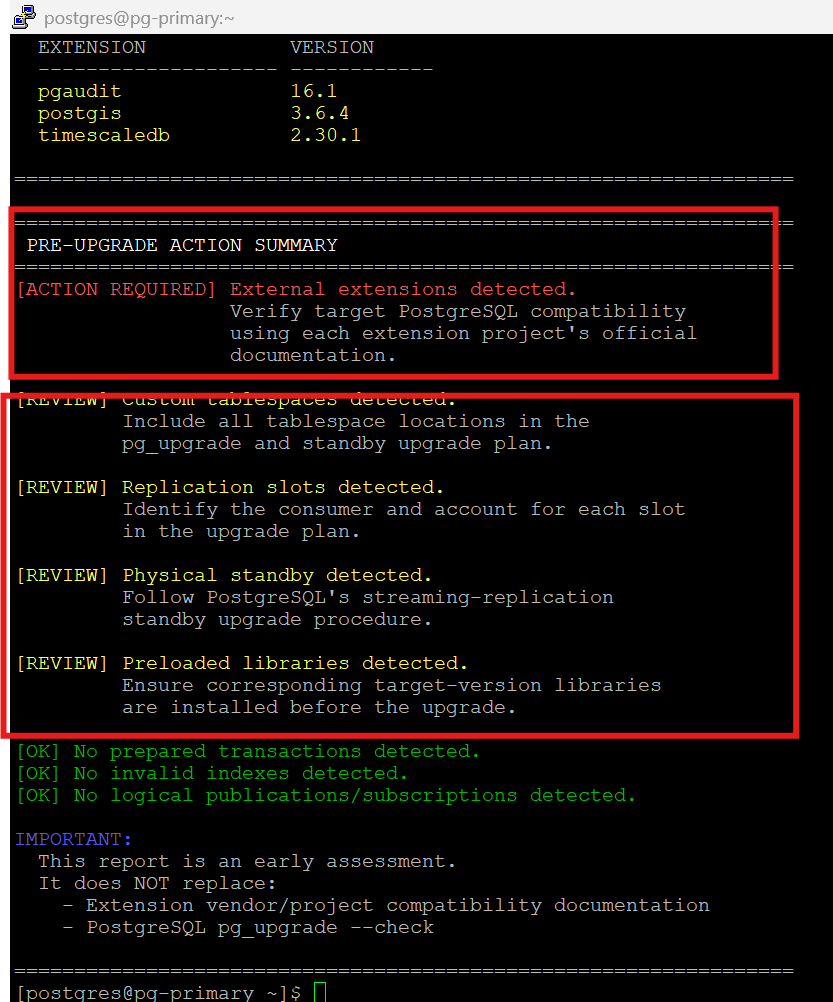
💡 Production Tip: Save the assessment output before the upgrade. It gives you a useful source-cluster baseline for planning and post-upgrade validation.
⚠️ This assessment does not replace pg_upgrade --check. We will run the official compatibility check later before performing the actual upgrade.
🧩 Pay Special Attention to Extensions
- 🔍 Review the extension inventory captured during the pre-upgrade assessment.
- 🧩 Check every third-party extension for PostgreSQL 18 compatibility.
- 🔗 Use the extension’s official documentation to confirm the supported PostgreSQL versions and upgrade path.
- 📦 Install the PostgreSQL 18-compatible extension libraries before running
pg_upgrade. - ⚠️ Do not assume an extension is compatible just because PostgreSQL itself can be upgraded.
📘 Follow the Official PostgreSQL Upgrade Procedure
- 🐘 We will follow the PostgreSQL 18 official
pg_upgradedocumentation. - 🧪 We will validate each applicable step using our hands-on sandbox.
For this hands-on upgrade, we’ll follow the PostgreSQL 18 official pg_upgrade documentation and validate each applicable step in our sandbox.
🔗 PostgreSQL 18 — pg_upgrade Official Documentation
📝 Note: We’ll skip Step 1 (Optionally move the old cluster) because our PGDG installation uses version-specific directories, and Step 2 (For source installs, build the new version) because this lab uses packaged PostgreSQL binaries rather than a source build.
🚀 Step 3 — Install PostgreSQL 18 Binaries
PostgreSQL 16 is currently running on both servers. We will install PostgreSQL 18 alongside PostgreSQL 16.
👤 Run as:
vagrantuser on both Primary and Standby
📌 Run the following on both pg-primary and pg-standby.
🔍 Check the Current PostgreSQL Version
/usr/pgsql-16/bin/psql --version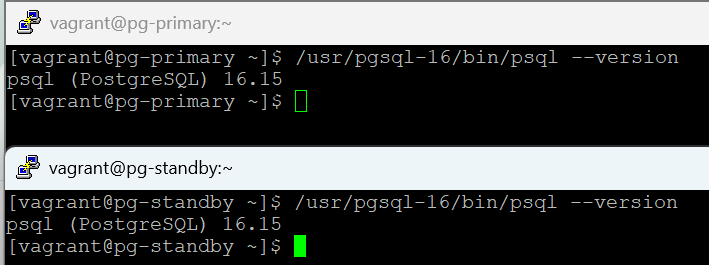
We should currently see PostgreSQL 16.
📦 Check PostgreSQL 18.4 Package Availability
Because our sandbox already has the PGDG repository configured, first confirm the PostgreSQL 18 packages are available:
sudo dnf --showduplicates list \
postgresql18 \
postgresql18-server \
postgresql18-contrib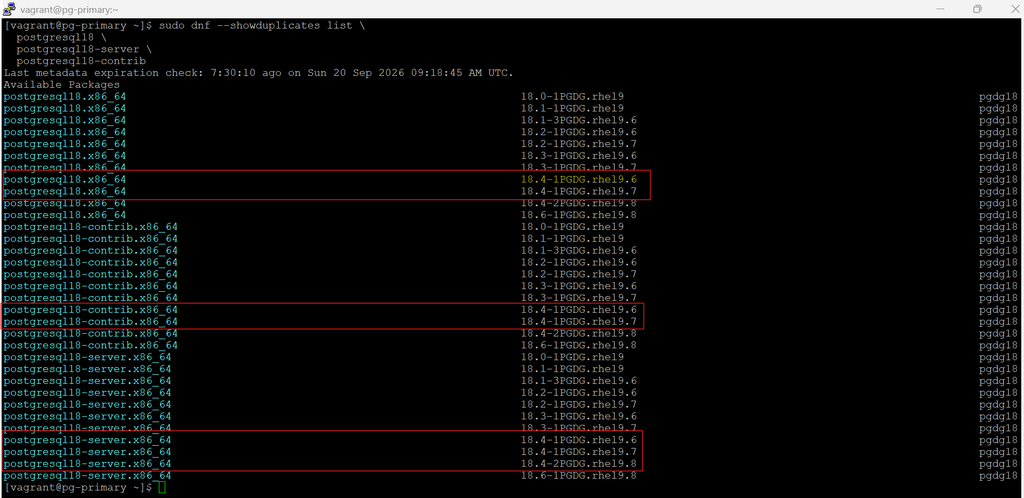
⬇️ Install PostgreSQL 18.4
Install the PostgreSQL 18 server and contrib packages:
sudo dnf install -y \
postgresql18-18.4-2PGDG.rhel9.8 \
postgresql18-server-18.4-2PGDG.rhel9.8 \
postgresql18-contrib-18.4-2PGDG.rhel9.8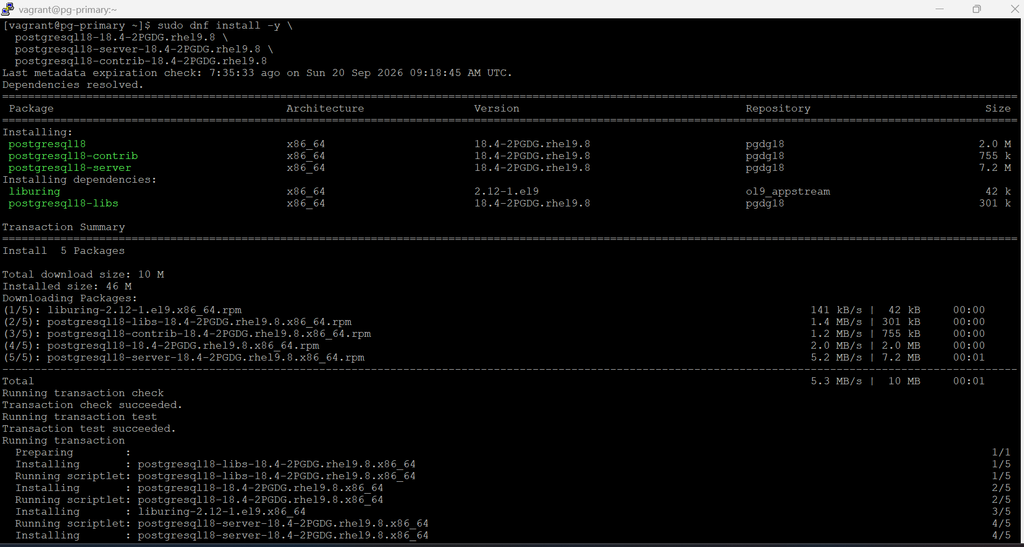
After installation, we should have both version-specific binary directories:
✅ Verify PostgreSQL 18
/usr/pgsql-18/bin/postgres --versionAnd verify pg_upgrade:
/usr/pgsql-18/bin/pg_upgrade --version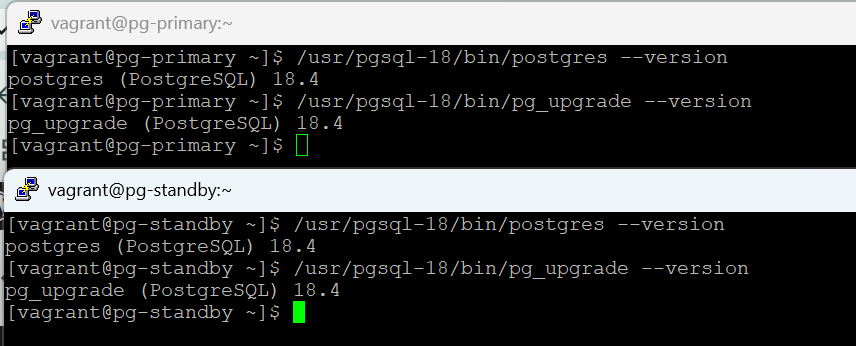
The official documentation specifically notes that pg_upgrade is included with the default PostgreSQL installation.
🏗️ Step 4 — Initialize the New PostgreSQL 18 Cluster
PostgreSQL recommends initializing the new cluster with initdb using compatible settings from the existing cluster. There is no need to start the PostgreSQL 18 cluster yet.
📌 Run this step on pg-primary.
👤 Switch to the PostgreSQL OS User
sudo -iu postgres🔍 Capture PostgreSQL 16 Cluster Settings
Check the existing database encoding and locale settings:
/usr/pgsql-16/bin/psql -d postgres -c "SELECT datname, pg_encoding_to_char(encoding) AS encoding, datlocprovider, datcollate, datctype FROM pg_database ORDER BY datname;"Check the WAL segment size and data checksums:
/usr/pgsql-16/bin/pg_controldata /var/lib/pgsql/16/data | grep -E "Bytes per WAL segment|Data page checksum version"Check for user-defined tablespaces:
/usr/pgsql-16/bin/psql -d postgres -c "SELECT spcname, pg_tablespace_location(oid) AS location FROM pg_tablespace ORDER BY spcname;"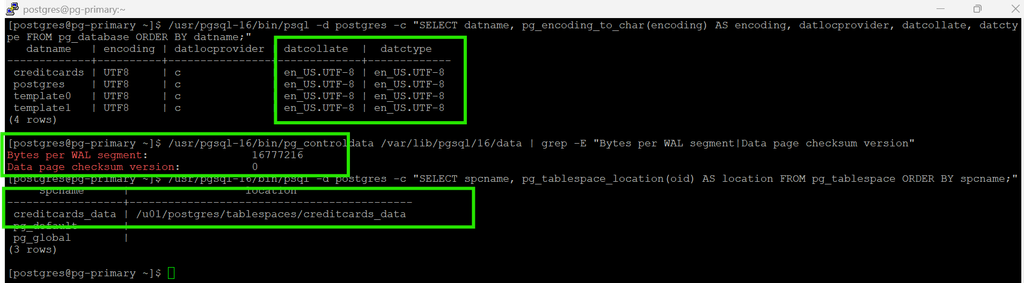
💡 Production Tip: Reference the actual settings from your existing PostgreSQL cluster and use compatible values when initializing the new cluster.
📋 Settings from Our PostgreSQL 16 Sandbox
Encoding : UTF8
Locale Provider : libc
LC_COLLATE : en_US.UTF-8
LC_CTYPE : en_US.UTF-8
WAL Segment Size : 16 MB
Data Checksums : Disabled
User Tablespaces : None🚀 Initialize PostgreSQL 18
Using the settings captured from PostgreSQL 16:
/usr/pgsql-18/bin/initdb \
-D /var/lib/pgsql/18/data \
--encoding=UTF8 \
--locale-provider=libc \
--lc-collate=en_US.UTF-8 \
--lc-ctype=en_US.UTF-8 \
--wal-segsize=16 \
--no-data-checksums \
--auth-local=peer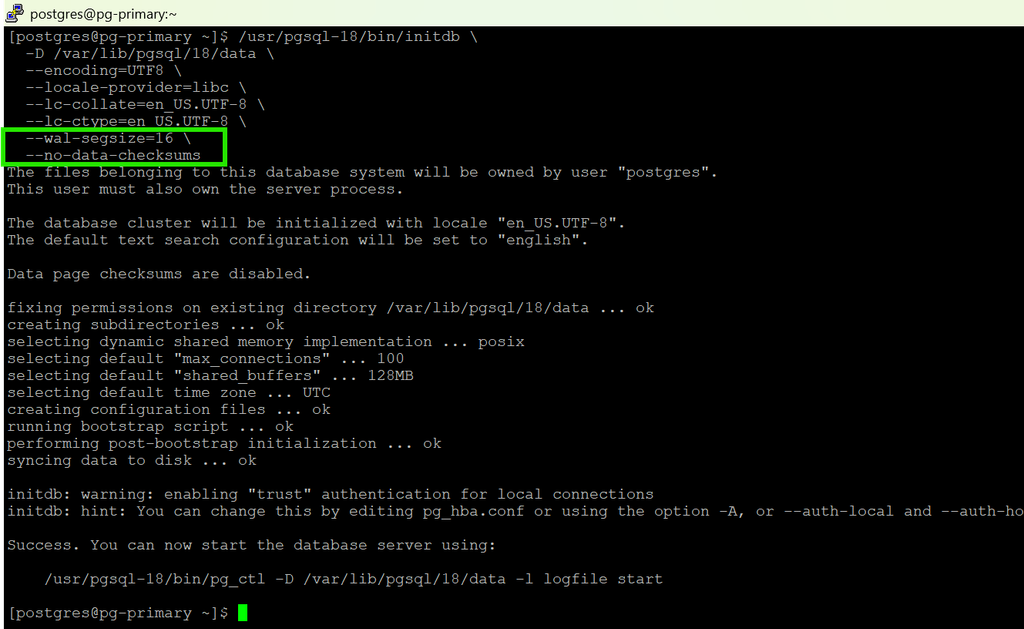
Reference the PG16 initialization settings when creating PG18 — and remember that PG18 now enables checksums by default.
✅ Verify the New Cluster
/usr/pgsql-18/bin/pg_controldata /var/lib/pgsql/18/data | grep -E "Bytes per WAL segment|Data page checksum version"⚠️ Do not start PostgreSQL 18 yet. At this stage, PostgreSQL 16 remains running while the PostgreSQL 18 cluster is initialized but stopped, as recommended by the official pg_upgrade procedure.
🧩 Step 5 — Install extension shared object files
Extensions need their own compatibility check during a PostgreSQL major upgrade.
PostgreSQL requires the extension libraries used by the old cluster to be installed for the new PostgreSQL version before running pg_upgrade. Do not run CREATE EXTENSION in the new cluster.
🔍 Check Extensions Used by PostgreSQL 16
📌 Run on: pg-primary
👤 OS User: postgres
for db in $(psql -At -d postgres -c "SELECT datname FROM pg_database WHERE datallowconn AND NOT datistemplate ORDER BY datname;")
do
echo "===== Database: ${db} ====="
psql -d "${db}" -c "SELECT extname, extversion FROM pg_extension ORDER BY extname;"
done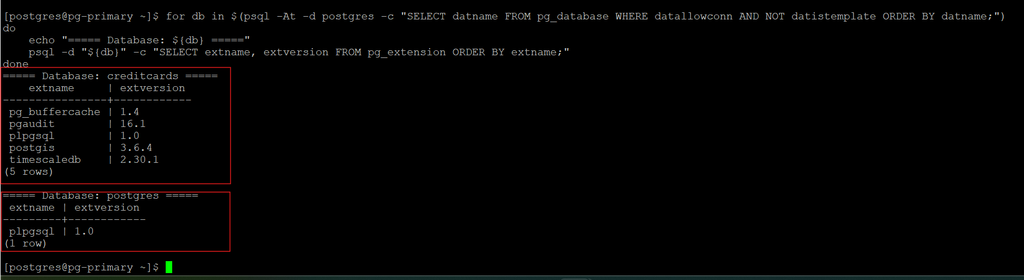
Our sandbox uses:
pg_buffercache
pgaudit
plpgsql
postgis
timescaledb🔗 Check Compatibility from Official Sources
Before installing anything, check the extension’s official documentation for PostgreSQL 18 support and its upgrade path.
- ⏱️ TimescaleDB — Check the supported PostgreSQL versions carefully. For a larger jump, such as PostgreSQL 14 → 18, an
intermediate upgrade may be neededdepending on the TimescaleDB versions supported across the path. - 🌍 PostGIS — Verify that your PostGIS release supports PostgreSQL 18 and review its supported upgrade path. PostGIS 3.6 added PostgreSQL 18 support.
- 🛡️ pgAudit — pgAudit versions follow PostgreSQL major versions. PostgreSQL 16 uses pgAudit 16.x, while PostgreSQL 18 requires pgAudit 18.x.
- 🧠 pg_buffercache — This is supplied through PostgreSQL
contrib. We already installedpostgresql18-contribin Step 3.
📦 Install the PostgreSQL 18 Extension Libraries
📌 Install on both: pg-primary and pg-standby
The same PostgreSQL 18 extension libraries should be available on the Primary and Standby. PostgreSQL explicitly requires the same extension shared-object files on new standbys.
For our sandbox, we need PostgreSQL 18-compatible packages for:
TimescaleDB
PostGIS
pgAudit🚨 Important
- ✅ Install the PostgreSQL 18 extension packages/libraries.
- ❌ Do not run
CREATE EXTENSIONin the PostgreSQL 18 cluster. - 🔄 Existing extension definitions will be carried across by
pg_upgrade. - 📄 If extension updates are needed afterward,
pg_upgradecan generate a script for those updates.
💡 Production Tip
Always validate the PostgreSQL version + extension version combination before the maintenance window. PostgreSQL can check its own binary compatibility, but
pg_upgradecannot guarantee binary compatibility of external modules.
📌 Run on: pg-primary & pg-standby
👤 OS User: vagrant
sudo dnf info \
postgis36_18 \
timescaledb_18 \
pgaudit_18📦 Install PostgreSQL 18 Extension Libraries
sudo dnf install -y \
postgis36_18 \
timescaledb_18 \
pgaudit_18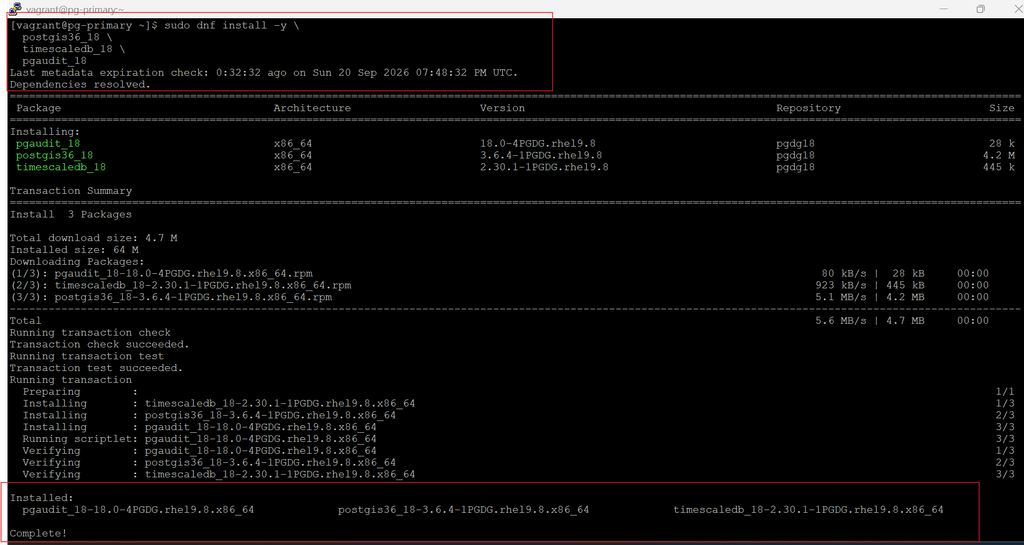
✅ Verify the Installed Packages
rpm -q \
postgis36_18 \
timescaledb_18 \
pgaudit_18 \
postgresql18-contrib
⏱️ TimescaleDB — Official PostgreSQL compatibility / upgrade guide
🌍 PostGIS — Official PostGIS installation requirements
🛡️ pgAudit — Official pgAudit documentation
💡 Production Tip: Check this before the maintenance window.
pg_upgradedoes not copy custom full-text-search files for you.
📚 Step 6 — Check Custom Full-Text Search Dictionaries
pg_upgrade does not automatically copy custom full-text-search files stored in the PostgreSQL installation directory.
Before the upgrade, check whether your application databases contain any custom text-search dictionaries.
📌 Run on: pg-primary
👤 OS User: postgres
For our creditcards database:
psql -d creditcards -c "
SELECT
n.nspname AS schema_name,
d.dictname,
d.dictinitoption
FROM pg_ts_dict d
JOIN pg_namespace n
ON n.oid = d.dictnamespace
WHERE n.nspname NOT IN ('pg_catalog', 'information_schema')
ORDER BY n.nspname, d.dictname;
"Our sandbox returns:
schema_name | dictname | dictinitoption
-------------+----------+----------------
(0 rows)
✅ What Does This Mean?
There are no application-defined text-search dictionaries in the creditcards database.
Therefore, our sandbox has no custom dictionary configuration that needs to be carried forward to PostgreSQL 18.
If you have multiple application databases, repeat this check for each one.
⚠️ If Custom Dictionaries Are Found
If the query returns custom dictionaries, investigate whether they depend on external files such as:
*.stop
*.syn
*.ths
*.dict
*.affixThese files are normally stored under:
/usr/pgsql-16/share/tsearch_data/Any custom files required by your dictionaries must also be made available to PostgreSQL 18 under:
/usr/pgsql-18/share/tsearch_data/Copy only the files that belong to your application or custom dictionary configuration.
⚠️ Do not copy the entire PostgreSQL 16
tsearch_datadirectory over PostgreSQL 18. PostgreSQL-supplied files can change between major versions.
🧪 Our Sandbox Result
Custom text-search dictionaries : None
Custom files to migrate : None
Action required : NoneStep 6 complete. ✅
🔐 Step 7 — Adjust Authentication
pg_upgrade starts and connects to both the old and new PostgreSQL clusters during the upgrade.
The OS user running pg_upgrade must therefore be able to connect to both clusters without an interactive password prompt.
In this lab, we run the upgrade as the postgres OS user and use peer authentication for local PostgreSQL connections.
🔍 Check PostgreSQL 16
📌 Run on: pg-primary
👤 OS User: postgres
grep -vE '^[[:space:]]*(#|$)' \
/var/lib/pgsql/16/data/pg_hba.confOur PostgreSQL 16 cluster contains:
local all all peerWith peer authentication, the operating-system username is used to authenticate the corresponding PostgreSQL user.
Because we run the upgrade as:
OS user: postgres
Database user: postgresno password prompt is required for the local connection.
Verify it:
psql -d postgres -c "SELECT current_user;"Expected:
current_user
--------------
postgres
🔍 Check PostgreSQL 18
Now verify the newly initialized PostgreSQL 18 cluster:
grep -vE '^[[:space:]]*(#|$)' \
/var/lib/pgsql/18/data/pg_hba.confFor this lab, PostgreSQL 18 was explicitly initialized with:
--auth-local=peerso the new cluster also contains:
local all all peerOur authentication setup is therefore consistent:
PostgreSQL 16 PostgreSQL 18
---------------------------------------------------
Local authentication peer peer
Upgrade OS user postgres postgres
Interactive password No No
⚠️ Production Note
This is a sandbox lab, and peer authentication is convenient for demonstrating the upgrade procedure.
Your production environment may use peer, SCRAM, certificate authentication, or another organization-approved authentication model.
Do not weaken or replace your company’s authentication standards just to run pg_upgrade.
The important requirement is simply:
The account running
pg_upgrademust be able to connect to both the old and new clusters non-interactively.
If your environment requires password authentication, PostgreSQL supports using a .pgpass file rather than embedding passwords in commands or temporarily changing pg_hba.conf.
For example:
~/.pgpasswith permissions:
chmod 600 ~/.pgpass✅ Our Sandbox
Both clusters use:
local all all peerTherefore:
PG16 local authentication : peer
PG18 local authentication : peer
Interactive password needed : No
Authentication change needed : NoStep 7 complete. ✅
⏸️ Step 8 — Stop Both PostgreSQL Servers
This is the start of the upgrade downtime. Stop application traffic first, then make sure the standby receives the final WAL changes before shutting it down.
🚦 Stop Application Traffic
Before stopping PostgreSQL:
- 🛑 Stop application writes and database jobs.
- 🔌 Drain or disable application connections.
- 📋 Confirm no unexpected sessions are still writing to the database.
⚠️ Production Tip: Stop application services, scheduled jobs, ETL processes, and other database writers before shutting down PostgreSQL.
🔍 Check Replication Before Shutdown
📌 Run on: pg-primary
👤 OS User: postgres
psql -d postgres -c "SELECT application_name, client_addr, state, sync_state, sent_lsn, write_lsn, flush_lsn, replay_lsn FROM pg_stat_replication;"Confirm the standby is:

🔍 Check Active Database Connections
📌 Run on: pg-primary
👤 OS User: postgres
Before proceeding with the shutdown, confirm that expected application connections have been drained.
psql -d postgres -c "
SELECT
pid,
datname,
usename,
client_addr,
application_name,
state,
backend_start
FROM pg_stat_activity
WHERE backend_type = 'client backend'
AND pid <> pg_backend_pid()
ORDER BY datname, usename, pid;
"Expected:
pid | datname | usename | client_addr | application_name | state | backend_start
-----+---------+---------+-------------+------------------+-------+---------------
(0 rows)
🛑 Stop PostgreSQL 16 on the Primary
📌 Run on: pg-primary
sudo systemctl stop postgresql-16Verify:
sudo systemctl is-active postgresql-16Expected:
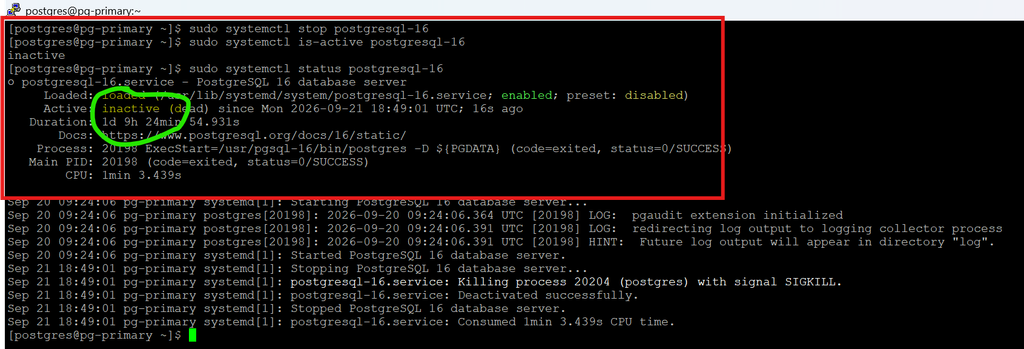
Keep the standby running at this point so it can receive and replay the final WAL generated by the primary shutdown. This follows PostgreSQL’s requirement that streaming-replication standbys remain running during the shutdown process.
🔄 Confirm the Standby Has Caught Up
📌 Run on: pg-standby
👤 OS User: postgres
psql -d postgres -c "SELECT pg_is_in_recovery(), pg_last_wal_receive_lsn(), pg_last_wal_replay_lsn();"Confirm:
- ✅
pg_is_in_recovery()returnst. - ✅ The standby has received and replayed the final WAL.
[postgres@pg-standby ~]$ psql -d postgres -c "SELECT pg_is_in_recovery(), pg_last_wal_receive_lsn(), pg_last_wal_replay_lsn();"
pg_is_in_recovery | pg_last_wal_receive_lsn | pg_last_wal_replay_lsn
-------------------+-------------------------+------------------------
t | 0/400B320 | 0/400B320
(1 row)
🛑 Stop PostgreSQL 16 on the Standby
Once the standby has caught up:
sudo systemctl stop postgresql-16Verify:
sudo systemctl is-active postgresql-16Verify:
sudo systemctl status postgresql-16Expected:
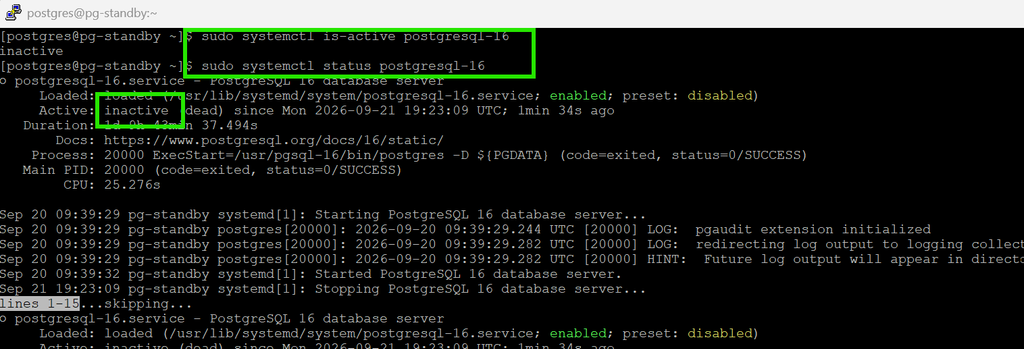
🔍 Confirm PostgreSQL 18 Is Also Stopped
The PostgreSQL 18 cluster should not have been started yet, but verify it:
sudo systemctl is-active postgresql-18Expected:
[postgres@pg-standby ~]$ sudo systemctl is-active postgresql-18
inactive
[postgres@pg-standby ~]$✅ End State
At the end of Step 8:
pg-primary pg-standby
────────── ──────────
PostgreSQL 16 → STOPPED PostgreSQL 16 → STOPPED
PostgreSQL 18 → STOPPED PostgreSQL 18 → Not running🚨 Do not start PostgreSQL 16 or PostgreSQL 18 after this point unless the upgrade procedure specifically requires it.
🔄 Step 9 — Prepare for Standby Server Upgrades
Since our environment uses streaming replication, verify that the old standby was fully caught up with the Primary before moving to pg_upgrade.
PostgreSQL specifically asks us to compare the Latest checkpoint location on the old Primary and Standby. The values must match.
🔍 Check the Primary Checkpoint
📌 Run on: pg-primary
👤 OS User: postgres
/usr/pgsql-16/bin/pg_controldata /var/lib/pgsql/16/data | grep "Latest checkpoint location"Example:
Latest checkpoint location: 0/400B320🔍 Check the Standby Checkpoint
📌 Run on: pg-standby
👤 OS User: postgres
/usr/pgsql-16/bin/pg_controldata /var/lib/pgsql/16/data | grep "Latest checkpoint location"The value should match the Primary:
pg-primary → 0/400B320
pg-standby → 0/400B320
↑
MATCH ✅✅ Checkpoint locations match: The old standby received the final changes from the Primary before shutdown.
⚙️ Check PostgreSQL 18 wal_level
PostgreSQL also requires the new Primary cluster’s wal_level not to be set to minimal when standby servers will be used.
📌 Run on: pg-primary
Since PostgreSQL 18 is stopped, check the configuration file:
grep -E '^[[:space:]]*#?[[:space:]]*wal_level[[:space:]]*=' /var/lib/pgsql/18/data/postgresql.confExpected:
#wal_level = replica # minimal, replica, or logicalIf you see:
wal_level = minimalchange it before continuing.
For streaming replication, use:
wal_level = replicaIf the command returns nothing because wal_level is commented out, you can check the PostgreSQL 18 default from the sample configuration: – By default – it is set to replica, so we will continue without any modifications.
🧠 Why This Step Matters
- 🔄 Primary and Standby checkpoint locations must match.
- ✅ This confirms the old standby is synchronized before the upgrade.
- 📡 PostgreSQL 18 must use a replication-capable
wal_level. - 🚫 Do not proceed if the old Primary and Standby checkpoint locations differ.
💡 Production Tip
If you have multiple standby servers, run the
pg_controldatacheck on every standby and confirm that allLatest checkpoint locationvalues match the old Primary before proceeding.
🚀 Step 10 — Run pg_upgrade
Always run the PostgreSQL 18 pg_upgrade binary, not the PostgreSQL 16 binary.
📌 Run on: pg-primary
👤 OS User: postgres
Both PostgreSQL 16 and PostgreSQL 18 must be stopped before the actual upgrade.
🔍 Confirm Both Clusters Are Stopped
sudo systemctl is-active postgresql-16
sudo systemctl is-active postgresql-18Expected:
[postgres@pg-primary ~]$ sudo systemctl is-active postgresql-16
inactive
[postgres@pg-primary ~]$ sudo systemctl is-active postgresql-18
inactive
[postgres@pg-primary ~]$📂 Define the Old and New Cluster Paths
For our sandbox:
Old binaries : /usr/pgsql-16/bin
New binaries : /usr/pgsql-18/bin
Old PGDATA : /var/lib/pgsql/16/data
New PGDATA : /var/lib/pgsql/18/data⚙️ Check Extension Preload Requirements
Some extensions also require entries in shared_preload_libraries. Check the old cluster and carry the required extension entries into the new cluster.
grep -E '^[[:space:]]*shared_preload_libraries' /var/lib/pgsql/16/data/postgresql.auto.confOur PostgreSQL 16 cluster uses:
shared_preload_libraries = 'timescaledb, pgaudit'Add the required libraries to PostgreSQL 18:
echo "shared_preload_libraries = 'timescaledb, pgaudit'" >> /var/lib/pgsql/18/data/postgresql.conf💡 Installing an extension package may not be enough. Some extensions, such as TimescaleDB and pgAudit, must also be preloaded before
pg_upgradecan validate them.
🧪 Run pg_upgrade --check First
Before changing any data, run the compatibility check:
cd /var/lib/pgsql
mkdir -p /var/lib/pgsql/logsnohup bash -c '
/usr/pgsql-18/bin/pg_upgrade \
--old-bindir=/usr/pgsql-16/bin \
--new-bindir=/usr/pgsql-18/bin \
--old-datadir=/var/lib/pgsql/16/data \
--new-datadir=/var/lib/pgsql/18/data \
--link \
--check
rc=$?
echo
echo "PG_UPGRADE_CHECK_EXIT_CODE=${rc}"
exit ${rc}
' > /var/lib/pgsql/logs/pg_upgrade_check.log 2>&1 &--check validates the clusters without performing the upgrade. Because we plan to use link mode, we also include --link so PostgreSQL performs the mode-specific checks.
You’ll get a background PID:
[1] 12345Monitor it:
tail -f /var/lib/pgsql/logs/pg_upgrade_check.logWhen it finishes:
cat /var/lib/pgsql/logs/pg_upgrade_check.logFor a successful check, we want both:
*Clusters are compatible*and:
PG_UPGRADE_CHECK_EXIT_CODE=0You can also quickly check just the important lines:
grep -E 'Clusters are compatible|PG_UPGRADE_CHECK_EXIT_CODE' \
/var/lib/pgsql/logs/pg_upgrade_check.logWe want the check to finish with:
Clusters are compatible📦 Choose the Data Transfer Mode
PostgreSQL provides several transfer modes.
- 📄 Copy — default and safest to understand, but requires additional disk space and data copying.
- 🔗 Link — very fast and uses little additional disk space.
- 🧬 Clone — similar advantages to link mode while leaving the old cluster untouched, but requires filesystem support.
- ⚡ Copy-file-range — optimized copying where supported.
- 🔄 Swap — can be very fast for clusters with many relations, but modifies the old cluster destructively once transfer begins.
For this sandbox we use:
--link⚠️ Link Mode: Once the upgraded PostgreSQL 18 cluster is started, the old cluster cannot safely be used because the old and new clusters share data files.
⚡ Choose Parallel Jobs
pg_upgrade can process multiple databases and tablespaces in parallel using --jobs.
Check the available CPU cores:
nprocOur VM has:
3So we can use:
--jobs=3💡 Production Tip: PostgreSQL suggests the number of CPU cores as a reasonable starting point. Test the value in your environment rather than assuming that more jobs always means a faster upgrade.
🚀 Run the Actual Upgrade
Once --check passes:
cd /var/lib/pgsqlnohup bash -c '
/usr/pgsql-18/bin/pg_upgrade \
--old-bindir=/usr/pgsql-16/bin \
--new-bindir=/usr/pgsql-18/bin \
--old-datadir=/var/lib/pgsql/16/data \
--new-datadir=/var/lib/pgsql/18/data \
--link \
--jobs=3
rc=$?
echo
echo "PG_UPGRADE_EXIT_CODE=${rc}"
exit ${rc}
' > /var/lib/pgsql/logs/pg_upgrade.log 2>&1 &pg_upgrade will perform its compatibility checks again and then upgrade the cluster.
Expected output as below:
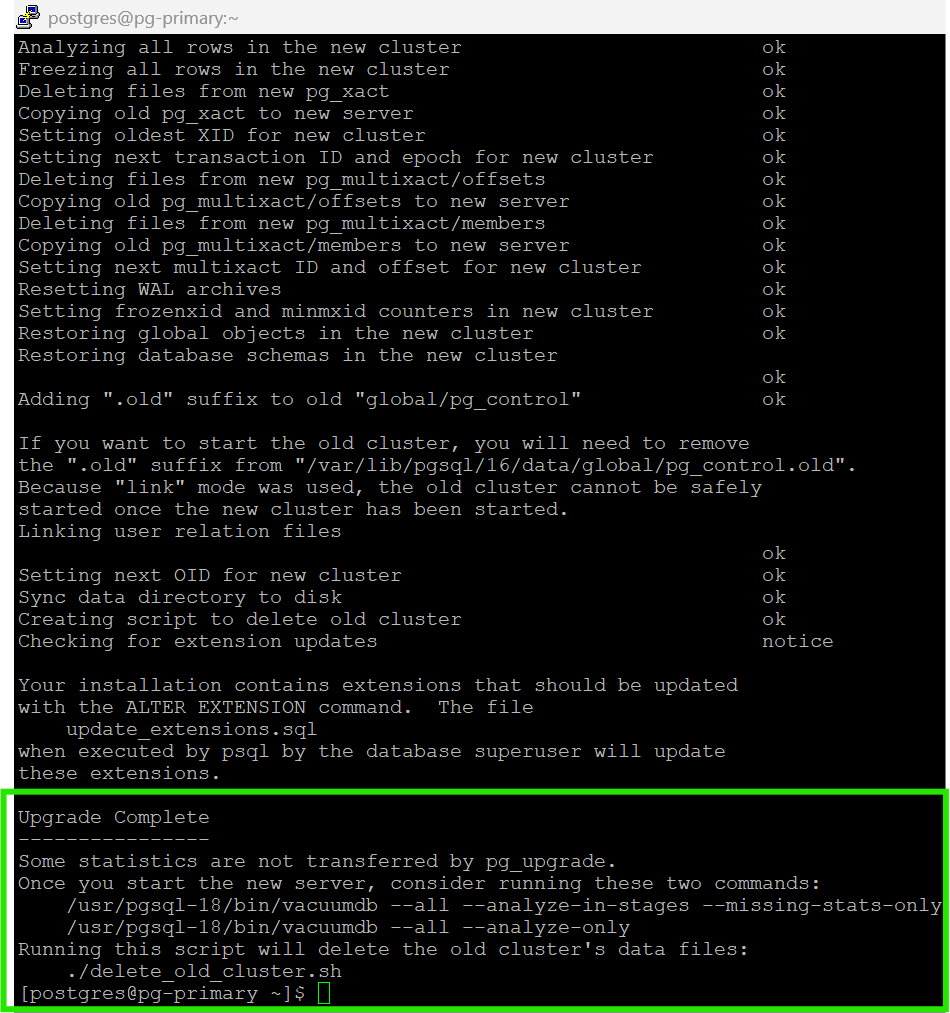
You’ll get the background PID:
[1] 12345Monitor the upgrade:
tail -f /var/lib/pgsql/logs/pg_upgrade.logAfter completion:
cat /var/lib/pgsql/log/pg_upgrade.logFor success, we want to see:
Upgrade Completeand:
PG_UPGRADE_EXIT_CODE=0Quick verification:
grep -E 'Upgrade Complete|PG_UPGRADE_EXIT_CODE' \
/var/lib/pgsql/logs/pg_upgrade.log🚨 Important During the Upgrade
- 🛑 Do not allow applications or users to access eithe]r cluster.
- 📂 Run
pg_upgradefrom a directory where thepostgresuser has write permission. - 📝 Keep the terminal output and review any warnings.
- ❌ Do not start PostgreSQL 16 or PostgreSQL 18 manually while
pg_upgradeis running. - 🔙 If the upgrade fails, stop and review the failure before retrying.
PostgreSQL stores diagnostic files under pg_upgrade_output.d; failed runs can leave useful logs there for troubleshooting.
🔄 Step 11 — Upgrade the Streaming Replication Standby
Since we used --link mode, we can upgrade the standby using rsync instead of running pg_upgrade on the standby.
🚨 Do not run
pg_upgradeon the standby and do not start PostgreSQL 18 yet.
🔍 Verify PostgreSQL 18 Binaries on the Standby
📌 Run on: pg-standby
👤 OS User: postgres
/usr/pgsql-18/bin/postgres --versionExpected:
postgres (PostgreSQL) 18.4🧩 Verify PostgreSQL 18 Extension Packages
rpm -q \
postgis36_18 \
timescaledb_18 \
pgaudit_18 \
postgresql18-contrib🗑️ Make Sure the New Standby PGDATA Is Empty
The PostgreSQL 18 standby data directory must not exist or must be empty before running rsync.
ls -la /var/lib/pgsql/18/dataIf it was initialized earlier, remove its contents:
# rm -rf /var/lib/pgsql/18/data/*⚠️ Run this only on the standby PG18 data directory after carefully confirming the path.
💾 Save Standby-Specific Configuration
Before rsync, save any standby configuration that you need to reapply later:
mkdir -p /var/lib/pgsql/standby_config_backupFor example:
cp /var/lib/pgsql/16/data/postgresql.conf /var/lib/pgsql/standby_config_backup/
cp /var/lib/pgsql/16/data/postgresql.auto.conf /var/lib/pgsql/standby_config_backup/
cp /var/lib/pgsql/16/data/pg_hba.conf /var/lib/pgsql/standby_config_backup/🔑 Verify Primary → Standby SSH
📌 Run on: pg-primary
👤 OS User: postgres
ssh-keyscan -H 192.168.56.171 >> ~/.ssh/known_hosts
chmod 600 ~/.ssh/known_hostsssh -o BatchMode=yes postgres@192.168.56.171 "hostname && whoami"Expected:
[postgres@pg-primary ~]$ ssh -o BatchMode=yes postgres@192.168.56.171 "hostname && whoami"
pg-standby
postgres
[postgres@pg-primary ~]$🧪 Dry Run — Main PostgreSQL Directories
From the Primary:
cd /var/lib/pgsqlRun:
nohup bash -c '
rsync \
--archive \
--delete \
--hard-links \
--size-only \
--no-inc-recursive \
--dry-run \
16 \
18 \
postgres@192.168.56.171:/var/lib/pgsql
rc=$?
echo "RSYNC_EXIT_CODE=${rc}"
exit ${rc}
' > /var/lib/pgsql/log/rsync_pg_upgrade_dryrun.log 2>&1 &Review the output carefully before removing --dry-run.
cat /var/lib/pgsql/rsync_pg_upgrade_dryrun.logWe want:
RSYNC_EXIT_CODE=0🚀 Sync the Main PostgreSQL Directories
nohup bash -c '
rsync \
--archive \
--delete \
--hard-links \
--size-only \
--no-inc-recursive \
16 \
18 \
postgres@192.168.56.171:/var/lib/pgsql
rc=$?
echo "RSYNC_EXIT_CODE=${rc}"
exit ${rc}
' > /var/lib/pgsql/log/rsync_pg_upgrade.log 2>&1 &You can monitor it with:
tail -f /var/lib/pgsql/rsync_pg_upgrade.logWe require:
RSYNC_EXIT_CODE=0📂 External Tablespace — Dry Run
Our assumed tablespace is:
/u01/postgres/tablespaces/creditcards_dataFirst inspect the version-specific directories on the Primary:
find /u01/postgres/tablespaces/creditcards_data \
-maxdepth 1 \
-type d \
-name 'PG_*' \
-printYou should see as below :
/u01/postgres/tablespaces/creditcards_data/PG_16_202307071
/u01/postgres/tablespaces/creditcards_data/PG_18_202506291The important structure is:
SOURCE 1
.../creditcards_data/PG_16_202307071
SOURCE 2
.../creditcards_data/PG_18_202506291
DESTINATION
standby:/u01/postgres/tablespaces/creditcards_dataBoth PG_16_* and PG_18_* must be passed in the same rsync invocation so --hard-links can reproduce the hard-link relationships on the standby.
Test the tablespace sync with dry-run:
nohup bash -c '
rsync \
--archive \
--delete \
--hard-links \
--size-only \
--no-inc-recursive \
--dry-run \
/u01/postgres/tablespaces/creditcards_data/PG_16_202307071 \
/u01/postgres/tablespaces/creditcards_data/PG_18_202506291 \
postgres@192.168.56.171:/u01/postgres/tablespaces/creditcards_data
rc=$?
echo "RSYNC_EXIT_CODE=${rc}"
exit ${rc}
' > /var/lib/pgsql/logs/rsync_tablespace_dryrun.log 2>&1 &Check:
cat /var/lib/pgsql/rsync_tablespace_dryrun.logWe require:
RSYNC_EXIT_CODE=0🚀 Sync the External Tablespace
If the dry run looks correct:
nohup bash -c '
rsync \
--archive \
--delete \
--hard-links \
--size-only \
--no-inc-recursive \
/u01/postgres/tablespaces/creditcards_data/PG_16_202307071 \
/u01/postgres/tablespaces/creditcards_data/PG_18_202506291 \
postgres@192.168.56.171:/u01/postgres/tablespaces/creditcards_data
rc=$?
echo "RSYNC_EXIT_CODE=${rc}"
exit ${rc}
' > /var/lib/pgsql/log/rsync_tablespace.log 2>&1 &Then:
cat /var/lib/pgsql/rsync_tablespace.logAgain we require:
RSYNC_EXIT_CODE=0💡 Production Tip: Repeat this operation for every external tablespace identified during the pre-upgrade assessment. If
pg_walis located outsidePGDATA, it also requires separate handling. This follows PostgreSQL’s Step 11 standby procedure.
🔄 Configure Streaming Replication and Replication Slots
- 🔄 Review the replication slots captured during the Pre-Upgrade Assessment and note any slots that must be recreated for PostgreSQL 18.
- ⏸️ Keep both PostgreSQL 18 servers stopped for now; recreate/verify the required slots after the new Primary is started and before starting the Standby.
⚙️ Step 12 — Restore PostgreSQL Configuration
Carry forward only the required custom configuration to PostgreSQL 18.
📌 Both PostgreSQL 18 servers remain stopped.
🟢 Run Only on Primary
👤 OS User: postgres
Add the standby replication access to PostgreSQL 18 pg_hba.conf:
echo "host replication replicator 192.168.56.171/32 scram-sha-256" >> /var/lib/pgsql/18/data/pg_hba.conf🟢 This rule is required on the Primary because the Standby connects to the Primary for WAL streaming.
🔵 Run Only on Standby
👤 OS User: postgres
Configure how the standby connects to the Primary:
⚠️ Replication Slot: Configure
primary_slot_nameonly if your standby was designed to use a physical replication slot. Check the slot inventory captured during the Pre-Upgrade Assessment. If your environment does not use replication slots, do not add this setting.
cat >> /var/lib/pgsql/18/data/postgresql.conf <<'EOF'
primary_conninfo = 'host=192.168.56.170 port=5432 user=replicator'
primary_slot_name = 'pg_standby_slot'
EOFCreate the standby signal file:
touch /var/lib/pgsql/18/data/standby.signal📋 Step 12 — Simple Summary
| Server | Configuration |
|---|---|
| 🟢 Primary | Add replicator access to pg_hba.conf |
| 🔵 Standby | Set primary_conninfo |
| 🔵 Standby | Set primary_slot_name |
| 🔵 Standby | Create standby.signal |
| ⏸️ Both | Keep PostgreSQL 18 stopped |
📌 Replication slot: We have only configured the slot name on the standby. The actual
pg_standby_slotwill be created/verified on the PostgreSQL 18 Primary after the Primary is started and before starting the Standby.⚠️ Important: This sandbox carries forward only the configuration required for this lab. In a production upgrade, carefully review your existing
postgresql.conf,postgresql.auto.conf,pg_hba.conf, included configuration files, and any environment-specific settings before starting PostgreSQL 18.
▶️ Step 13 — Start PostgreSQL 18
Start the upgraded PostgreSQL 18 Primary first. Once the Primary is healthy and the required replication slot is ready, start the Standby.
🟢 Start PostgreSQL 18 on Primary
📌 Run on: pg-primary
👤 OS User: postgres
sudo systemctl start postgresql-18Check the service:
sudo systemctl status postgresql-18Confirm PostgreSQL 18 is running:
psql -d postgres -c "SELECT version();"Expected:
PostgreSQL 18.4 ...🔄 Create / Verify the Physical Replication Slot
Check whether the slot already exists:
psql -d postgres -c "SELECT slot_name, slot_type, active FROM pg_replication_slots ORDER BY slot_name;"If pg_standby_slot does not exist, create it: (Use the name that was captured in pre upgrade assesment)
psql -d postgres -c "SELECT pg_create_physical_replication_slot('pg_standby_slot');"Before the Standby starts, it is normal to see:
psql -d postgres -c "SELECT slot_name, slot_type, active FROM pg_replication_slots ORDER BY slot_name;"slot_name | slot_type | active
----------------+-----------+-------
pg_standby_slot | physical | f🔵 Start PostgreSQL 18 on Standby
📌 Run on: pg-standby
👤 OS User: postgres
sudo systemctl start postgresql-18Check the service:
sudo systemctl status postgresql-18Confirm it started as a standby:
psql -d postgres -c "SELECT pg_is_in_recovery();"Expected:
pg_is_in_recovery
-------------------
t
🔄 Verify Streaming Replication
📌 Run on: pg-primary
psql -d postgres -c "SELECT application_name, client_addr, state, sync_state FROM pg_stat_replication;"Expected:
application_name | client_addr | state | sync_state
------------------+----------------+-----------+------------
walreceiver | 192.168.56.171 | streaming | async
(1 row)Verify the physical slot is now active:
psql -d postgres -c "SELECT slot_name, slot_type, active FROM pg_replication_slots WHERE slot_name='pg_standby_slot';"Expected:
slot_name        | slot_type | active
-----------------+-----------+--------
pg_standby_slot  | physical  | t
(1 row)✅ Step 13 Complete
- 🟢 PostgreSQL 18 Primary → Running
- 🔵 PostgreSQL 18 Standby → Running
- 🔄 Streaming replication → Active
- 🔗 Physical replication slot → Active
- 🐘 PostgreSQL version → 18.4
⚠️ Important: Start the Primary first and confirm it is healthy before starting any rsync-upgraded standbys. For environments with replication slots, make sure the required slot exists before starting the Standby.
🛠️ Step 14 — Post-Upgrade Processing
A successful pg_upgrade does not necessarily mean that every database object is immediately ready for application traffic.
If additional post-upgrade processing is required, pg_upgrade displays warnings at the end of the upgrade and generates SQL scripts that must be reviewed and executed by the administrator.
⚠️ Important: Do not ignore the final
pg_upgradeoutput. Always review the generated scripts and validate that every command completes successfully.
🔍 Check the Generated Post-Upgrade Scripts
📌 Run on: pg-primary
👤 OS User: postgres
Check the files generated by pg_upgrade:
ls -l ~In our sandbox, pg_upgrade generated:
delete_old_cluster.sh
update_extensions.sql
For Step 14, we are interested in:
update_extensions.sqlInspect the script before executing it:
cat ~/update_extensions.sqlOur sandbox generated:
\connect creditcards
ALTER EXTENSION "pg_buffercache" UPDATE;
ALTER EXTENSION "pgaudit" UPDATE;
This tells us that PostgreSQL detected newer versions of these extensions in the PostgreSQL 18 installation.
📋 Check Extension Versions Before the Update
Before executing the generated script, record the currently installed and available versions:
psql -d creditcards -c "
SELECT
    name,
    default_version,
    installed_version
FROM pg_available_extensions
WHERE name IN (
    'pg_buffercache',
    'pgaudit',
    'postgis',
    'timescaledb'
)
ORDER BY name;
"In our sandbox, we observed:
      name      | default_version | installed_version
----------------+-----------------+-------------------
 pg_buffercache | 1.6             | 1.4
 pgaudit        | 18.0            | 16.1
 postgis        | 3.6.4           | 3.6.4
 timescaledb    | 2.29.2          | 2.29.2
So the post-upgrade state is clear:
pg_buffercache   1.4  → 1.6
pgaudit         16.1  → 18.0
postgis          3.6.4 → 3.6.4
timescaledb      2.29.2 → 2.29.2
PostGIS and TimescaleDB already match the versions available in our PostgreSQL 18 installation, so pg_upgrade did not include them in update_extensions.sql.
▶️ Run the Generated Script
Run the script using the PostgreSQL 18 psql binary:
cd ~/usr/pgsql-18/bin/psql \
--username=postgres \
--file=update_extensions.sql \
postgresOur sandbox produced:
You are now connected to database "creditcards" as user "postgres".
ALTER EXTENSION
ERROR: extension "pgaudit" has no update path from version "16.1" to version "18.0"
This result is important.
pg_buffercache successfully upgraded:
1.4 → 1.6 ✅But pgAudit failed:
16.1 → 18.0 ❌🧩 Why Did the pgAudit Update Fail?
let us inspect the pgAudit extension files installed for PostgreSQL 18:
ls -1 /usr/pgsql-18/share/extension/pgaudit*Our installation contains:
/usr/pgsql-18/share/extension/pgaudit--18.0.sql
/usr/pgsql-18/share/extension/pgaudit.control
The control file confirms:
cat /usr/pgsql-18/share/extension/pgaudit.controldefault_version = '18.0'However, there is no extension upgrade script providing a path such as:
pgaudit--16.1--18.0.sqlTherefore PostgreSQL cannot execute:
ALTER EXTENSION pgaudit UPDATE;from 16.1 directly to 18.0.
💡 Key takeaway: A command appearing in
update_extensions.sqldoes not guarantee that the extension package provides a valid upgrade path. Always check the script execution results.
🔬 Inspect pgAudit Before Recreating It
Before dropping an extension, understand what database objects belong to it.
Run:
psql -d creditcards -c "
SELECT
    pg_describe_object(
        d.classid,
        d.objid,
        d.objsubid
    ) AS extension_member
FROM pg_depend d
JOIN pg_extension e
    ON d.refobjid = e.oid
WHERE e.extname = 'pgaudit'
  AND d.deptype = 'e'
ORDER BY 1;
"In our sandbox, pgAudit owns:
event trigger pgaudit_ddl_command_end
event trigger pgaudit_sql_drop
function pgaudit_ddl_command_end()
function pgaudit_sql_drop()
We also verified its current version:
psql -d creditcards -c "
SELECT
    extname,
    extversion,
    extnamespace::regnamespace AS schema
FROM pg_extension
WHERE extname = 'pgaudit';
"Before recreation:
 extname | extversion | schema
---------+------------+--------
 pgaudit | 16.1       | public
🔄 Recreate pgAudit for PostgreSQL 18
For this sandbox, after inspecting the extension-owned objects, we resolved the missing update path by recreating pgAudit:
psql -d creditcardsThen:
DROP EXTENSION pgaudit;
CREATE EXTENSION pgaudit;Verify:
SELECT
    extname,
    extversion
FROM pg_extension
WHERE extname = 'pgaudit';Expected:
 extname | extversion
---------+------------
 pgaudit | 18.0
-- exit from the psql prompt
\q⚠️ Production Note: Drop-and-recreate is the procedure we validated in this sandbox after confirming the objects owned by pgAudit. Do not assume this is the supported procedure for every pgAudit release or production environment. Verify the extension vendor’s supported major-upgrade procedure and understand extension dependencies before dropping any extension.
✅ Verify All Extensions
After completing the post-upgrade processing, verify the final extension versions:
psql -d creditcards -c "
SELECT
    extname,
    extversion
FROM pg_extension
ORDER BY extname;
"Our final PostgreSQL 18 state is:
    extname     | extversion
----------------+------------
 pg_buffercache | 1.6
 pgaudit        | 18.0
 plpgsql        | 1.0
 postgis        | 3.6.4
 timescaledb    | 2.29.2
⚠️ Caution — Rebuild Scripts
pg_upgrade may also generate scripts that rebuild database objects that cannot safely be reused after the major-version upgrade.
If a generated rebuild script references application tables, PostgreSQL warns that accessing those tables before the rebuild completes may result in incorrect query results or poor performance.
The safe sequence is:
pg_upgrade completes
        ↓
Review warnings and generated scripts
        ↓
Rebuild script generated?
        ↓
Identify affected tables
        ↓
Run rebuild script to completion
        ↓
Validate
        ↓
Allow application access
Tables that are not referenced by rebuild scripts can be accessed immediately.
🚨 Production Cutover Note: Do not release application traffic simply because
pg_upgradeprintsUpgrade Complete. First review and complete all mandatory post-upgrade processing, especially generated rebuild scripts.
🧪 Our Sandbox Result
For our PostgreSQL 16 → PostgreSQL 18.4 upgrade:
Post-upgrade rebuild scripts     : None
Extension update script          : Generated
pg_buffercache                   : 1.4 → 1.6 ✅
pgAudit                          : 16.1 → 18.0 ✅*
PostGIS                          : 3.6.4 unchanged
TimescaleDB                      : 2.29.2 unchanged
* pgAudit did not provide a direct ALTER EXTENSION update path in our installed packages, so we investigated its extension objects and recreated it for PostgreSQL 18 in this sandbox.
Step 14 complete. ✅
📊 Step 15 — Statistics
PostgreSQL 18 pg_upgrade transfers most optimizer statistics from the PostgreSQL 16 cluster to the new PostgreSQL 18 cluster unless the upgrade was run with:
--no-statisticsThis helps the PostgreSQL 18 query planner start with useful information immediately after the upgrade.
However, not all statistics are transferred.
Examples include:
- 📈 Extended statistics created explicitly with
CREATE STATISTICS - 🧩 Custom statistics maintained by extensions
- 📊 Statistics maintained by PostgreSQL’s cumulative statistics system
Because of this, pg_upgrade recommends regenerating the missing information after the upgrade.
🧠 Why Are Statistics Important?
PostgreSQL’s query planner uses statistics to estimate how much data a query will process and to choose an efficient execution plan.
Statistics influence decisions such as:
Sequential Scan  vs  Index Scan
Nested Loop      vs  Hash Join
Join order
Estimated row counts
The database may be completely healthy after the upgrade, but incomplete statistics can still result in poor execution plans.
🚀 Phase 1 — Generate Missing Optimizer Statistics
📌 Run on: pg-primary
👤 OS User: postgres
Run:
/usr/pgsql-18/bin/vacuumdb \
  --username=postgres \
  --all \
  --analyze-in-stages \
  --missing-stats-only \
--jobs=3The important options are:
--all
    Process all databases.

--analyze-in-stages
    Build statistics progressively.

--missing-stats-only
    Concentrate on relations where statistics are missing.

--jobs=3
    Run multiple analyze jobs concurrently.
--analyze-in-stages builds statistics progressively rather than waiting for full-quality statistics everywhere before useful planner information becomes available.
You may see output similar to:
Generating minimal optimizer statistics (1 target)
Generating medium optimizer statistics (10 targets)
Generating default (full) optimizer statistics
Conceptually:
Minimal statistics
       ↓
Get useful planner information quickly
       ↓
Medium statistics
       ↓
Improve estimates
       ↓
Default/full statistics
This is especially useful after upgrading a large production cluster.
⚡ Production Note — Use --jobs
For a large database environment, statistics collection can take considerable time.
Using:
--jobs=Nallows vacuumdb to process multiple objects concurrently.
For example:
--jobs=3is appropriate for our example, but 3 is not a universal production value.
Choose the number of jobs according to:
- 🖥️ Available CPU
- 💾 Storage and I/O capacity
- 📦 Database size
- 🔥 Concurrent workload
- ⏱️ Maintenance-window requirements
⚠️ More jobs are not automatically better. Excessive parallelism can create significant CPU and storage pressure.
🔄 Phase 2 — Refresh Statistics Across All Relations
After the staged statistics generation completes, run:
/usr/pgsql-18/bin/vacuumdb \
  --username=postgres \
  --all \
  --analyze-only \
--jobs=3This performs the broader post-upgrade statistics refresh across the cluster and ensures relations have updated statistics needed for normal PostgreSQL maintenance and planning behavior.
The two phases therefore serve different purposes:
Phase 1
--analyze-in-stages
--missing-stats-only
        │
        ▼
Quickly address missing optimizer statistics

Phase 2
--analyze-only
        │
        ▼
Refresh statistics across all relations
🐢 What If vacuum_cost_delay Is Enabled?
🔍 Check
vacuum_cost_delayBefore overriding
vacuum_cost_delay, check its effective value:psql -d postgres -c "SHOW vacuum_cost_delay;"Our sandbox returns:
vacuum_cost_delay
-------------------
0
Therefore, no
PGOPTIONSoverride is required.If your production environment uses a non-zero
vacuum_cost_delay, PostgreSQL documents temporarily overriding it withPGOPTIONS='-c vacuum_cost_delay=0'to speed up statistics generation. Consider the additional I/O impact before doing so.
🖥️ Why Run This Only on the Primary?
For our physical replication topology, run these commands on the PostgreSQL 18 primary.
Do not independently run them against the read-only physical standby.
Our topology is:
PG18 PRIMARY
     │
     │ physical WAL replication
     ▼
PG18 STANDBY
The standby remains in recovery while the primary performs the required post-upgrade processing.
🚦 Application Cutover Consideration
This step also matters when deciding when to release application traffic.
A practical production sequence is:
PG18 starts
      ↓
Mandatory Step 14 processing
      ↓
Required rebuild scripts completed
      ↓
Generate missing statistics
      ↓
Critical database validation
      ↓
Application cutover
      ↓
Continue broader statistics work
   if required by the maintenance strategy
For very large environments, whether the complete second --analyze-only pass must finish before application cutover depends on the maintenance window and operational plan.
The important requirement is to avoid releasing a critical workload into the new cluster without understanding the state of its planner statistics.
Step 15 complete. ✅
🗑️ Step 16 — Delete the Old PostgreSQL 16 Cluster
Once the PostgreSQL 18 upgrade is fully validated, the old PostgreSQL 16 cluster can be removed.
⚠️ Do not perform this cleanup until the PostgreSQL 18 primary, standby, application data, extensions, and replication have been validated.
🔍 Inspect the Cleanup Script
📌 Run on: pg-primary
👤 OS User: postgres
pg_upgrade generated:
cat ~/delete_old_cluster.shOur sandbox:
#!/bin/sh

rm -rf '/var/lib/pgsql/16/data'
rm -rf '/u01/postgres/tablespaces/creditcards_data/PG_16_202307071'
Notice that pg_upgrade also included our custom tablespace in the cleanup script.
💡 Always inspect
delete_old_cluster.shbefore executing it, especially when custom tablespaces are present.
🗑️ Delete the Old Primary Cluster
cd ~
./delete_old_cluster.shVerify PG16 is gone:
ls -ld /var/lib/pgsql/16/data 2>&1Check the tablespace:
find /u01/postgres/tablespaces/creditcards_data \
  -maxdepth 1 \
  -type d \
-printAfter cleanup, only the PG18 tablespace directory should remain:
/u01/postgres/tablespaces/creditcards_data
/u01/postgres/tablespaces/creditcards_data/PG_18_202506291
🖥️ Clean Up the Old Standby
delete_old_cluster.sh only cleans the server where pg_upgrade was executed.
The old PG16 standby files must therefore be removed separately.
📌 Run on: pg-standby
rm -rf /var/lib/pgsql/16/datarm -rf \
/u01/postgres/tablespaces/creditcards_data/PG_16_202307071⚠️ Double-check the hostname, PGDATA and tablespace paths before using
rm -rf.
📦 PostgreSQL 16 Binaries
This step removes the old cluster data, not necessarily the PostgreSQL 16 software.
Old PG16 packages and directories such as:
/usr/pgsql-16/can be removed separately according to your organization’s cleanup and retention policy.
✅ Step 16 Complete
At this point:
PG16 primary data       Removed ✅
PG16 standby data       Removed ✅
PG16 tablespace data    Removed ✅
PG18 primary            Healthy ✅
PG18 standby            Streaming ✅
↩️ Step 17 — Reverting to PostgreSQL 16
Because this upgrade uses:
pg_upgrade --linkrollback depends on whether the new PostgreSQL 18 cluster has been started.
🟢 PG18 Has NOT Been Started
With --link, pg_upgrade renames the old cluster’s:
$PGDATA/global/pg_controlto:
$PGDATA/global/pg_control.oldIf PostgreSQL 18 has not been started, restore the original name:
mv /var/lib/pgsql/16/data/global/pg_control.old \
   /var/lib/pgsql/16/data/global/pg_control
The PostgreSQL 16 cluster can then be started again.
⚠️ Do this only if the PostgreSQL 18 cluster has never been started after
pg_upgrade --link.
🔴 PG18 Has Already Been Started
Once PostgreSQL 18 has been started, it can modify files that are shared with PostgreSQL 16 through hard links.
At that point:
DO NOT START POSTGRESQL 16The old cluster is no longer a safe rollback target.
To revert to PostgreSQL 16, restore the PG16 environment from your approved backup/recovery source.
💡 The --link Point of No Return
Keep this simple rule in mind:
pg_upgrade --link completes
        │
        ├── PG18 NOT started
        │      └── PG16 can still be recovered
        │
        └── PG18 started
               └── Restore PG16 from backup
🚨 Production Note: With
--link, your backup and rollback plan must be validated before starting the new PostgreSQL 18 cluster.
✅ Our Sandbox
In our lab, PostgreSQL 18 has already been started and validated.
Therefore, reverting to PostgreSQL 16 would now require a restore from backup.
Step 17 complete. ✅
🧹 Lab Cleanup — Stop or Destroy the Sandbox
Once you have finished the lab, you can either stop the VMs and keep them for later, or destroy the environment completely.
📌 Run from: Windows PowerShell
📂 Directory: PostgreSQL upgrade project directory
⏸️ Option 1 — Stop the Lab
To shut down both Vagrant VMs while keeping the environment for later:
vagrant haltWhen you want to continue:
vagrant upYour virtual machines and database files are preserved.
🗑️ Option 2 — Destroy the Lab
If you have finished the lab and no longer need the VMs:
vagrant destroy -fThis destroys the Vagrant-managed virtual machines.
⚠️ Warning:
vagrant destroy -fpermanently removes the lab VMs and their local data. Make sure there is nothing you need to preserve before running it.
🚀 Rebuild the Lab Anytime
Because the environment is provisioned through Vagrant, you can recreate it again with:
And you are ready for another PostgreSQL upgrade run. 🐘
vagrant up