
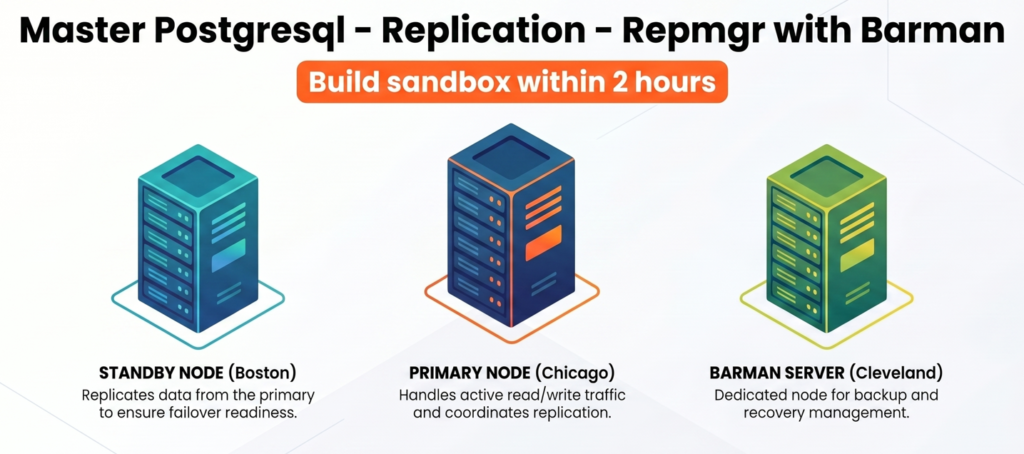
This page explains the step by step configuration of sandbox and implementation of repmgr along with barman according to official documentation
Huge thanks to Tim Hall of ORACLE-BASE. His years of high-quality tutorials inspired me to start my own journey of ‘learning by doing’ and sharing that knowledge here.
Also thanks to chatgpt, google gemini & Notebooklm for assisting in this blogging.
Disclaimer: This guide is provided for educational purposes only and is not intended for production use. These steps were documented and tested in a controlled sandbox environment. Please exercise caution before applying any changes to a production system; the author assumes no responsibility for discrepancies or issues. Use at your own risk.
Chapter 2. Installation
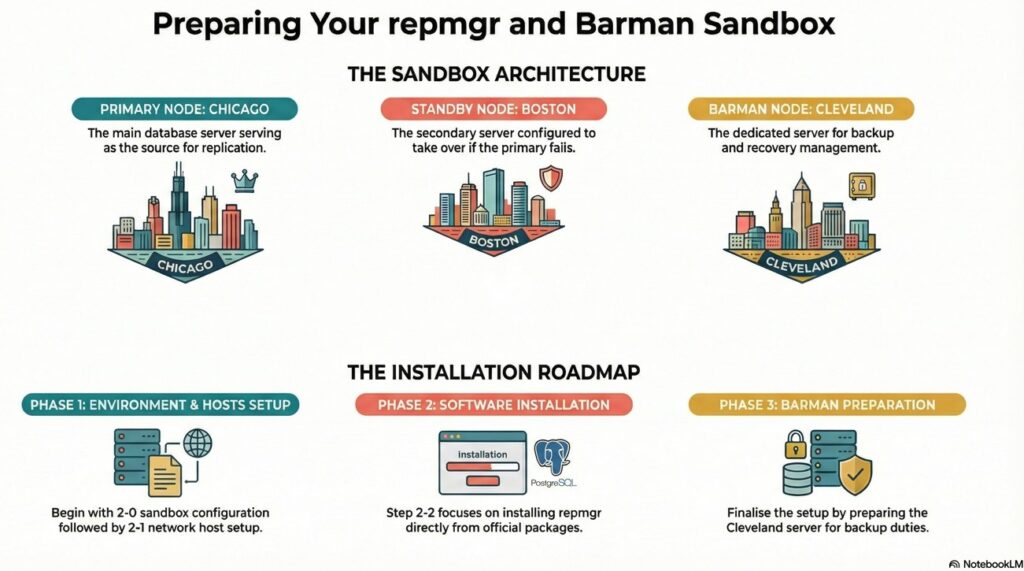
2.0 sandbox configuration
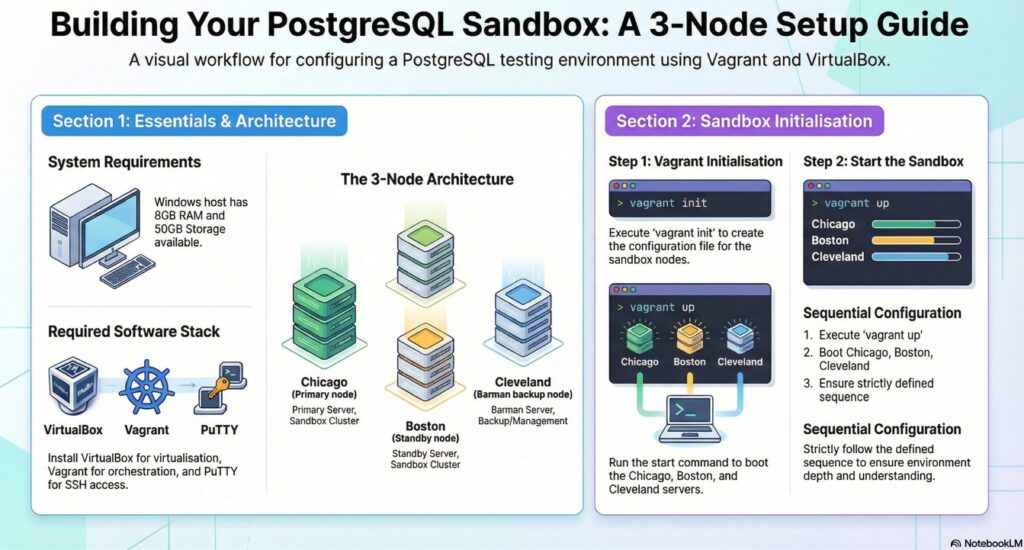
System requirements:
Laptop : Windows
Processor:
RAM: minimum 8 GB
Storage: minimum 50 GB
1 Install Oracle virtual box – Virtualbox
2 Install Vagrant – vagrant
3 Install putty – putty
a) OEL 9 – as OS for the sandbox
b) 3 Number of Sandboxes
—–b.1) chicago – primary database server (2 GB RAM)
—–b.2) boston – standby database server (2 GB RAM)
—–b.3) cleveland – backup and recovery manager server (1 GB RAM)
After Installation of mentioned software as defined, Its time to create Vagrant config files to start the machines.
- a) create a directory in your windows folder
— example : i created a directory as : D:\sandboxes\postgres\pg-rpmgr-brmn - b) right click the directory name pg-rpmgr-brmn and select – Open in Terminal
—- this opens an windows powershell (command line)
example:
PS D:\sandboxes\postgres\pg-rpmgr-brmn - c) execute the command “vagrant init“
vagrant init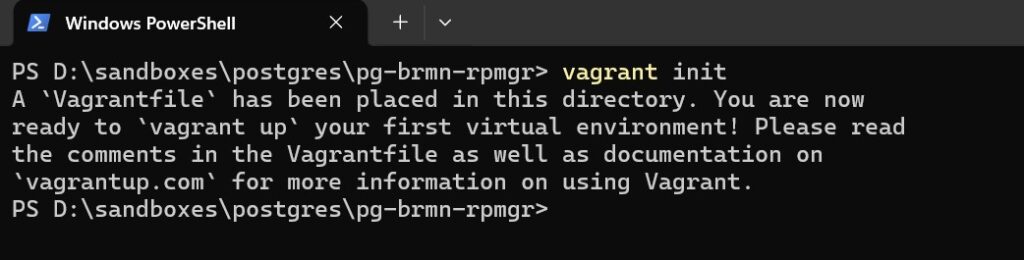
expand_for_code (file to be edited in notepad / notepad++ )
Vagrantfile
# -*- mode: ruby -*-
# vi: set ft=ruby :

# --- Configuration Data ---
# Merged directly into the script for single-file portability
conf = {
  'shared' => {
    'box' => "oraclebase/oracle-9"
  },
  'nodes' => [
    { 'name' => 'chicago',    'ip' => '192.168.56.140', 'mem' => 2048, 'cpu' => 2 },
    { 'name' => 'boston',     'ip' => '192.168.56.141', 'mem' => 2048, 'cpu' => 2 },
    { 'name' => 'cleveland',  'ip' => '192.168.56.142', 'mem' => 1024, 'cpu' => 1 }
  ]
}

Vagrant.configure("2") do |config|
  # Loop through each node defined in the Hash above
  conf['nodes'].each do |node|
    config.vm.define node['name'] do |node_config|

      node_config.vm.box = conf['shared']['box']
      node_config.vm.hostname = node['name']
      node_config.vm.network "private_network", ip: node['ip']

      node_config.vm.provider "virtualbox" do |vb|
        vb.name   = node['name']
        vb.memory = node['mem']
        vb.cpus   = node['cpu']

        # Recommended for OEL9: Ensure high-resolution timers and IO APIC are enabled
        vb.customize ["modifyvm", :id, "--ioapic", "on"]
      end

      # Optional: Add a provisioner if you want to automate the pg_bindir fix
      # node_config.vm.provision "shell", inline: "echo 'Postgres nodes ready!'"
    end
  end
end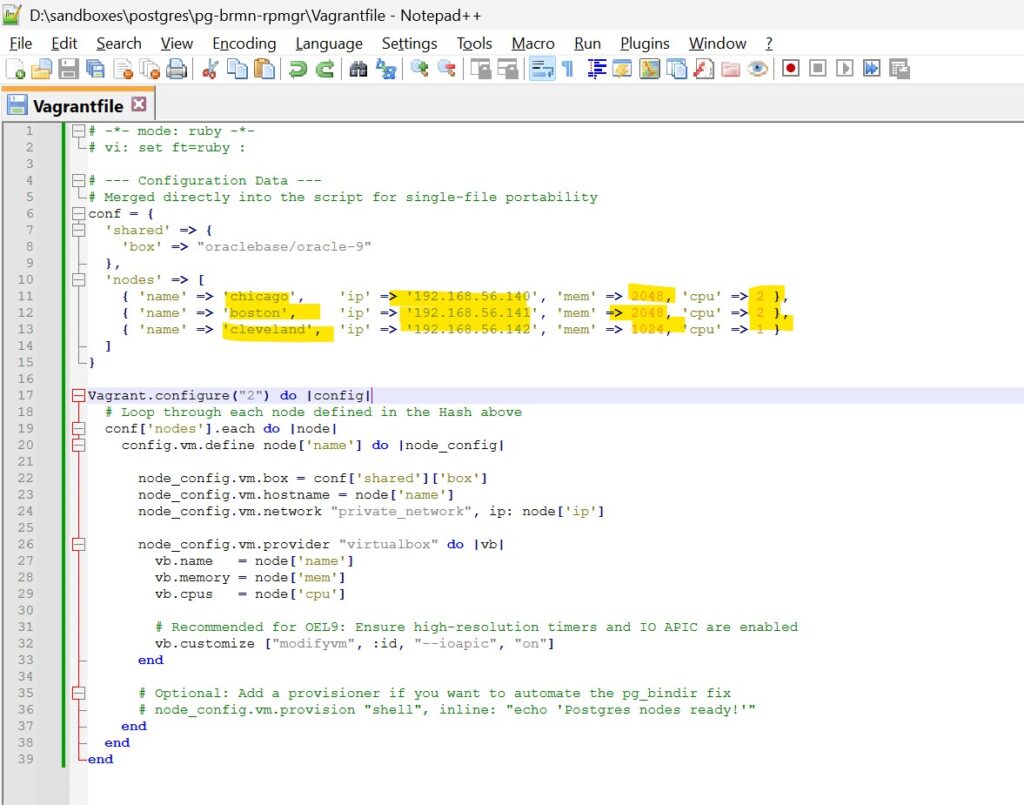
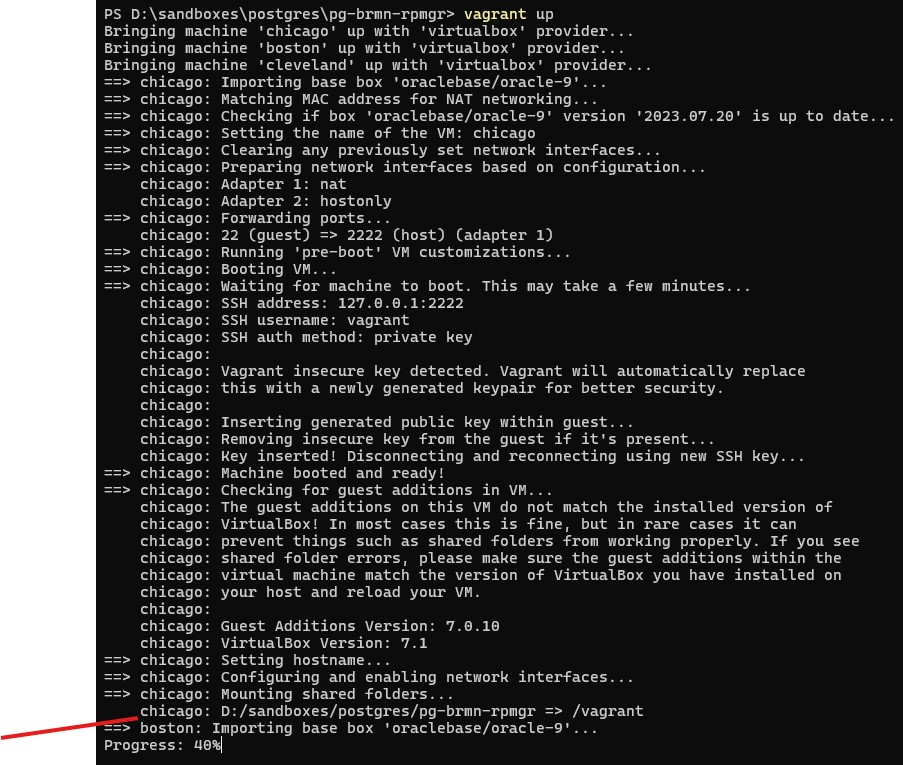
execute the command “vagrant up” in your power shell command line –
vagrant up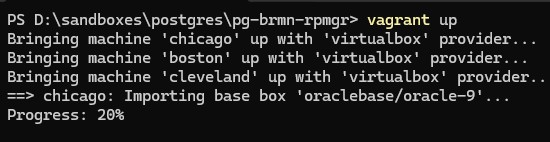
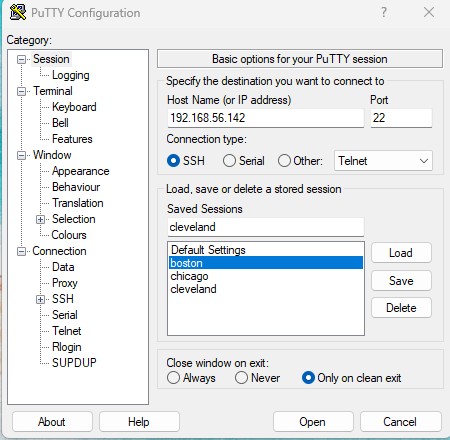
In putty session , save the session with appropriate IP addresses and hostnames accordingly
session_name: chicago, ip => 192.168.56.140
session_name: boston, ip => 192.168.56.141
session_name: cleveland, ip => 192.168.56.142
save the sessions in putty
username: vagrant
password: vagrant
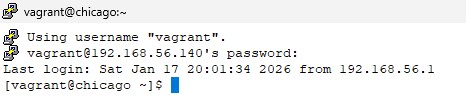
Congratulations. The Sandbox for the Hands on Lab is successfully configured.
2.1 Hosts Setup
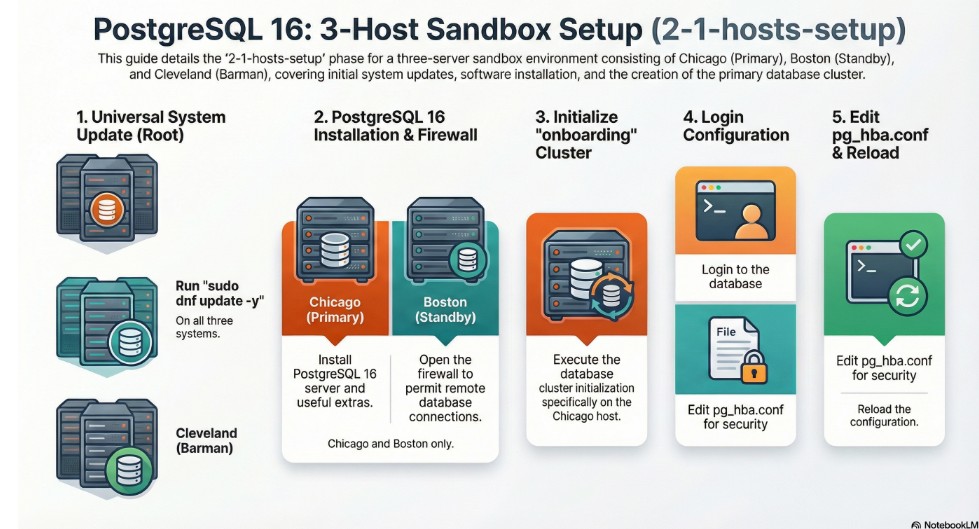
2.1.1 Add postgresql RPM repository (05 – mins)
where: all 3 servers
user : vagrant ,
passwd : vagrant
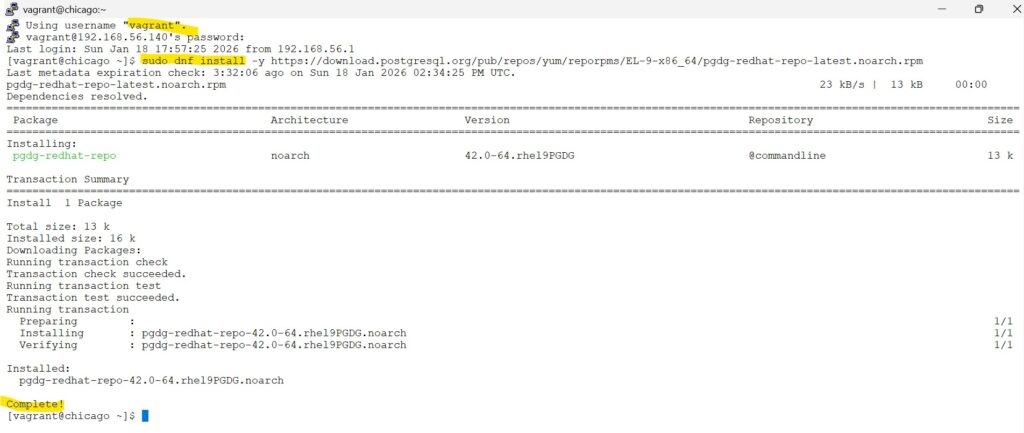
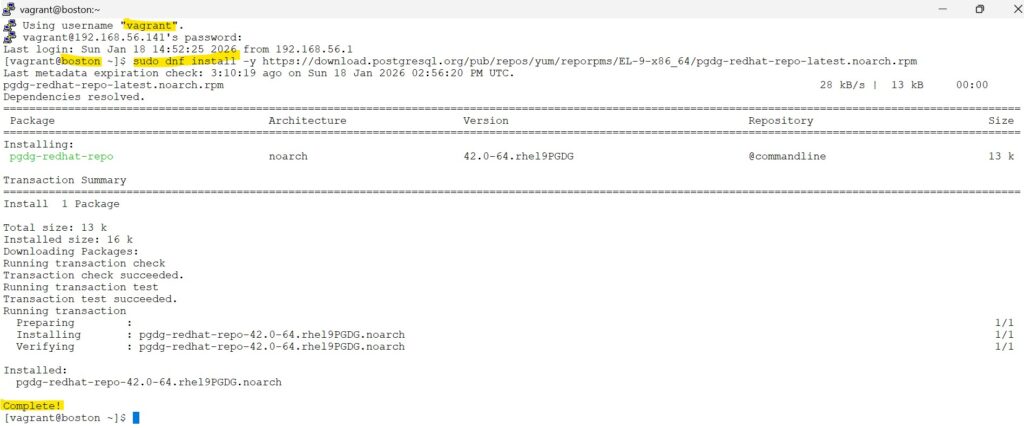
sudo dnf install -y https://download.postgresql.org/pub/repos/yum/reporpms/EL-9-x86_64/pgdg-redhat-repo-latest.noarch.rpmexpand_for_screenshot_reference
dnf install as vagrant user
#  Step 2: update the host ip addresses in /etc/hosts
sudo bash -c 'cat << EOF >> /etc/hosts
192.168.56.140 chicago
192.168.56.141 boston
192.168.56.142 cleveland
EOF'2.1.2 Disable the default PostgreSQL Application Stream module(01 – min)
Where : as vagrant user in both chicago and boston servers
Note: This command ensures the OS ignores its own older PostgreSQL version so we can install the specific community release we need
sudo dnf -qy module disable postgresqlexpand_for_screenshot_reference
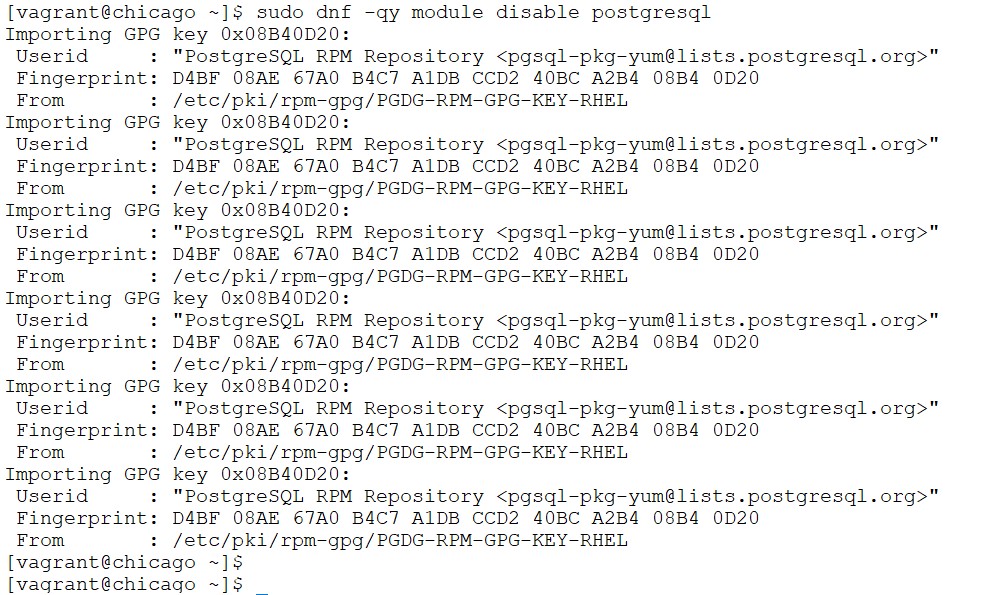
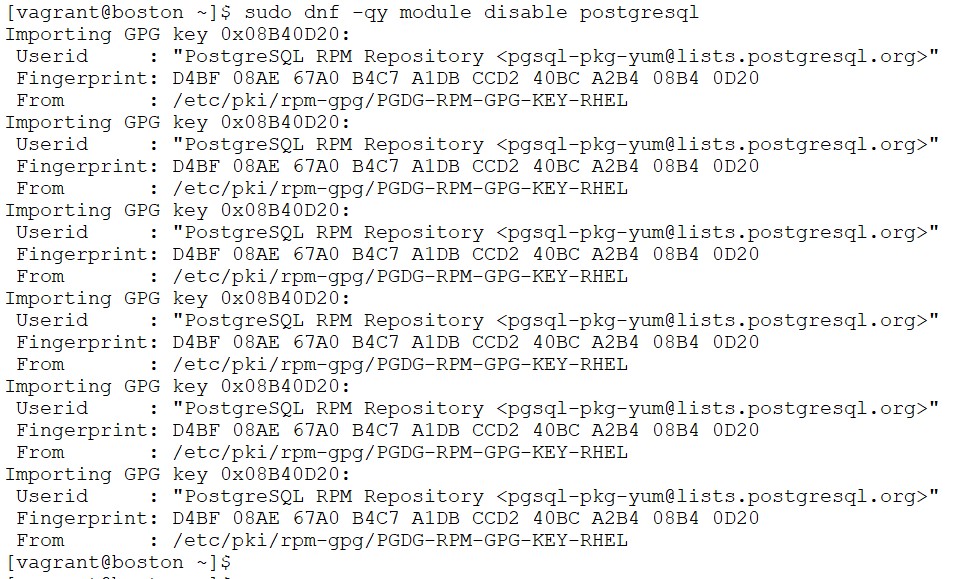
2.1.3 Update the Sudoers file (01 – min)
Where : as vagrant user in both chicago and boston servers
Update the sudoers file
sudo tee /etc/sudoers.d/postgres-systemctl >/dev/null <<'EOF'
Defaults:postgres !requiretty
postgres ALL = NOPASSWD: /usr/bin/systemctl start postgresql-onboarding, \
                         /usr/bin/systemctl stop postgresql-onboarding, \
                         /usr/bin/systemctl restart postgresql-onboarding, \
						 /usr/bin/systemctl status postgresql-onboarding, \
                         /usr/bin/systemctl reload postgresql-onboarding
EOF

sudo chmod 440 /etc/sudoers.d/postgres-systemctl
sudo visudo -cscreenshot
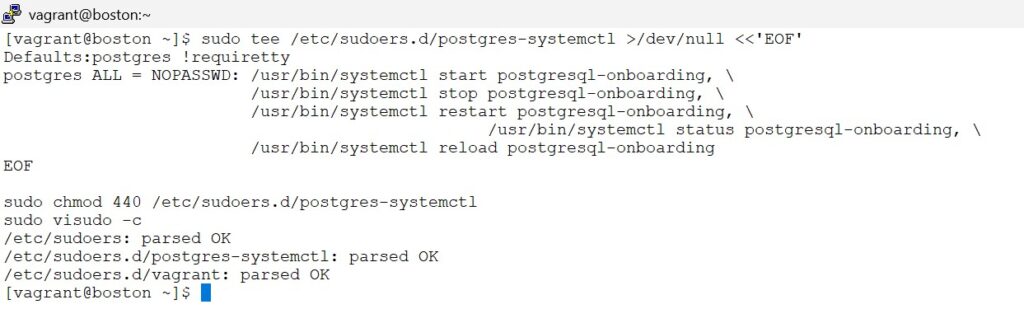
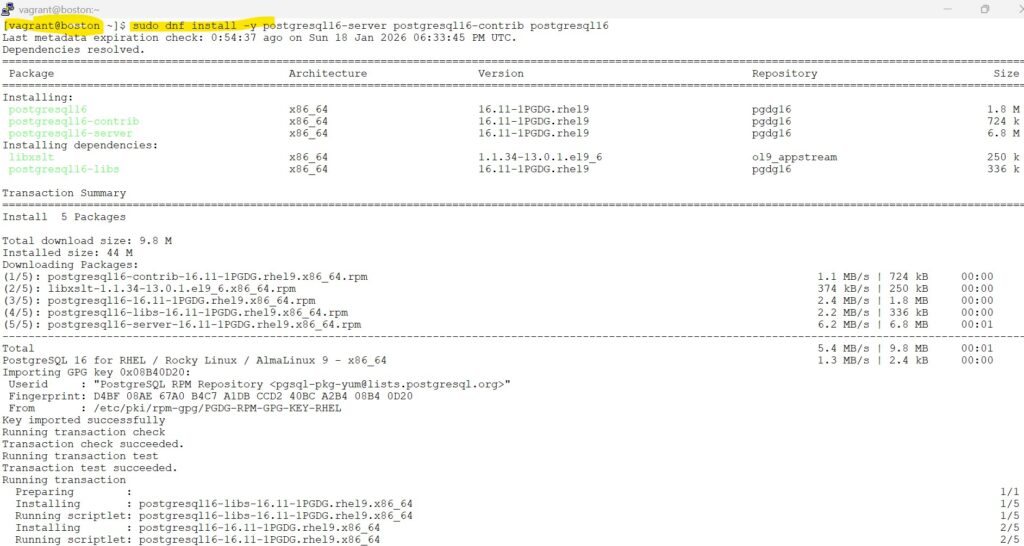
2.1.4 Install PostgreSQL 16 server and useful extras(01 – min)
Where : as vagrant user in both chicago and boston servers
sudo dnf install -y postgresql16-server postgresql16-contrib postgresql16# Step 2:Force the SSH client to match the new libraries
sudo dnf reinstall openssh-clients openssh-server -y
sudo dnf update openssh-clients openssh-server -yexpand_for_screenshot_reference
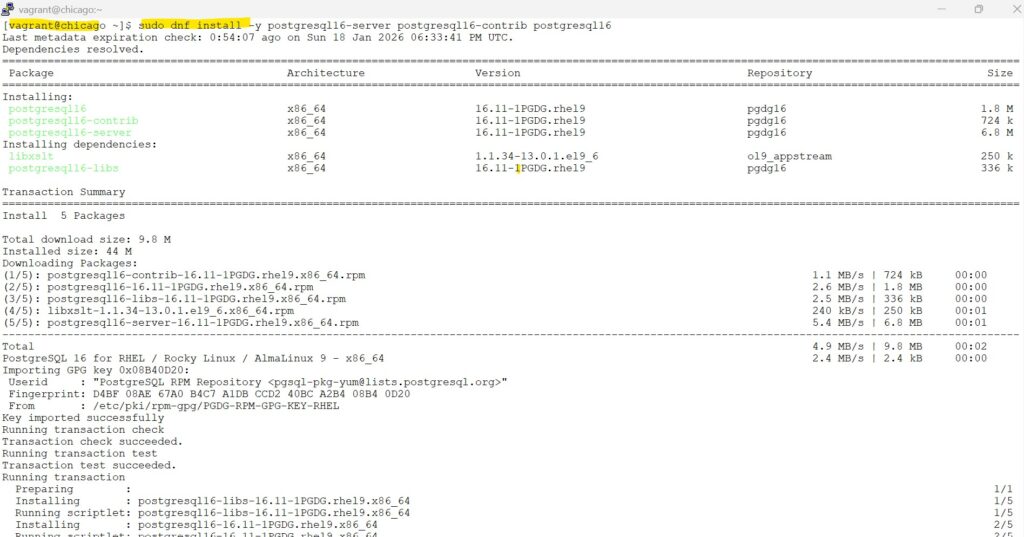
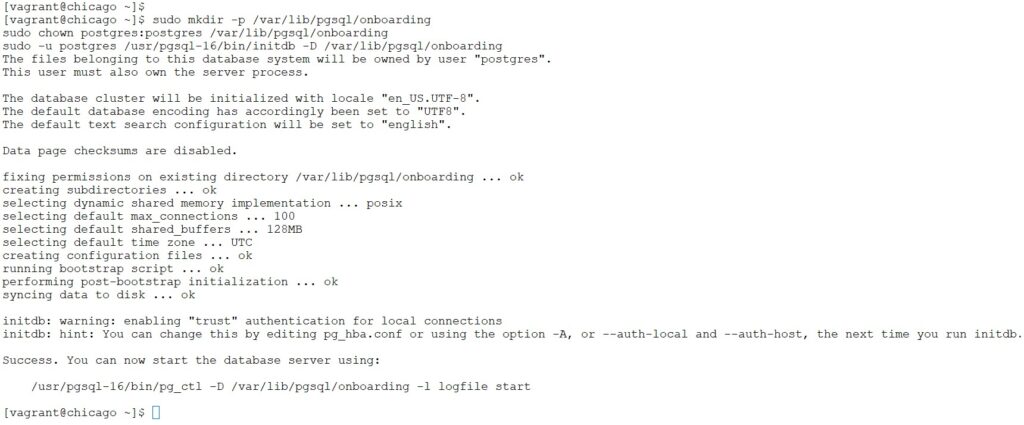
2.1.5 Initialize the database cluster(01 – min)
Where : as vagrant user in chicago
In Chicago server. we will create a cluster database named as “onboarding“
sudo mkdir -p /var/lib/pgsql/onboarding
sudo chown postgres:postgres /var/lib/pgsql/onboarding
sudo -u postgres /usr/pgsql-16/bin/initdb -D /var/lib/pgsql/onboardingexpand_for_screenshot_reference
2.1.6 edit the service file(01 – min)
Where : as vagrant user in chicago
To manage our new onboarding cluster independently, we need to create a dedicated service file.
This allows us to start, stop, and enable the specific instance without affecting other PostgreSQL services on the same host.
Backup the Default Service:
We copy the standard PostgreSQL service file to a new name (postgresql-onboarding.service) to act as our template.
sudo cp /usr/lib/systemd/system/postgresql-16.service /etc/systemd/system/postgresql-onboarding.serviceUpdate the Description:
Modifying the Description line helps us easily identify this specific cluster when running systemctl status.
Set the Data Path:
Updating the Environment=PGDATA variable ensures that the service points exactly to our new /var/lib/pgsql/onboarding directory.
# Update the Description line
sudo sed -i 's|^Description=.*|Description=PostgreSQL 16 database server (onboarding)|' /etc/systemd/system/postgresql-onboarding.service

# Update the PGDATA path
sudo sed -i 's|^Environment=PGDATA=.*|Environment=PGDATA=/var/lib/pgsql/onboarding|' /etc/systemd/system/postgresql-onboarding.serviceexpand_for_screenshot_reference

Where : as vagrant user in boston
Note: Lets copy the service file from boston , we fetch the service file of chicago;s.
# On Boston, as vagrant:
scp vagrant@chicago:/etc/systemd/system/postgresql-onboarding.service /tmp/
sudo mv /tmp/postgresql-onboarding.service /etc/systemd/system/
sudo chmod 644 /etc/systemd/system/postgresql-onboarding.service
sudo systemctl daemon-reloadonly on boston as vagrant user

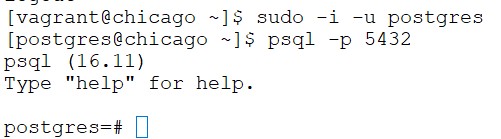
2.1.7 Login to database(01 – min)
Where : as vagrant user in chicago
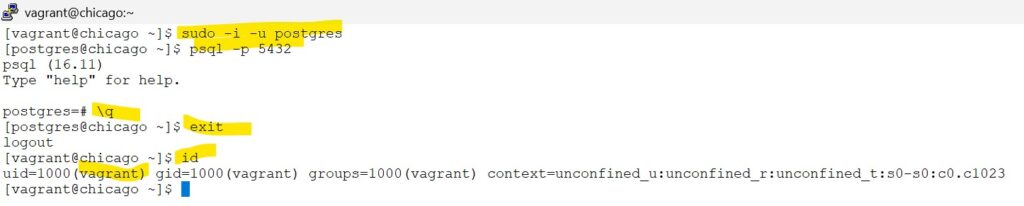
Now that the service is running, we will switch to the system’s postgres user and access the database using the psql utility.
# switch to postgres user
sudo -i -u postgres # start the database cluster
sudo systemctl start postgresql-onboarding
sudo systemctl status postgresql-onboarding# login to database
psql -p 5432 screenshot
in Chicago host: Inside the psql prompt, execute the command. to allow remote hosts to connect to
-- This creates/updates the postgresql.auto.conf file
ALTER SYSTEM SET listen_addresses = '*';screenshot
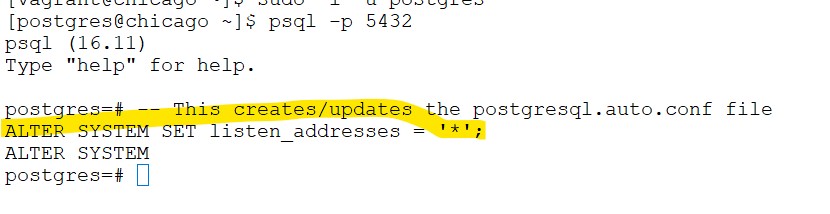
After running this, your will still need to restart the service:
exit from the database prompt of psql by typing — \q
exit from postgresql account by typing — exit
so now you are as Vagrant user
screenshot
# ReStart the database (one-time)
sudo systemctl restart postgresql-onboarding
# Verify it is running
sudo systemctl status postgresql-onboardingCongratulations, You have successfully configured your primary database on chicago host.
2.2. Installing repmgr from packages
2.2.1. RedHat/CentOS/Fedora - repmgr Installation (01 – min)
we will follow the steps from official link : https://www.repmgr.org/docs/5.4/installation-packages.html
Since we are using Oracle Enterprise Linux (OEL) in our sandboxes , we will follow the step 2.2.1. RedHat/CentOS/Fedora
Where : as vagrant user in both chicago and boston servers
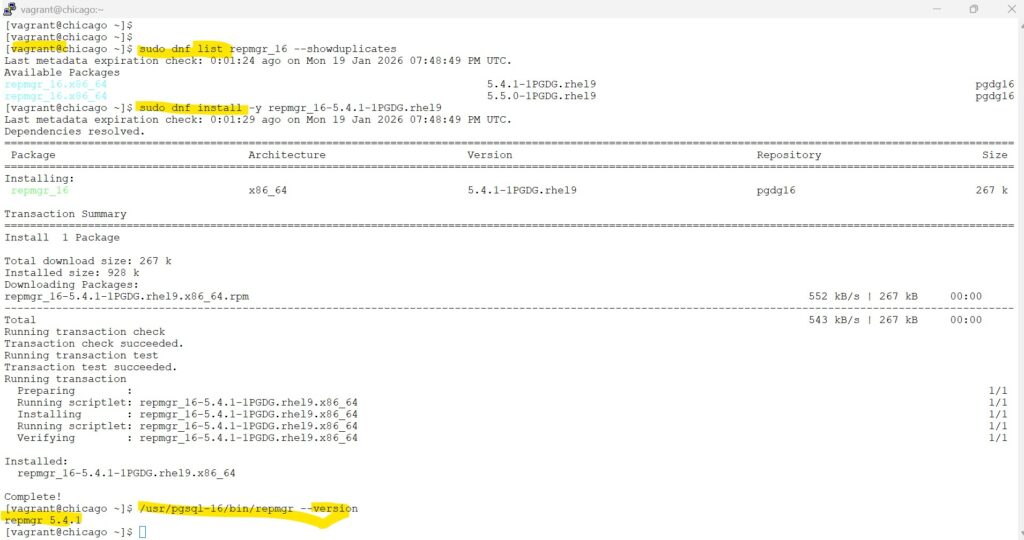
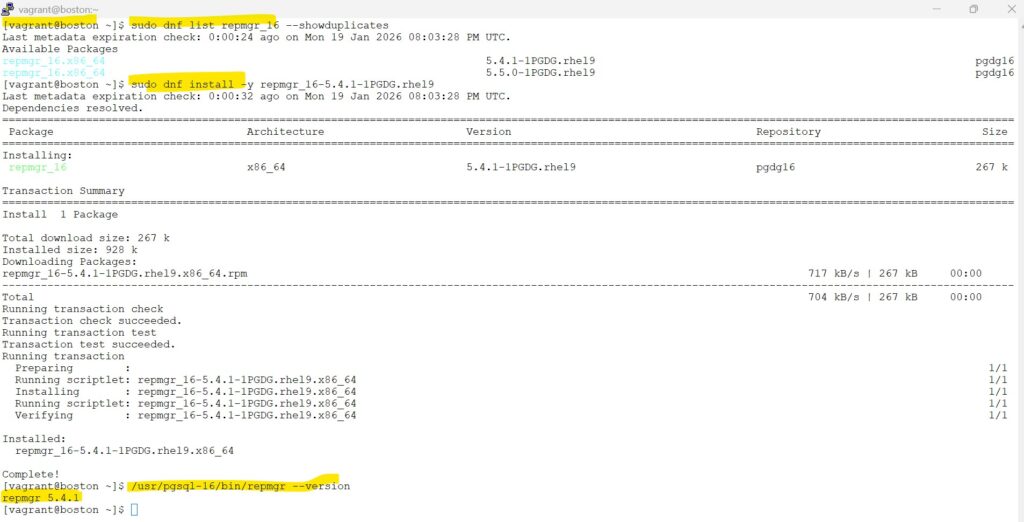
#displays all available versions of the package
sudo dnf list repmgr_16 --showduplicates
#install the specific version - in our lab we will install : 5.4.1
sudo dnf install -y repmgr_16-5.4.1-1PGDG.rhel9
#validation check
/usr/pgsql-16/bin/repmgr --version screenshot
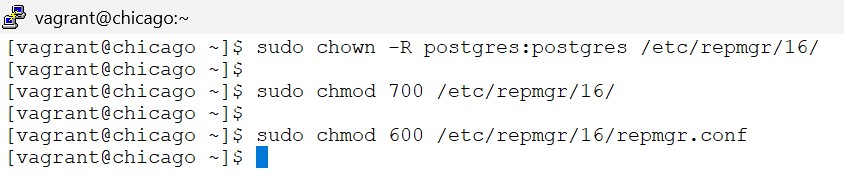
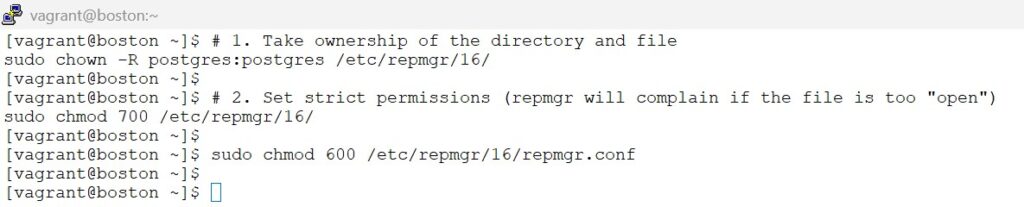
2.2.2 change permission and ownership (01 – min)
Where : as vagrant user in both chicago and boston servers
“We set strict ownership and permissions to ensure the postgres user has full control over its configuration while preventing other system users from accessing sensitive connection strings and credentials.”
# 1. Take ownership of the directory and file
sudo chown -R postgres:postgres /etc/repmgr/16/
# 2. Set strict permissions (repmgr will complain if the file is too "open")
sudo chmod 700 /etc/repmgr/16/
sudo chmod 600 /etc/repmgr/16/repmgr.confscreenshot
2.3. Preparing Cleveland server
Note : In this tutorial , we will install barman 3.16
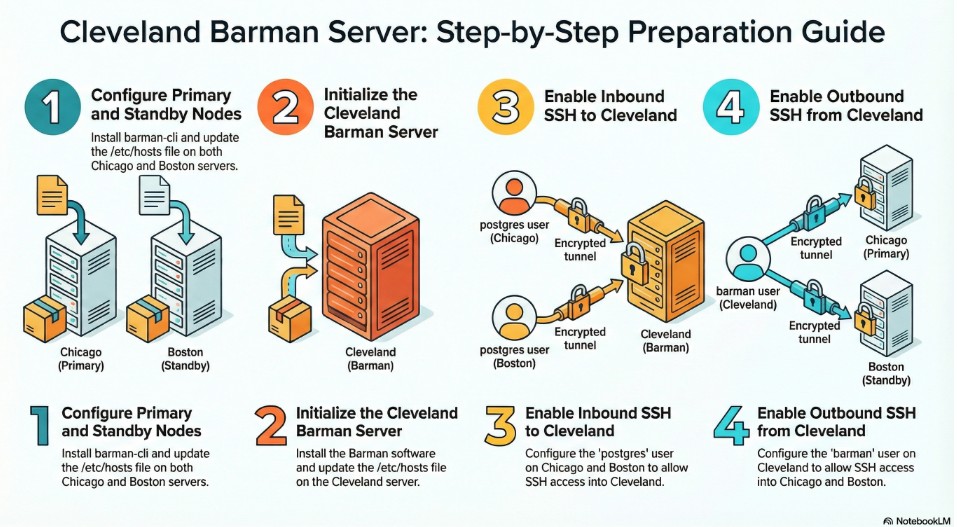
2.3.1 Install Barman-cli and update /etc/hosts (01 - min)
Where : as vagrant user in both chicago and boston servers
# Step 1: Add the official PGDG repository to access PostgreSQL-specific tools
sudo dnf install -y https://download.postgresql.org/pub/repos/yum/reporpms/EL-9-x86_64/pgdg-redhat-repo-latest.noarch.rpm# Step 2: List all available barman-cli versions to find our specific target
sudo dnf --showduplicates -y list barman
# Step 3: Install version 3.16.0 specifically to allow for a future upgrade demonstration
sudo dnf install -y barman-cli-3.16.0-42PGDG.rhel9
# Step 4: Verify the installation
barman-wal-archive --version# Step 5 : switch to postgres user
sudo -i -u postgres# Step 6: Generate the ssh keys - accept the defaults
ssh-keygen -t rsaNote: Hit enter – 3 times by accepting the defaults .
# Step 7:: Display the contents of public key
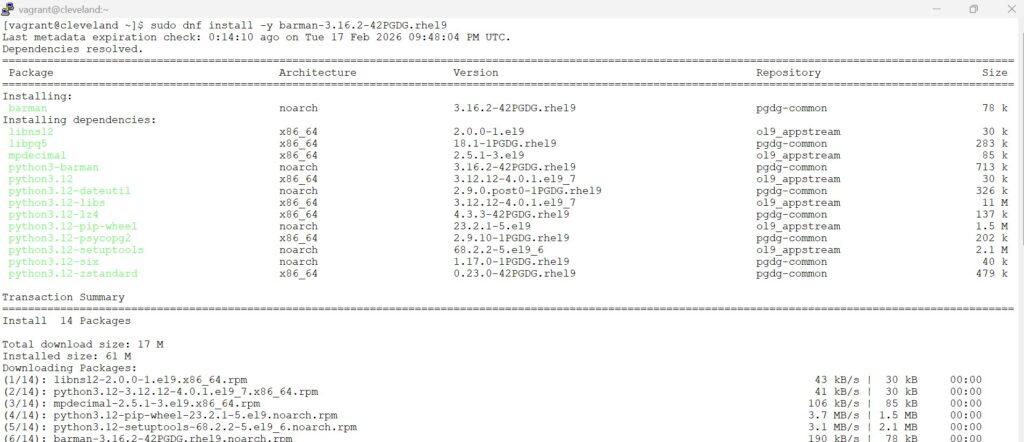
cat /var/lib/pgsql/.ssh/id_rsa.pub2.3.2 Install Barman(01 - min)
Where : as vagrant user in Cleveland(barman) server
# Step 1 : List the available Barman versions
sudo dnf list -y barman --showduplicates # Step 2 : Install Barman specific version
sudo dnf install -y barman-3.16.2-42PGDG.rhel9# Step 3: Verify the installed barman version
sudo barman --versionscreenshot
2.3.3 Enable SSH setup to cleveland from chicago and boston (01 – min)
Where : as vagrant user in Cleveland(barman) server
# Step 1 : switch to barman user in Cleveland server
sudo -i -u barman# Step 2: Generate the ssh keys - accept the defaults - Hit enter whenever you see prompts
ssh-keygen -t rsaNote: Hit enter – 3 times by accepting the defaults .
Copy the contents from section 2.3.1 – Step 7 (from above) – output of both chicago and boston and paste it in cleveland
# Step 3: edit the authorized_keys file in barman server(cleveland) to paste the public key of both chicago and boston
vi /var/lib/barman/.ssh/authorized_keysafter editing the auth keys, now lets try ssh to postgres user of both chicago and boston
# check for chicago from barman(cleveland) server
ssh postgres@chicagoexit and re-test the connection for postgres user of boston from cleveland .
# check for boston from barman(cleveland) server
ssh postgres@bostonscreenshot
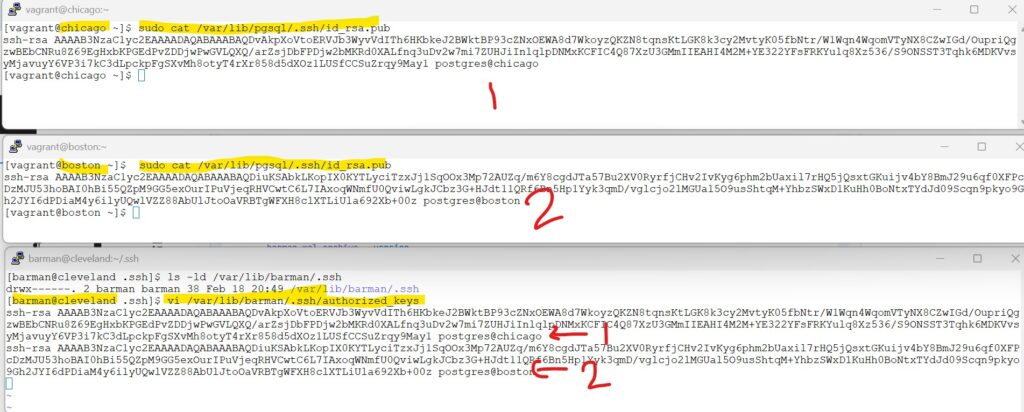
Note: the public keys are sensitive information and not to be shared / documented in the real world. This demo is purely carried out in local sandbox and most of the best practices in security terms is not considered to give the readers the screenshots at the time of implementation.
# Step 4 : cat the contents of public key on barman server
cat /var/lib/barman/.ssh/id_rsa.pub2.3.4 Enable SSH setup from database servers(01 - min)
Where : as postgres user in both chicago and boston server
copy the output of step 3 from section 2.3.3 in both chicago and boston as postgres user and save the file
# Step 1 : copy the public key of barman user from cleveland (section 2.3.3 step 4)
vi /var/lib/pgsql/.ssh/authorized_keysscreenshot
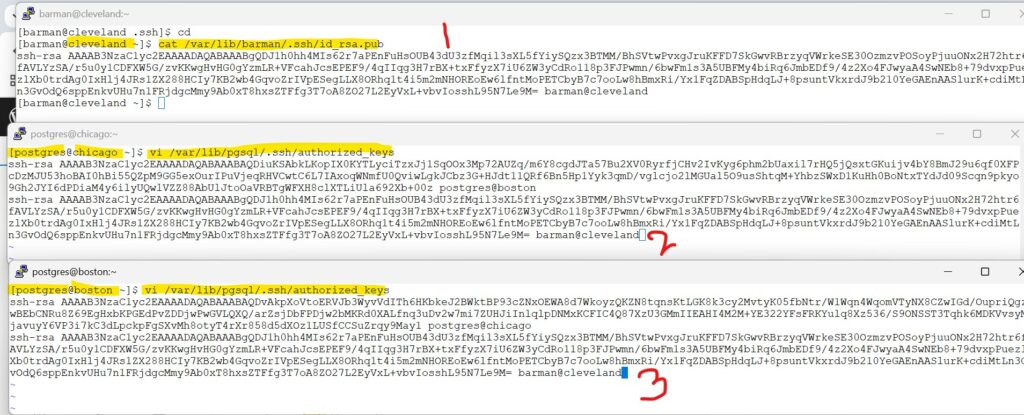
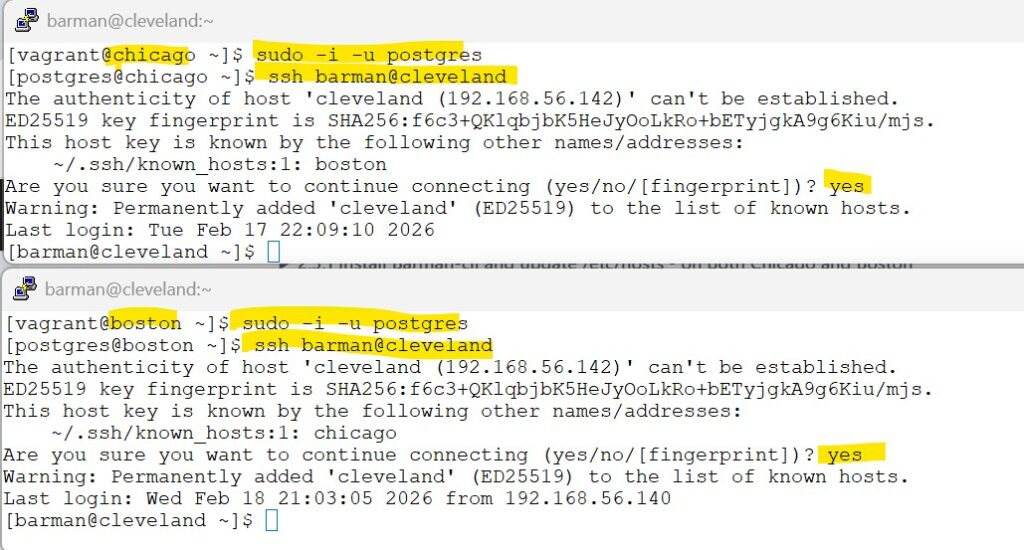
# Step 2: ssh to barman
ssh barman@clevelandNote on both chicago and boston : accept the defaults – and enter Yes when prompted.
later exit – to get back to respective server
screenshot
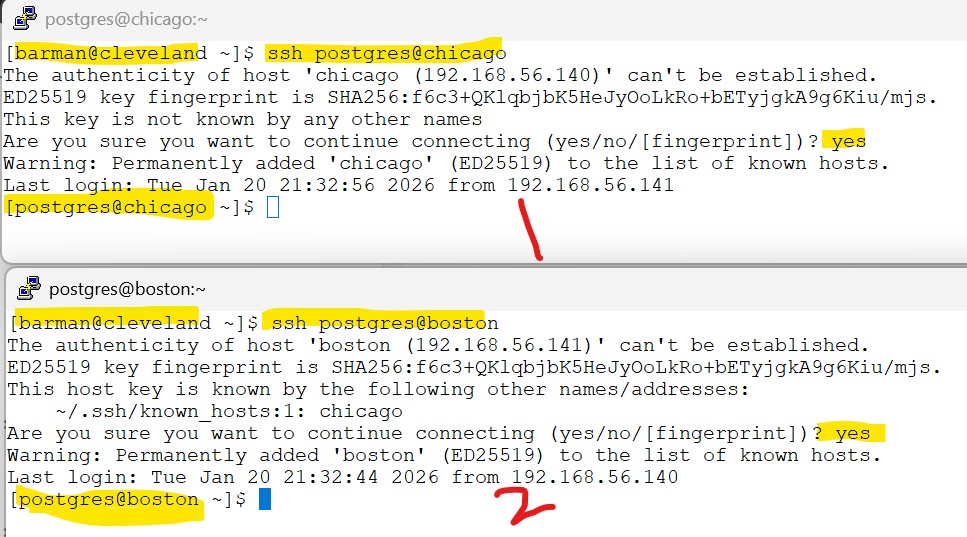
Step 4 is to switch back to postgres user on the DB server(chicago and boston) from cleveland
Now we are connected to cleveland server as barman user.
lets try to switchback to postgres user of both chicago and boston without password prompt.
Accept the defaults , hit Yes when prompted,
see the below screenshot for reference
screenshot
Chapter 3. Quick-start guide
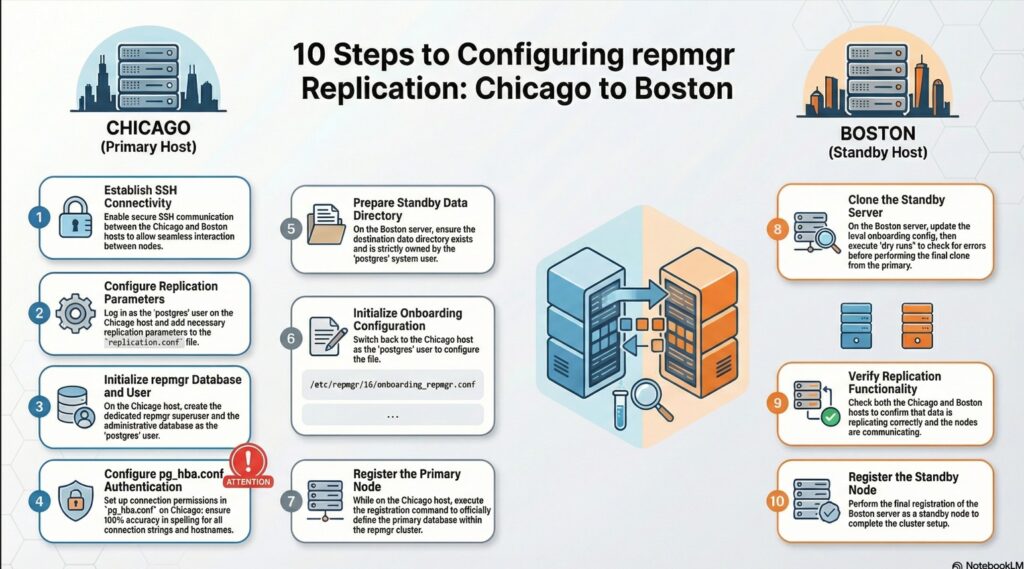
3.1. Prerequisites for setting up a basic replication cluster with repmgr
enabling ssh between chicago and boston
Where : as postgres user in both chicago and boston server
As per 3.1 from official pages: 3.1. Prerequisites for setting up a basic replication cluster with repmgr
we need passwordless SSH connections between both servers, and rsync should be installed.
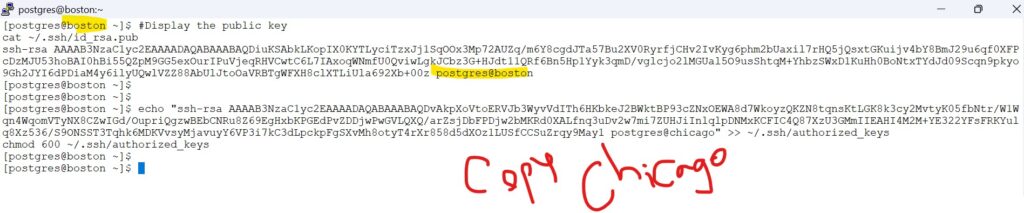
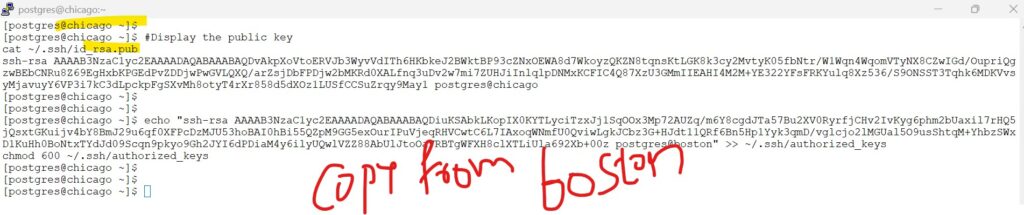
cat ~/.ssh/id_rsa.pub
Copy the code you see from boston to chicago,, and the code from chicago to boston .. below is an example format
and chmod 600 for the file
# Step 1 : copy the public key of one DB server to other DB server as postgres user
vi /var/lib/pgsql/.ssh/authorized_keys
chmod 600 ~/.ssh/authorized_keysscreenshot
— the ssh-rsa code placed within double quotes is copied from boston to chicago
echo “ssh-rsa AAAAB3NzaC1yc2EAAAADAQABAAABAQDiuKSAbkLKopIX0KYTLyciTzxJj1SqOOx3Mp72AUZq/m6Y8cgdJTa57Bu2XV0RyrfjCHv2IvKyg6phm2bUaxil7rHQ5jQsxtGKuijv4bY8BmJ29u6qf0XFPcDzMJU53hoBAI0hBi55QZpM9GG5exOurIPuVjeqRHVCwtC6L7IAxoqWNmfU0QviwLgkJCbz3G+HJdt11QRf6Bn5Hp1Yyk3qmD/vglcjo2lMGUal5O9usShtqM+YhbzSWxD1KuHh0BoNtxTYdJd09Scqn9pkyo9Gh2JYI6dPDiaM4y6ilyUQwlVZZ88AbUlJtoOaVRBTgWFXH8clXTLiUla692Xb+00z postgres@boston” >> ~/.ssh/authorized_keys
chmod 600 ~/.ssh/authorized_keys
— the ssh-rsa code placed within double quotes is copied from chicago to boston
echo “ssh-rsa AAAAB3NzaC1yc2EAAAADAQABAAABAQDvAkpXoVtoERVJb3WyvVdITh6HKbkeJ2BWktBP93cZNxOEWA8d7WkoyzQKZN8tqnsKtLGK8k3cy2MvtyK05fbNtr/W1Wqn4WqomVTyNX8CZwIGd/OupriQgzwBEbCNRu8Z69EgHxbKPGEdPvZDDjwPwGVLQXQ/arZsjDbFPDjw2bMKRd0XALfnq3uDv2w7mi7ZUHJiInlqlpDNMxKCFIC4Q87XzU3GMmIIEAHI4M2M+YE322YFsFRKYulq8Xz536/S9ONSST3Tqhk6MDKVvsyMjavuyY6VP3i7kC3dLpckpFgSXvMh8otyT4rXr858d5dXOz1LUSfCCSuZrqy9May1 postgres@chicago” >> ~/.ssh/authorized_keys
chmod 600 ~/.ssh/authorized_keys
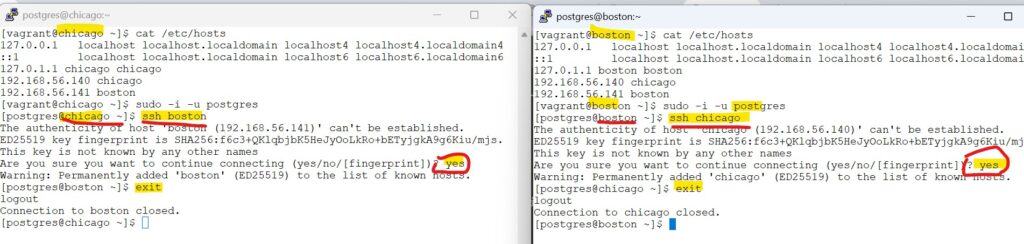
From Boston server: (try ssh to chicago server)
ssh postgres@chicago
# exit back to boston
exitwhen prompted : type : yes and hit enter
From Chicago server: (try ssh to boston server)
ssh postgres@boston
# exit back to chicago
exitwhen prompted : type : yes and hit enter
screenshot
3.2. PostgreSQL configuration
Where : as postgres user in chicago server
lets follow the steps as per official documentation : 3.2. PostgreSQL configuration
3.2.1 “By using an external replication.conf file, we decouple replication settings from the main data directory. This prevents critical configuration from being overwritten or lost during repmgr switchovers.”
# create the directory:
mkdir -p /var/lib/pgsql/onboarding/conf.d/
# add below parameters to the replication.conf file
cat << EOF >> /var/lib/pgsql/onboarding/conf.d/replication.conf
max_wal_senders = 10
max_replication_slots = 10
wal_level = 'replica'
hot_standby = on
archive_mode = on
archive_command = '/bin/true'
EOF3.2.2 “We add the include line because PostgreSQL only reads postgresql.conf by default; this line tells the database to ‘jump’ over and read the replication settings we’ve stored in our separate, safe file.”
#include 'onboarding.replication.conf' in the master postgresql.conf
echo "include '/var/lib/pgsql/onboarding/conf.d/replication.conf'" | tee -a /var/lib/pgsql/onboarding/postgresql.conf3.3. Create the repmgr user and database
Where : as postgres user in chicago server
lets follow the steps as per official documentation : 3.3. Create the repmgr user and database
3.3.1 – Create the repmgr super user and the database
#Create the repmgr user
createuser -s repmgr
#Create the repmgr database
createdb repmgr -O repmgrscreenshot
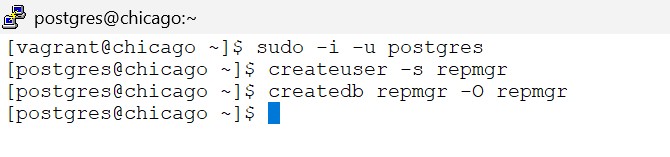
3.3.2. set the repmgr user’s search path to include this schema name, e.g.
psql -U postgres -d repmgr -c "ALTER USER repmgr SET search_path TO repmgr, \"$(whoami)\", public;"screenshot

3.4. Configuring authentication in pg_hba.conf
Where : as postgres user in chicago server
lets follow the steps as per official documentation : 3.4. Configuring authentication in pg_hba.conf
3.4.1 – repmgr user has appropriate permissions in pg_hba.conf and can connect in replication mode
# Copy the pg_hba file
cp /var/lib/pgsql/onboarding/pg_hba.conf /var/lib/pgsql/onboarding/pg_hba.conf.$(date +'%Y-%m-%d_%H-%M-%S')add below lines to the above file:
Note: as already mentioned – the steps here are just for learning purpose and only applicable to sandbox environment
Note that these are simple settings for testing purposes only
would suggest to replace the contents of sample pg_hba.conf in this tutorial in your sandbox environment
cat << 'EOF' >> /var/lib/pgsql/onboarding/pg_hba.conf
#----------
# 1. Allow local system access (postgres user, etc.)
local all all peer
#----------
# 2. Allow repmgr & replication traffic (The "Fast Track")
# This covers the 'repmgr' database AND the special 'replication' pseudo-db
local repmgr,replication repmgr trust
host repmgr,replication repmgr 127.0.0.1/32 trust
host repmgr,replication repmgr 192.168.56.0/24 trust
#----------
# 3. Allow general connections
# Place this AFTER the repmgr rules so it doesn't prompt repmgr for a password
host all all 127.0.0.1/32 scram-sha-256
host all all 192.168.56.0/24 scram-sha-256
#----------
EOFsample – pg_hba.conf
# PostgreSQL Client Authentication Configuration File
# ===================================================
#
# Refer to the "Client Authentication" section in the PostgreSQL
# documentation for a complete description of this file. A short
# synopsis follows.
#
# ----------------------
# Authentication Records
# ----------------------
#
# This file controls: which hosts are allowed to connect, how clients
# are authenticated, which PostgreSQL user names they can use, which
# databases they can access. Records take one of these forms:
#
# local DATABASE USER METHOD [OPTIONS]
# host DATABASE USER ADDRESS METHOD [OPTIONS]
# hostssl DATABASE USER ADDRESS METHOD [OPTIONS]
# hostnossl DATABASE USER ADDRESS METHOD [OPTIONS]
# hostgssenc DATABASE USER ADDRESS METHOD [OPTIONS]
# hostnogssenc DATABASE USER ADDRESS METHOD [OPTIONS]
#
# (The uppercase items must be replaced by actual values.)
#
# The first field is the connection type:
# - "local" is a Unix-domain socket
# - "host" is a TCP/IP socket (encrypted or not)
# - "hostssl" is a TCP/IP socket that is SSL-encrypted
# - "hostnossl" is a TCP/IP socket that is not SSL-encrypted
# - "hostgssenc" is a TCP/IP socket that is GSSAPI-encrypted
# - "hostnogssenc" is a TCP/IP socket that is not GSSAPI-encrypted
#
# DATABASE can be "all", "sameuser", "samerole", "replication", a
# database name, a regular expression (if it starts with a slash (/))
# or a comma-separated list thereof. The "all" keyword does not match
# "replication". Access to replication must be enabled in a separate
# record (see example below).
#
# USER can be "all", a user name, a group name prefixed with "+", a
# regular expression (if it starts with a slash (/)) or a comma-separated
# list thereof. In both the DATABASE and USER fields you can also write
# a file name prefixed with "@" to include names from a separate file.
#
# ADDRESS specifies the set of hosts the record matches. It can be a
# host name, or it is made up of an IP address and a CIDR mask that is
# an integer (between 0 and 32 (IPv4) or 128 (IPv6) inclusive) that
# specifies the number of significant bits in the mask. A host name
# that starts with a dot (.) matches a suffix of the actual host name.
# Alternatively, you can write an IP address and netmask in separate
# columns to specify the set of hosts. Instead of a CIDR-address, you
# can write "samehost" to match any of the server's own IP addresses,
# or "samenet" to match any address in any subnet that the server is
# directly connected to.
#
# METHOD can be "trust", "reject", "md5", "password", "scram-sha-256",
# "gss", "sspi", "ident", "peer", "pam", "ldap", "radius" or "cert".
# Note that "password" sends passwords in clear text; "md5" or
# "scram-sha-256" are preferred since they send encrypted passwords.
#
# OPTIONS are a set of options for the authentication in the format
# NAME=VALUE. The available options depend on the different
# authentication methods -- refer to the "Client Authentication"
# section in the documentation for a list of which options are
# available for which authentication methods.
#
# Database and user names containing spaces, commas, quotes and other
# special characters must be quoted. Quoting one of the keywords
# "all", "sameuser", "samerole" or "replication" makes the name lose
# its special character, and just match a database or username with
# that name.
#
# ---------------
# Include Records
# ---------------
#
# This file allows the inclusion of external files or directories holding
# more records, using the following keywords:
#
# include FILE
# include_if_exists FILE
# include_dir DIRECTORY
#
# FILE is the file name to include, and DIR is the directory name containing
# the file(s) to include. Any file in a directory will be loaded if suffixed
# with ".conf". The files of a directory are ordered by name.
# include_if_exists ignores missing files. FILE and DIRECTORY can be
# specified as a relative or an absolute path, and can be double-quoted if
# they contain spaces.
#
# -------------
# Miscellaneous
# -------------
#
# This file is read on server startup and when the server receives a
# SIGHUP signal. If you edit the file on a running system, you have to
# SIGHUP the server for the changes to take effect, run "pg_ctl reload",
# or execute "SELECT pg_reload_conf()".
#
# ----------------------------------
# Put your actual configuration here
# ----------------------------------
#
# If you want to allow non-local connections, you need to add more
# "host" records. In that case you will also need to make PostgreSQL
# listen on a non-local interface via the listen_addresses
# configuration parameter, or via the -i or -h command line switches.
# CAUTION: Configuring the system for local "trust" authentication
# allows any local user to connect as any PostgreSQL user, including
# the database superuser. If you do not trust all your local users,
# use another authentication method.
# TYPE DATABASE USER ADDRESS METHOD
# "local" is for Unix domain socket connections only
local all all trust
# IPv4 local connections:
host all all 127.0.0.1/32 trust
# IPv6 local connections:
host all all ::1/128 trust
# Allow replication connections from localhost, by a user with the
# replication privilege.
# 1. Allow local system access (postgres user, etc.)
local all all peer
# 2. Allow repmgr & replication traffic
# This covers the 'repmgr' database AND the special 'replication' pseudo-db
local repmgr,replication repmgr trust
host repmgr,replication repmgr 127.0.0.1/32 trust
host repmgr,replication repmgr 192.168.56.0/24 trust
# 3. Allow general connections
# Place this AFTER the repmgr rules so it doesn't prompt repmgr for a password
host all all 127.0.0.1/32 scram-sha-256
host all all 192.168.56.0/24 scram-sha-2563.4.2. Reload the configuration for the changes to take affect
# Reload the configuration
psql -c "SELECT pg_reload_conf();"3.5. Preparing the standby
Where : as postgres user in boston server
lets follow the steps as per official documentation : 3.5. Preparing the standby
3.5.1 – ensure the destination data directory exist and are owned by the postgres system user
# 1. Create the directory structure
mkdir -p /var/lib/pgsql/onboarding
# 2. Set the mandatory permissions (0700)
chmod 700 /var/lib/pgsql/onboarding
# 3. Verify the work
ls -ld /var/lib/pgsql/onboardingscreenshot
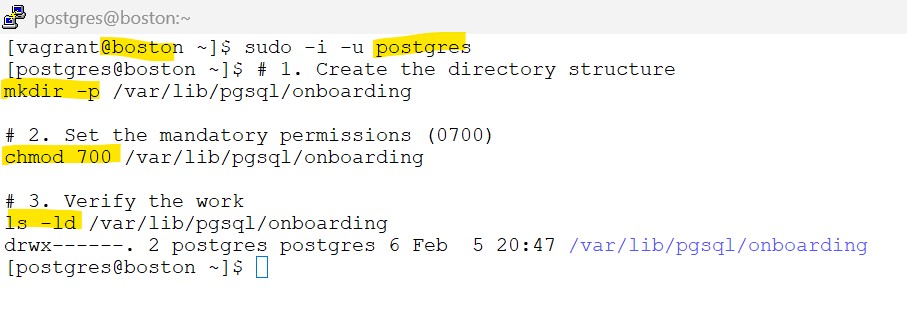
Where : as postgres user in boston server
3.5.2 Check the primary database is reachable from the standby using psql
# Check the primary database is reachable from the standby using psql:
psql 'host=chicago user=repmgr dbname=repmgr connect_timeout=2'screenshot

3.5.3 copy below contents to .bash_profile
Where : as postgres user in boston server
cat <<EOF > ~/.bash_profile
export PATH=/usr/pgsql-16/bin:\$PATH
export MANPATH=/usr/pgsql-16/share/man:\$MANPATH
export PS1="[\u@\h \W]\$ "
EOF
source ~/.bash_profile3.6. repmgr configuration file
Where : as postgres user in chicago server
lets follow the steps as per official documentation : 3.6. Configuring authentication in pg_hba.conf
3.6.1 Update the repmgr.conf file to add below entries .
cat << 'EOF' >> /etc/repmgr/16/onboarding_repmgr.conf
pg_bindir='/usr/pgsql-16/bin/'
ssh_options='-q -o ConnectTimeout=10'
node_id=1
node_name='chicago'
conninfo='host=chicago user=repmgr dbname=repmgr connect_timeout=2'
data_directory='/var/lib/pgsql/onboarding'
EOF
chmod 600 /etc/repmgr/16/onboarding_repmgr.conf3.6.2 copy below contents to .bash_profile
cat <<EOF > ~/.bash_profile
export PATH=/usr/pgsql-16/bin:\$PATH
export MANPATH=/usr/pgsql-16/share/man:\$MANPATH
export PS1="[\u@\h \W]\$ "
EOF
source ~/.bash_profile
3.7. Register the primary server
lets follow the steps as per 3.7. Register the primary server
3.7.1 register the primary database
Where : as postgres user in chicago server
repmgr -f /etc/repmgr/16/onboarding_repmgr.conf primary registerscreenshot

3.7.2 verify the status of the cluster
Where : as postgres user in chicago server
# View the cluster show
repmgr -f /etc/repmgr/16/onboarding_repmgr.conf cluster show
# View the record in repmgr metadata
psql -U postgres -d repmgr -c "select * from repmgr.nodes;" -x
screenshot
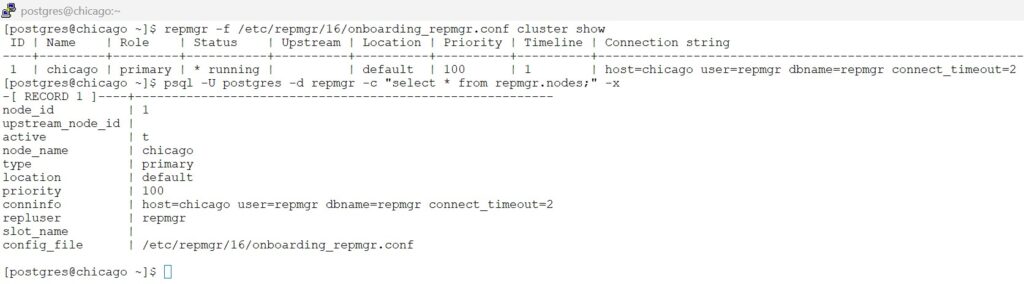
3.8. Clone the standby server
Where : as postgres user in boston server
lets follow the steps as per 3.8. Clone the standby server
3.8.1 Update the config file
# update the entries for the repmgr config file
cat << 'EOF' >> /etc/repmgr/16/onboarding_repmgr.conf
pg_bindir='/usr/pgsql-16/bin/'
ssh_options='-q -o ConnectTimeout=10'
node_id=2
node_name='boston'
conninfo='host=boston user=repmgr dbname=repmgr connect_timeout=2'
data_directory='/var/lib/pgsql/onboarding'
EOF
# change the permission to 600 for the config file
chmod 600 /etc/repmgr/16/onboarding_repmgr.conf3.8.2 Use the --dry-run option to check if the standby can be cloned:
Where : as postgres user in boston server
#Dry run to check if primary chicago can be cloned to standby
repmgr -h chicago -U repmgr -d repmgr --copy-external-config-files -f /etc/repmgr/16/onboarding_repmgr.conf standby clone --dry-runscreenshot
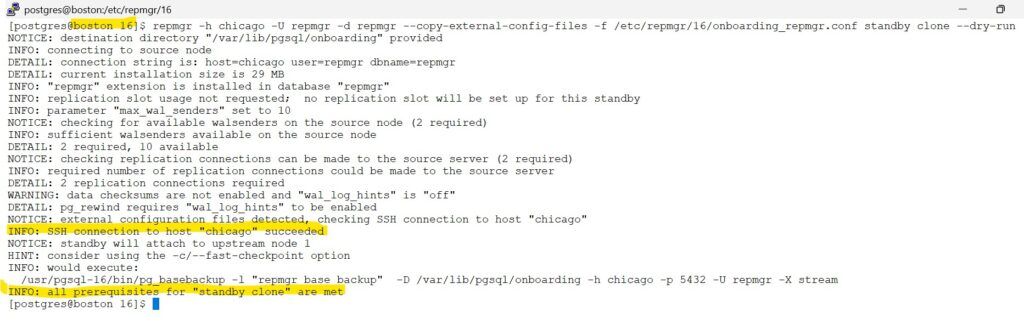
3.8.3 If no problems are reported, the standby can then be cloned with:
Where : as postgres user in boston server
#Clone the primary to standby
repmgr -h chicago -U repmgr -d repmgr --copy-external-config-files -f /etc/repmgr/16/onboarding_repmgr.conf standby clonescreenshot
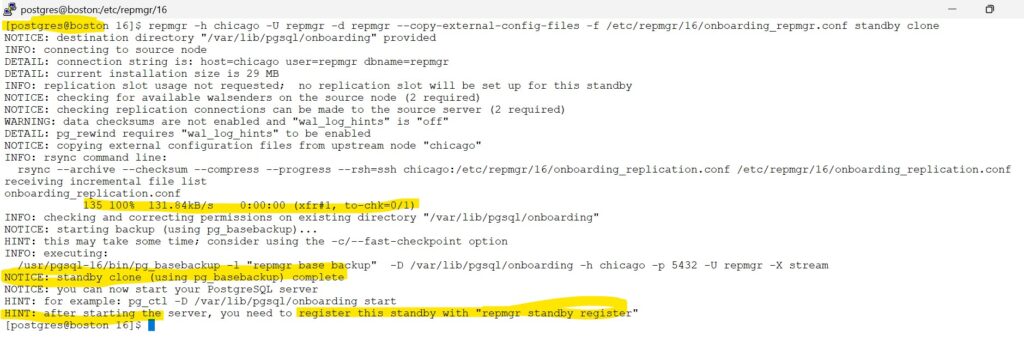
3.8.4 start the standby
Where : as postgres user in boston server
# Start the Stanby database
sudo systemctl start postgresql-onboarding3.9. Verify replication is functioning
lets follow the steps as per : 3.9. Verify replication is functioning
Where : as postgres user in chicago server
# execute on -- primary server,(chicago)
psql -U postgres -d repmgr -c "SELECT * FROM pg_stat_replication;" -xscreenshot
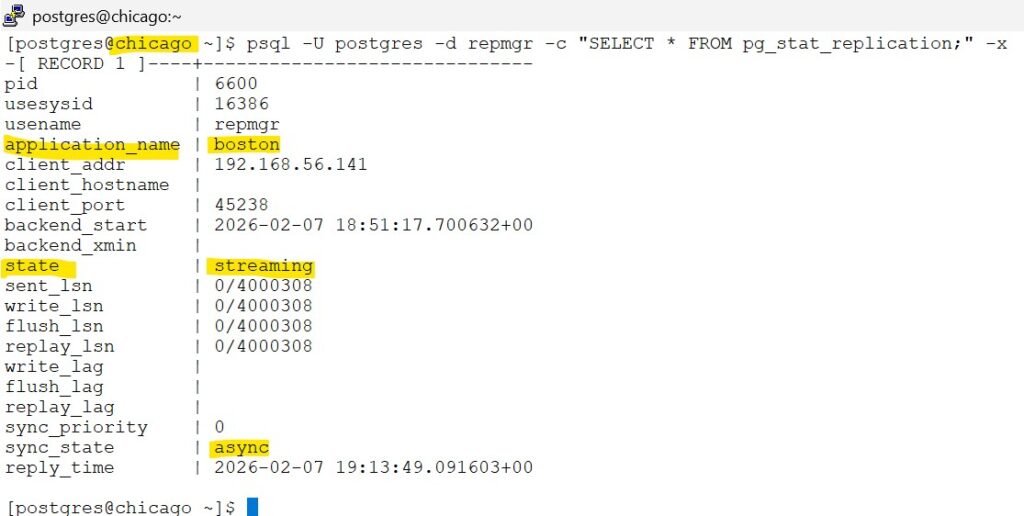
Where : as postgres user in boston server
# execute on -- standby server,(boston)
psql -U postgres -d repmgr -c "SELECT * FROM pg_stat_wal_receiver;" -xscreenshot
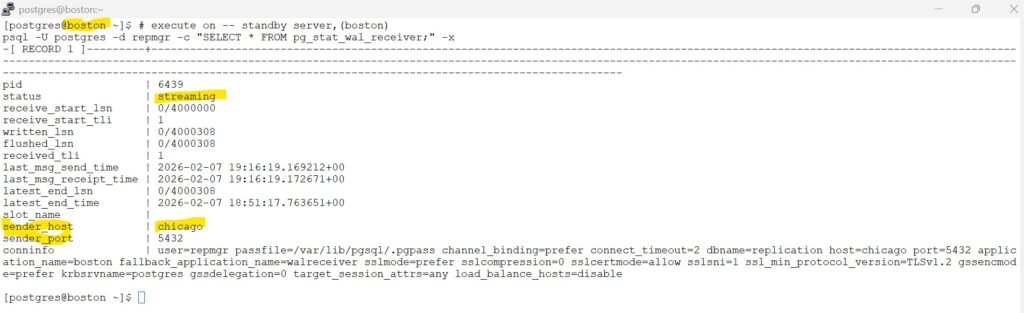
3.10. Register the standby
Where : as postgres user in boston server
lets follow the steps as per 3.10. Register the standby
Register the standby server with:
# Register the standby database
repmgr -f /etc/repmgr/16/onboarding_repmgr.conf standby registerscreenshot

Congratulations, you have successfully cloned the standby database.
Chapter 4. repmgr configuration
Hands on – only for section 4.5 and 4.6 are available in this tutorial.
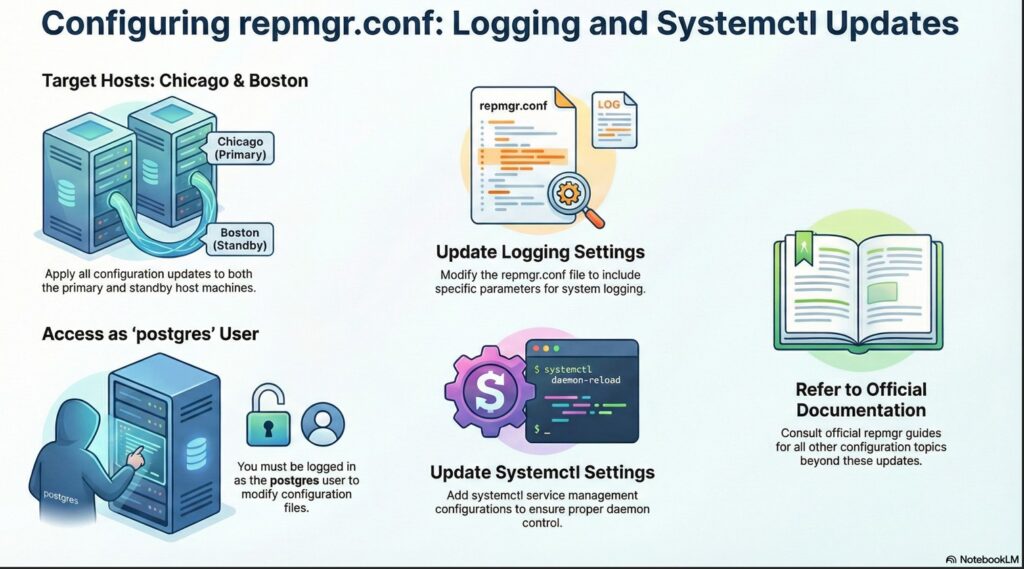
4.5. Log settings
In this course, lab steps are provided for the sections below.
lets follow the steps as per 4.5. Log settings
execute the below command to update the repmgr.conf file to include logging settings.
Where : as postgres user in both chicago and boston server
# update the repmgr.conf file
cat << 'EOF' >> /etc/repmgr/16/onboarding_repmgr.conf
#----------
# Logging settings
# https://www.repmgr.org/docs/5.4/configuration-file-log-settings.html
#----------
log_level='INFO'
log_facility='STDERR'
log_file='/var/log/repmgr/repmgr.log'
log_status_interval=300
#----------
EOF
# Verify the contents of the repmgr.conf
cat /etc/repmgr/16/onboarding_repmgr.conf
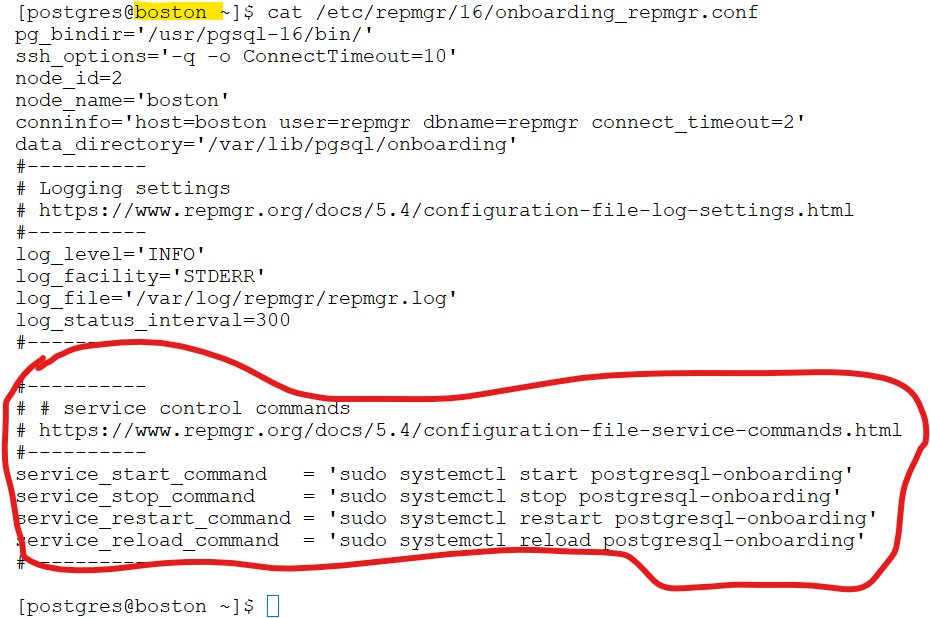
4.6. Service command settings
lets follow the steps as per 4.6. Service command settings
4.6.1 Update the repmgr.conf file
execute the below command to update the repmgr.conf file to include systemctl settings.
Where : as postgres user in both chicago and boston server
# update the repmgr.conf file
cat << 'EOF' >> /etc/repmgr/16/onboarding_repmgr.conf
#----------
# service control commands
# https://www.repmgr.org/docs/5.4/configuration-file-service-commands.html
#----------
service_start_command = 'sudo systemctl start postgresql-onboarding'
service_stop_command = 'sudo systemctl stop postgresql-onboarding'
service_restart_command = 'sudo systemctl restart postgresql-onboarding'
service_reload_command = 'sudo systemctl reload postgresql-onboarding'
#----------
EOF
# Verify the contents of the repmgr.conf
cat /etc/repmgr/16/onboarding_repmgr.confscreenshot
on both chicago and boston host as postgres user.
For the remaining sections, please refer to the official documentation for detailed explanations.
4.1. Prerequisites for configuration
4.2. Configuration file
4.3. Required configuration file settings
4.4. Optional configuration file settings
4.7. repmgr database user permissions
4.8. Password Management
In this course, we use a superuser (repmgr) with full (god-mode) privileges.
This is not considered best practice in production environments, but to keep the concepts and documentation simple, we will continue using a superuser throughout this tutorial.
Least-privilege configurations will be covered in the advanced topics / another tutorial.
Chapter 5. Cloning standbys
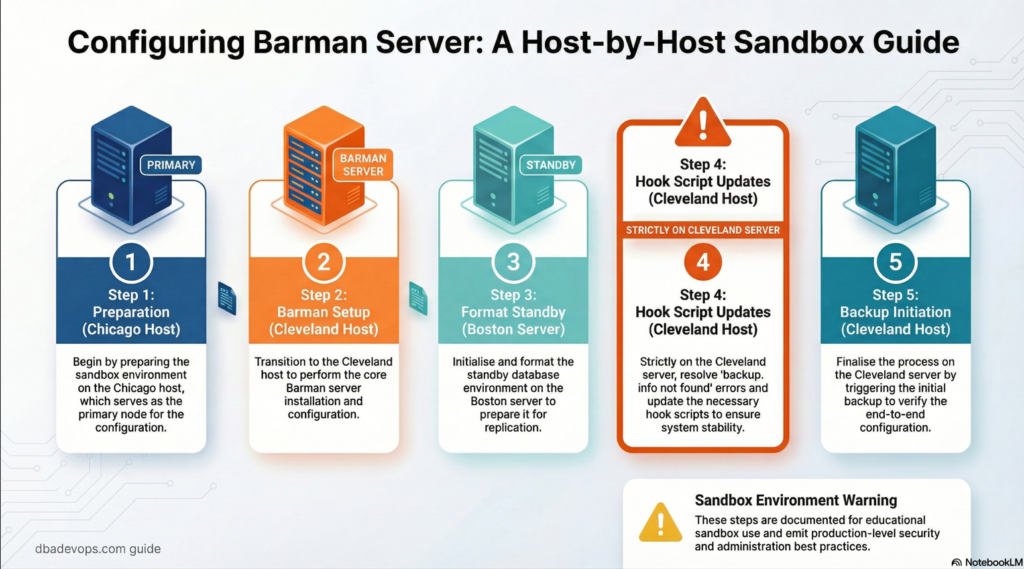
Step 1 : Preparation for barman settings in Chicago host
Step 1.1: Create the barman user
We will follow as per : Rsync setup – barman
Where : as postgres user in chicago server
createuser -s -P barmanscreenshot
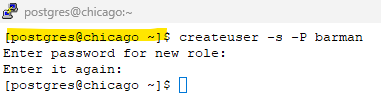
enter password of your choice.
Note: remember this password , we would be updating it in .pgpass file in barman host at step 2.3
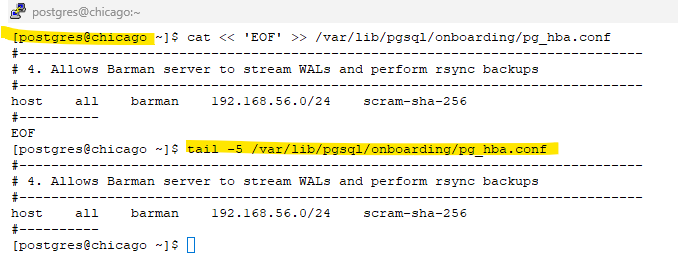
Step 1.2: Update the pg_hba.conf file in chicago to allow connections from barman server.
Where : as postgres user in chicago and boston server
cat << 'EOF' >> /var/lib/pgsql/onboarding/pg_hba.conf
#------------------------------------------------------------------------------
# 4. Allows Barman server to stream WALs and perform rsync backups
#------------------------------------------------------------------------------
host all barman 192.168.56.0/24 scram-sha-256
#----------
EOFscreenshot
Step 1.3: Edit the replication.conf file to include new barman wal archive command
Where : as postgres user in chicago server
sed -i "s|archive_command = '/bin/true'|archive_command = 'barman-wal-archive cleveland onboarding-chicago-backup %p'|" /var/lib/pgsql/onboarding/conf.d/replication.confStep 1.4: Reload your Postgres configuration so the new HBA rule takes effect.
Where : as postgres user in chicago and boston server
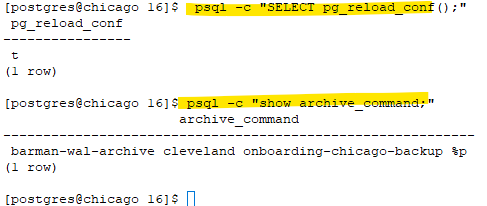
psql -c "SELECT pg_reload_conf();"
psql -c "show archive_command;"screenshot
Step 2: Barman setup
Barman setup : we will follow rsync backup method in this tutorial .
From official page : rsync-backup-barman 3.16
Where : as root user in cleveland server
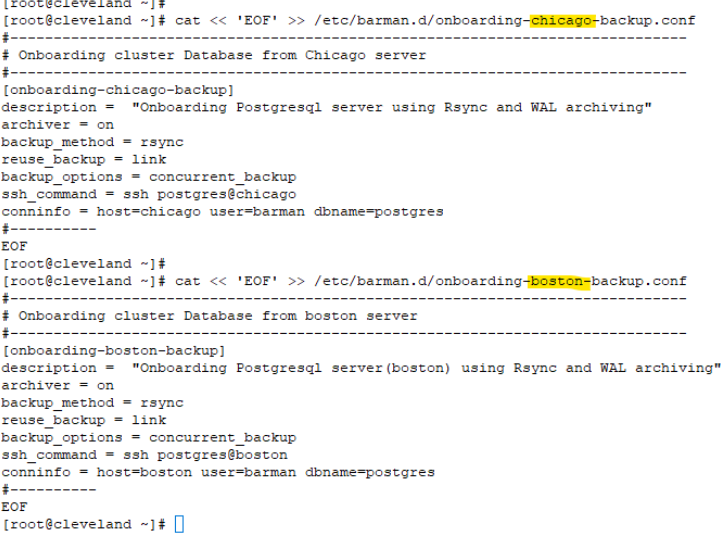
We will create the below config files under /etc/barman.d directory
onboarding-chicago-backup.conf :- for the onboarding cluster running in chicago server (backup for the primary db)
onboarding-boston-backup.conf :- for the onboarding cluster running in boston server – (backup for the standby db)
Note : However, due to limited laptop RAM and resource constraints, we are using a single backup server for both databases in this lab setup. In real-world deployments, it is recommended to use separate backup configurations or dedicated backup servers.
sudo -i -u rootcat << 'EOF' >> /etc/barman.d/onboarding-chicago-backup.conf
#------------------------------------------------------------------------------
# Onboarding cluster Database from chicago server
#------------------------------------------------------------------------------
[onboarding-chicago-backup]
description = "Onboarding Postgresql server(chicago) using Rsync and WAL archiving"
archiver = on
backup_method = rsync
reuse_backup = link
backup_options = concurrent_backup
ssh_command = ssh postgres@chicago
conninfo = host=chicago user=barman dbname=postgres
#----------
EOF
cat << 'EOF' >> /etc/barman.d/onboarding-boston-backup.conf
#------------------------------------------------------------------------------
# Onboarding cluster Database from boston server
#------------------------------------------------------------------------------
[onboarding-boston-backup]
description = "Onboarding Postgresql server(boston) using Rsync and WAL archiving"
archiver = on
backup_method = rsync
reuse_backup = link
backup_options = concurrent_backup
ssh_command = ssh postgres@boston
conninfo = host=boston user=barman dbname=postgres
#----------
EOFscreenshot
Step 2.2 : Switch to Barman user
su - barmanStep 2.3: create the .pgpass file
# Replace the <Passwd_for_barman_user> created in Step 1 .
cat << 'EOF' >> /var/lib/barman/.pgpass
#hostname:port:database:username:password
chicago:5432:postgres:barman:<Passwd_for_barman_user>
boston:5432:postgres:barman:<Passwd_for_barman_user>
EOF
# change the permission of .pgpass to barman user
chown barman:barman /var/lib/barman/.pgpass screenshot

Step 2.4: Change the permission of the .pgpass file to 600 as barman user.
Note: we are adding boston server details upfront although no barman user created there. This will help us to take backup for the standby db server after it is created.
chmod 0600 /var/lib/barman/.pgpassStep 3: Format the standby boston (since we will re-clone in Step 5)
Where : as postgres user in boston server
Step 3.1: Clean up the previously provisioned standby from repmgr
# On Boston
sudo systemctl stop postgresql-onboarding# On Boston as postgres user
rm -rf /var/lib/pgsql/onboarding/*Step 3.2: Update the repmgr.conf in boston server – to fetch the wal files from chicago folder in cleveland(barman server)
cat << 'EOF' >> /etc/repmgr/16/onboarding_repmgr.conf
#------------------------------------------------------------------------------
# Barman options
#------------------------------------------------------------------------------
barman_server='onboarding-chicago-backup' # cluster_name_server_name
barman_host='barman@cleveland' # server where barman is installed
restore_command='/usr/bin/barman-wal-restore cleveland onboarding-chicago-backup %f %p' #5.1.2. Using Barman as a WAL file source
use_replication_slots=true # 5.2. Cloning and replication slots
#----------
EOFStep 4 : Fix : backup.info not found
Barman introduced a minor change in3.13.2: relocation of the backup.info file
Follow this link for more info: Link
Here we discuss steps on how to fix in the newer version of Barman
Step 4.1 : Preparation of Hook script
Where : as barman user in cleveland server
what below steps does:
1) creates a directory for barman hook scripts LINK
2) copy the bakcup.info to the repmgr expected path.
3) change the permission to execute mode.
#1 Create a directory for hook scripts
mkdir -p /var/lib/barman/scripts/
# 2 : create a file fix_metadata.sh- and will be updating the below contents
cat << 'EOF' >> /var/lib/barman/scripts/fix_metadata.sh
#!/bin/bash
# Usage: ./fix_metadata.sh <server_name> <backup_id>
SERVER=$1
BACKUP_ID=$2
META_SOURCE="/var/lib/barman/$SERVER/meta/$BACKUP_ID-backup.info"
TARGET_DIR="/var/lib/barman/$SERVER/base/$BACKUP_ID"
# 1. Check if the metadata file exists
if [ -f "$META_SOURCE" ]; then
# 2. Ensure the target directory exists (it should, as the backup just finished)
if [ -d "$TARGET_DIR" ]; then
## 3. Create the file ../../meta/<timestamp>-backup.info : backup.info
cp /var/lib/barman/${BARMAN_SERVER}/meta/${BARMAN_BACKUP_ID}-backup.info /var/lib/barman/$SERVER/base/$BACKUP_ID/backup.info
echo "[$(date)] SUCCESS: Linked $META_SOURCE to $TARGET_DIR/backup.info" >> /var/log/barman/repmgr_fix.log
fi
else
echo "[$(date)] ERROR: Could not find $META_SOURCE" >> /var/log/barman/repmgr_fix.log
exit 1
fi
EOF
# 3 : Change the permission of the script
chmod +x /var/lib/barman/scripts/fix_metadata.shStep 4.2: Update the post_backup_script in barman.conf
Where : as root / vagrant user in cleveland server :
sudo sed -i 's|^;post_backup_script =.*|post_backup_script = /var/lib/barman/scripts/fix_metadata.sh ${BARMAN_SERVER} ${BARMAN_BACKUP_ID}|' /etc/barman.confStep 5: Barman Backup initiation
Barman checks
Where : as barman user in cleveland server
sudo -i -u barmanbarman list-serversscreenshot

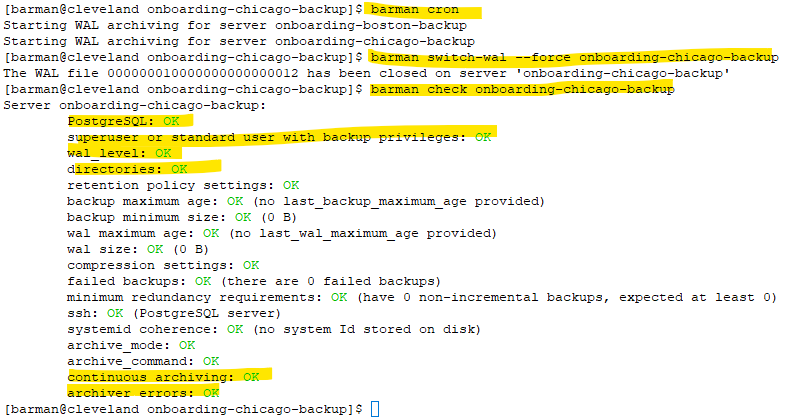
Step 5.2: Force a wal switch in barman host for the onboarding cluster running in chicago host,
barman switch-wal --force onboarding-chicago-backupscreenshot

Step 5.3: Initiate barman cron
barman cronscreenshot

Step 5.4: Check for the wal shipping to barman host .
barman check onboarding-chicago-backupscreenshot
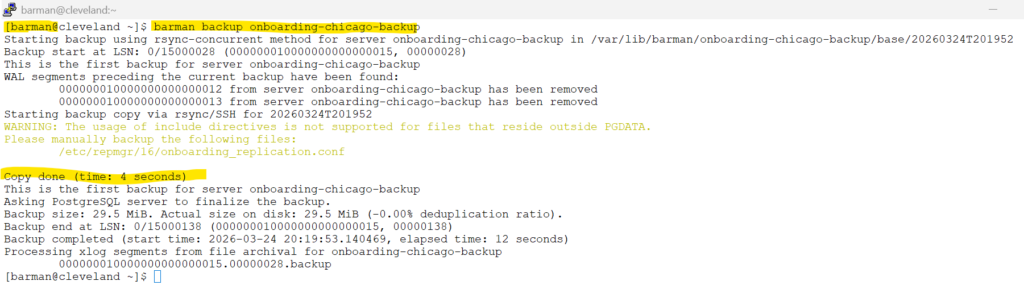
Step 5.5: Initiate backup from the barman server
barman backup onboarding-chicago-backupscreenshot
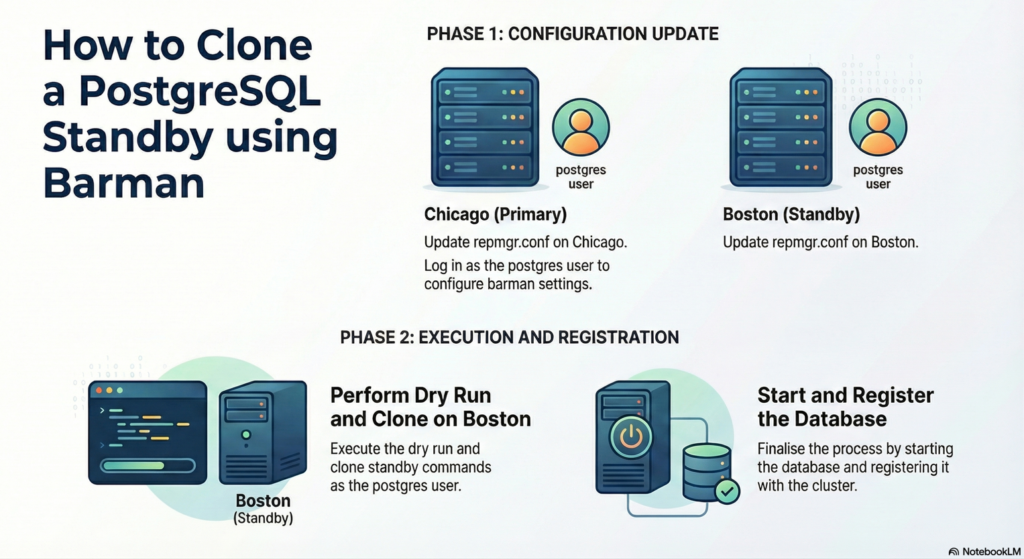
Tutorials for below sections are combined
Replication slots are used in this tutorial and is completely optional, please ignore if not needed.
5.1 / 5.2 Cloning a standby from Barman & replication slots
5.1 Cloning a standby from Barman
5.2. Cloning and replication slots
Where : as postgres user in both chicago and boston server
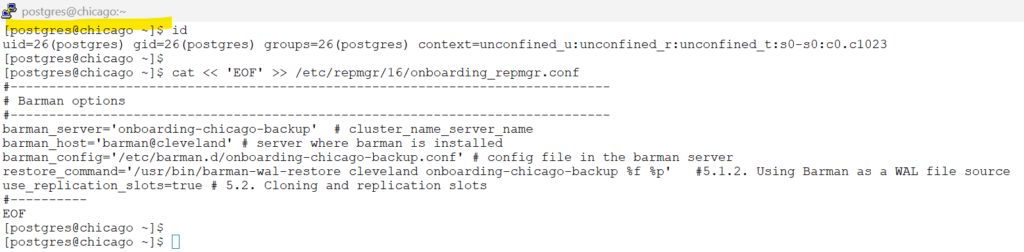
Update the repmgr.conf for barman configuration settings.
cat << 'EOF' >> /etc/repmgr/16/onboarding_repmgr.conf
#------------------------------------------------------------------------------
# Barman options
#------------------------------------------------------------------------------
barman_server='onboarding-chicago-backup' # cluster_name_server_name
barman_host='barman@cleveland' # server where barman is installed
restore_command='/usr/bin/barman-wal-restore cleveland onboarding-chicago-backup %f %p' #5.1.2. Using Barman as a WAL file source
use_replication_slots=true # 5.2. Cloning and replication slots
#----------
EOFscreenshot
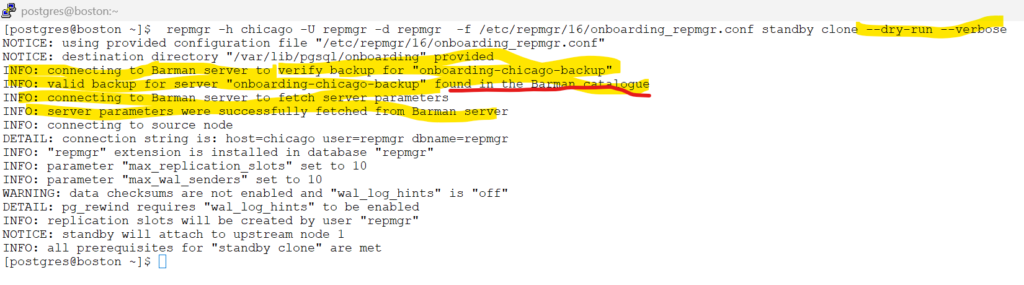
Where : as postgres user in boston server
execute Dry run commands to check if boston is setup properly to clone chicago .
repmgr -h chicago -U repmgr -d repmgr -f /etc/repmgr/16/onboarding_repmgr.conf standby clone --dry-run --verbosescreenshot
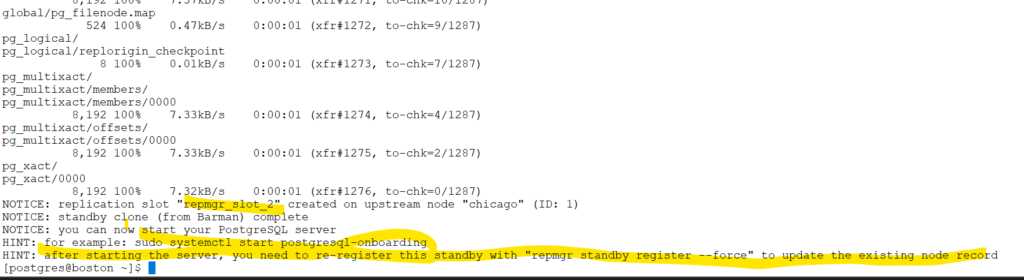
Initiate standby clone
repmgr -h chicago -U repmgr -d repmgr -f /etc/repmgr/16/onboarding_repmgr.conf standby clonescreenshot
start & register the database
#Start the standby database on boston server as postgres user
sudo systemctl start postgresql-onboarding
# Register the standby database
repmgr -f /etc/repmgr/16/onboarding_repmgr.conf standby register -F
#Check the node is registered by executing repmgr cluster show on the standby:
repmgr -f /etc/repmgr/16/onboarding_repmgr.conf cluster showscreenshot
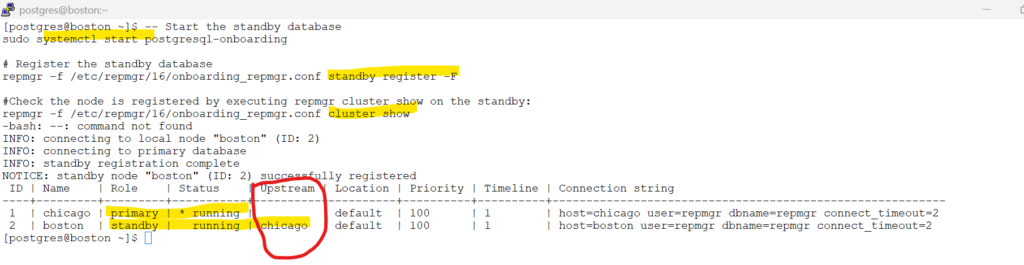
Check for the replication slots .
# check the replication slots.
psql -U postgres -d repmgr -c "SELECT node_id, upstream_node_id, active, node_name, type, priority, slot_name FROM repmgr.nodes ORDER BY node_id;"Congratulations , you succesfully configured barman setup and cloned to standby using repmgr
Skipped Chapters
From repmgr documentation :
What we will not cover in this tutorials is :
we will ignore this in the lab setup
5.1.3. Using Barman through its API (pg-backup-api)
5.3. Cloning and cascading replication
5.4.3. Separate replication user
5.4.4. Tablespace mapping
Chapter 6. Promoting a standby server with repmgr
Chapter 7. Following a new primary
Chapter 8. Performing a switchover with repmgr
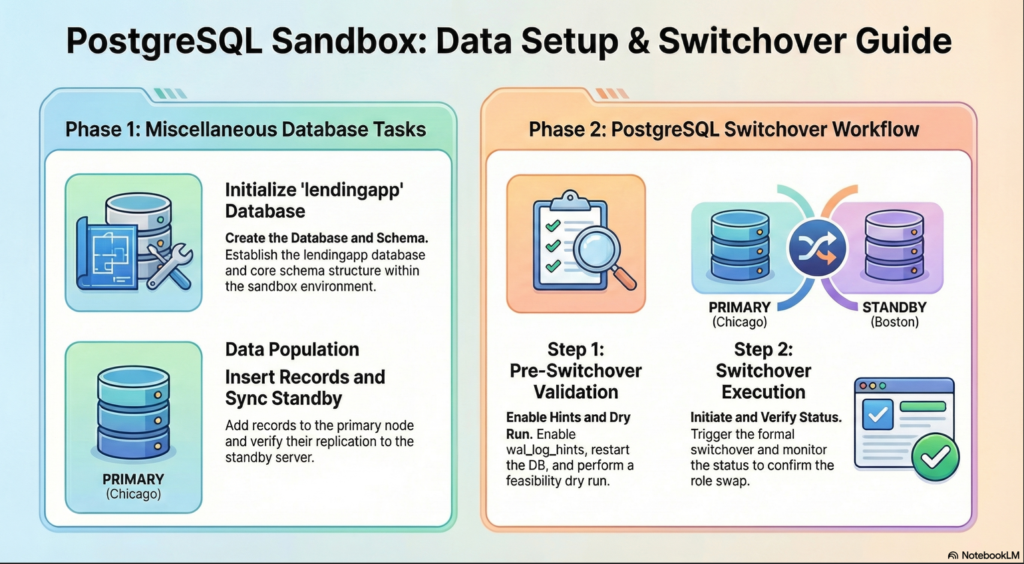
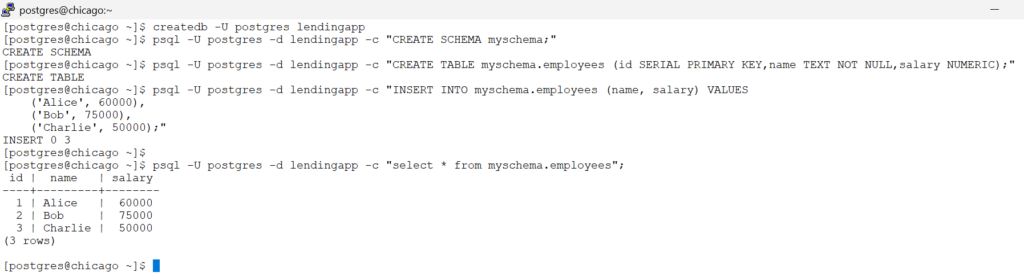
Miscellaneous: Check for Sync in standby
Where : as postgres user in chicago server
Create a Database , a table and insert set of records
# create a database called lendingapp
createdb -U postgres lendingapp
# create a schema called myschema
psql -U postgres -d lendingapp -c "CREATE SCHEMA myschema;"
# create a table called employees
psql -U postgres -d lendingapp -c "CREATE TABLE myschema.employees (id SERIAL PRIMARY KEY,name TEXT NOT NULL,salary NUMERIC);"
# insert few sample records
psql -U postgres -d lendingapp -c "INSERT INTO myschema.employees (name, salary) VALUES
('Alice', 60000),
('Bob', 75000),
('Charlie', 50000);"
# check for the records in the table
psql -U postgres -d lendingapp -c "select * from myschema.employees";screenshot
Where : as postgres user in boston server
# check for the records in the table
psql -U postgres -d lendingapp -c "select * from myschema.employees";You should be seeing the same records from Primary (chicago) is being shipped and applied at the Standby(boston) server.
8.1. Preparing for switchover
we will follow the steps as per preparing-for-switchover
Docs to read for pg_rewind , pg_rewind_in_repmgr
Where : as postgres user in both chicago and boston server
repmgr -f /etc/repmgr/16/onboarding_repmgr.conf node service --list-actions --action=stop
repmgr -f /etc/repmgr/16/onboarding_repmgr.conf node service --list-actions --action=start
repmgr -f /etc/repmgr/16/onboarding_repmgr.conf node service --list-actions --action=restart
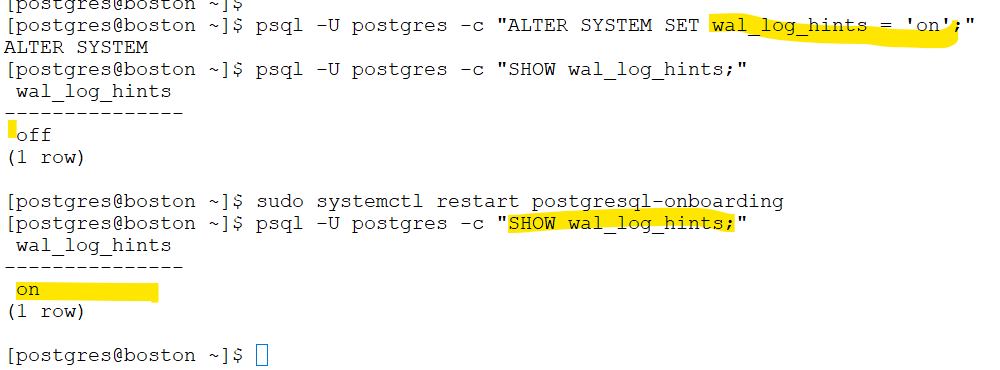
psql -U postgres -c "SHOW wal_log_hints;"
psql -U postgres -c "ALTER SYSTEM SET wal_log_hints = 'on';"
sudo systemctl restart postgresql-onboarding
psql -U postgres -c "SHOW wal_log_hints;"screenshot
chicago – screenshot
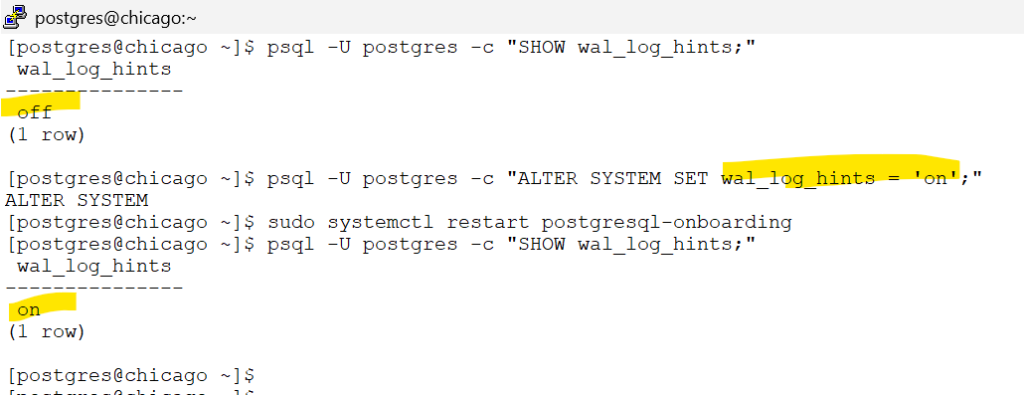
boston – screenshot
Where : as postgres user in boston server
dry run to check if standby is ready for switchover
repmgr standby switchover -f /etc/repmgr/16/onboarding_repmgr.conf --dry-run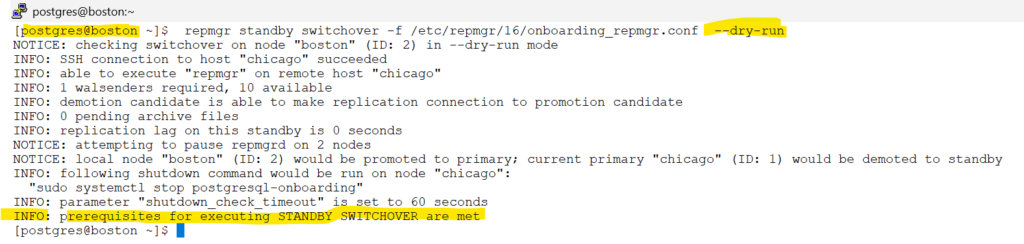
8.2. Executing the switchover command
we will follow the steps as per Executing the switchover command
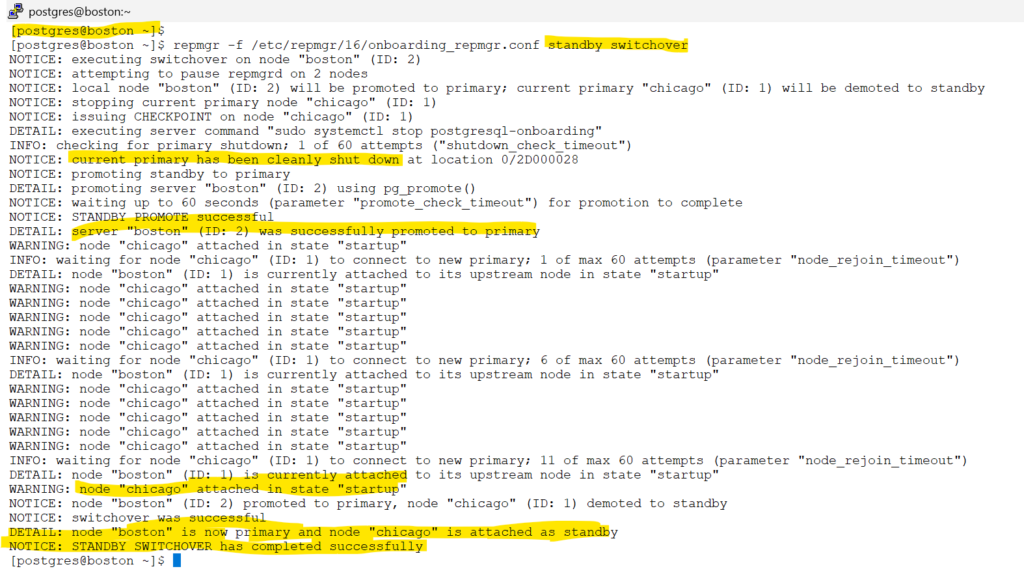
Where : as postgres user in boston server
repmgr -f /etc/repmgr/16/onboarding_repmgr.conf standby switchoverscreenshot
repmgr -f /etc/repmgr/16/onboarding_repmgr.conf cluster showscreenshot

Congratulations on the switchover test ,
now the primary is boston and standby is chicago
For the below topics, read the official documentation
8.3. Caveats
8.4. Troubleshooting switchover issues
Chapter 9. Event Notifications
Lets follow the official page : Chapter 9. Event Notifications
Each time repmgr or repmgrd perform a significant event, a record of that event is written into the repmgr.events table together with a timestamp, an indication of failure or success, and further details if appropriate.
psql -U repmgr -c "SELECT * from repmgr.events ;"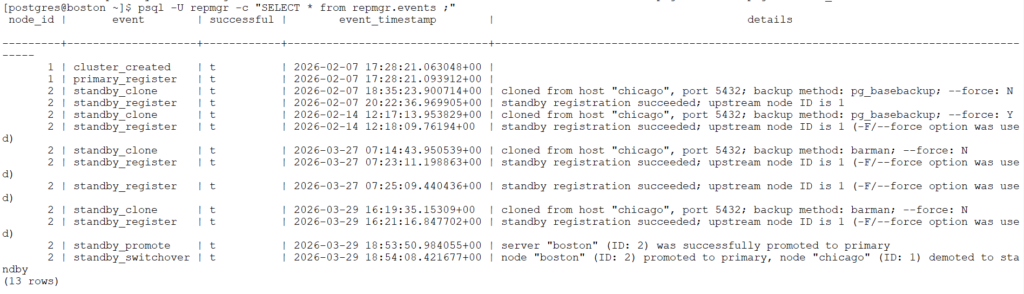
Note: We will skip the below chapters
Chapter 10. Upgrading repmgr – (we will cover this in advanced tutorials)
Chapter 11. repmgrd overview – (we will cover this in advanced tutorials)
Chapter 12. Automatic failover with repmgrd – (chapter 12 requires additional postgresql server, we will skip this. )
Chapter 13. repmgrd setup and configuration
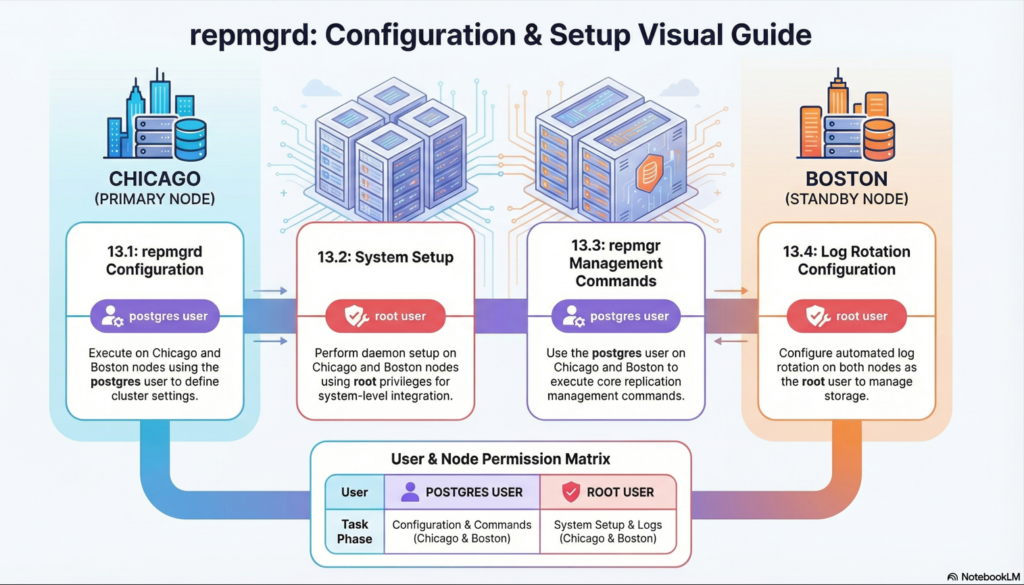
We will follow the steps as per official documentation Chapter 13. repmgrd setup and configuration
13.1. repmgrd configuration
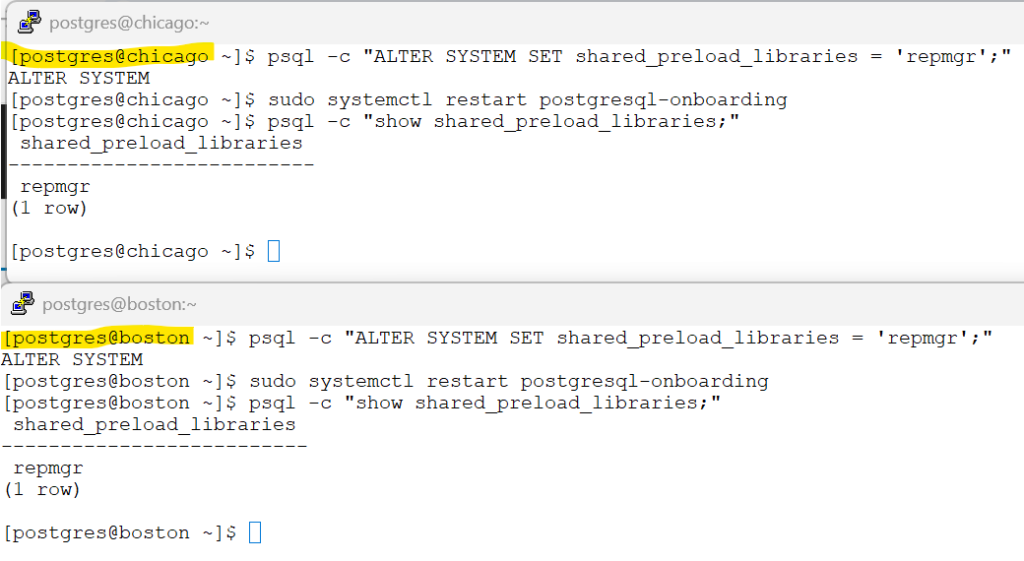
Where : as postgres user in both chicago and boston server
To use repmgrd, its associated function library must be included via postgresql.conf with below
# Preload the repmgr shared library (requires server restart)
psql -c "ALTER SYSTEM SET shared_preload_libraries = 'repmgr';"
# Restart the instance in both the servers
sudo systemctl restart postgresql-onboarding
# Verify if the library changes have taken effect
psql -c "show shared_preload_libraries;"screenshot
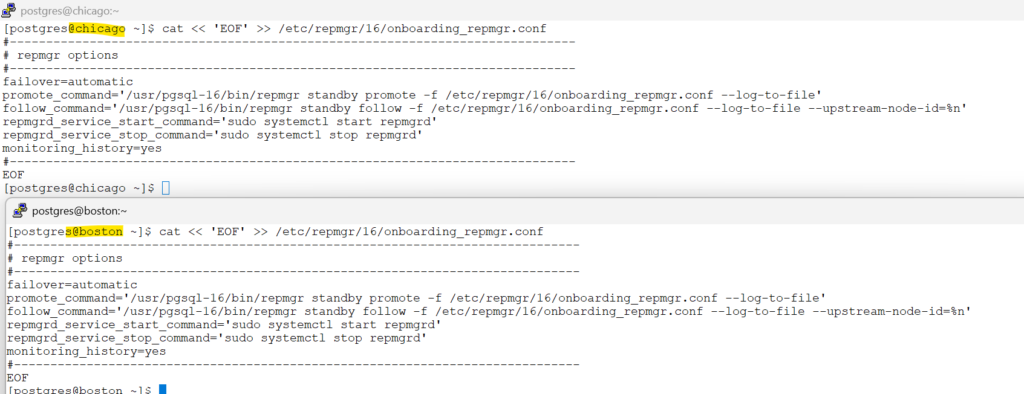
Steps for below sections
13.1.1. Required configuration for automatic failover
13.1.5. repmgrd service configuration
13.1.6. Monitoring configuration
cat << 'EOF' >> /etc/repmgr/16/onboarding_repmgr.conf
#------------------------------------------------------------------------------
# repmgr options
#------------------------------------------------------------------------------
failover=automatic
promote_command='/usr/pgsql-16/bin/repmgr standby promote -f /etc/repmgr/16/onboarding_repmgr.conf --log-to-file'
follow_command='/usr/pgsql-16/bin/repmgr standby follow -f /etc/repmgr/16/onboarding_repmgr.conf --log-to-file --upstream-node-id=%n'
repmgrd_service_start_command='sudo systemctl start repmgrd'
repmgrd_service_stop_command='sudo systemctl stop repmgrd'
monitoring_history=yes
#------------------------------------------------------------------------------
EOFscreenshot
For rest of the topics in the chapter 13 , please go through the official page tutorials.
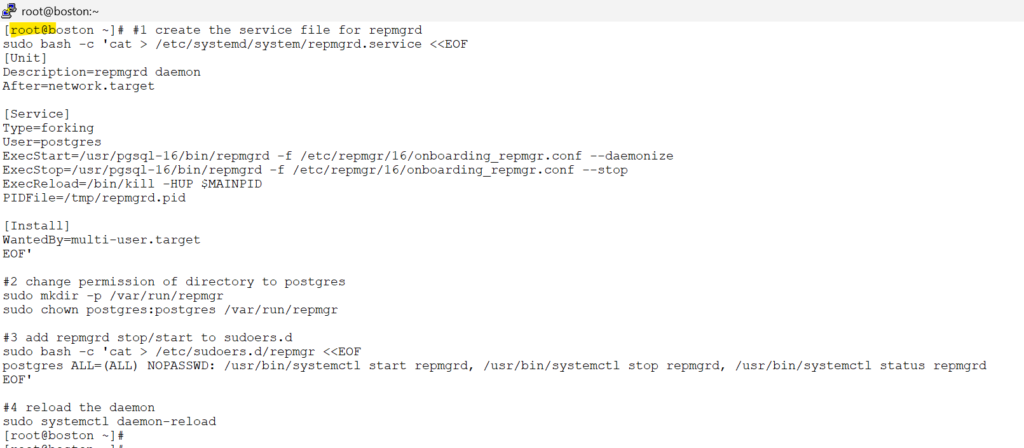
13.2 setup - repmgrd
Where : as vagrant/root user in both chicago and boston server
#1 create the service file for repmgrd
sudo bash -c 'cat > /etc/systemd/system/repmgrd.service <<EOF
[Unit]
Description=repmgrd daemon
After=network.target
[Service]
Type=forking
User=postgres
ExecStart=/usr/pgsql-16/bin/repmgrd -f /etc/repmgr/16/onboarding_repmgr.conf --daemonize
ExecStop=/usr/pgsql-16/bin/repmgrd -f /etc/repmgr/16/onboarding_repmgr.conf --stop
ExecReload=/bin/kill -HUP $MAINPID
PIDFile=/tmp/repmgrd.pid
[Install]
WantedBy=multi-user.target
EOF'
#2 change permission of directory to postgres
sudo mkdir -p /var/run/repmgr
sudo chown postgres:postgres /var/run/repmgr
#3 add repmgrd stop/start to sudoers.d
sudo bash -c 'cat > /etc/sudoers.d/repmgr <<EOF
postgres ALL=(ALL) NOPASSWD: /usr/bin/systemctl start repmgrd, /usr/bin/systemctl stop repmgrd, /usr/bin/systemctl status repmgrd
EOF'
#4 reload the daemon
sudo systemctl daemon-reloadscreenshot
13.3 repmgr commands for repmgrd
Where : as postgres user in both chicago and boston server
# switch to postgres user
sudo -i -u postgres
# start the repmgrd service
sudo systemctl start repmgrd
# check the status of repmgrd service
sudo systemctl status repmgrdscreenshot
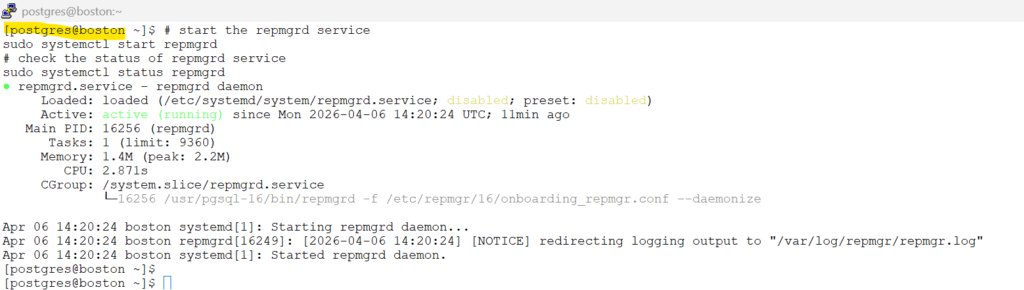
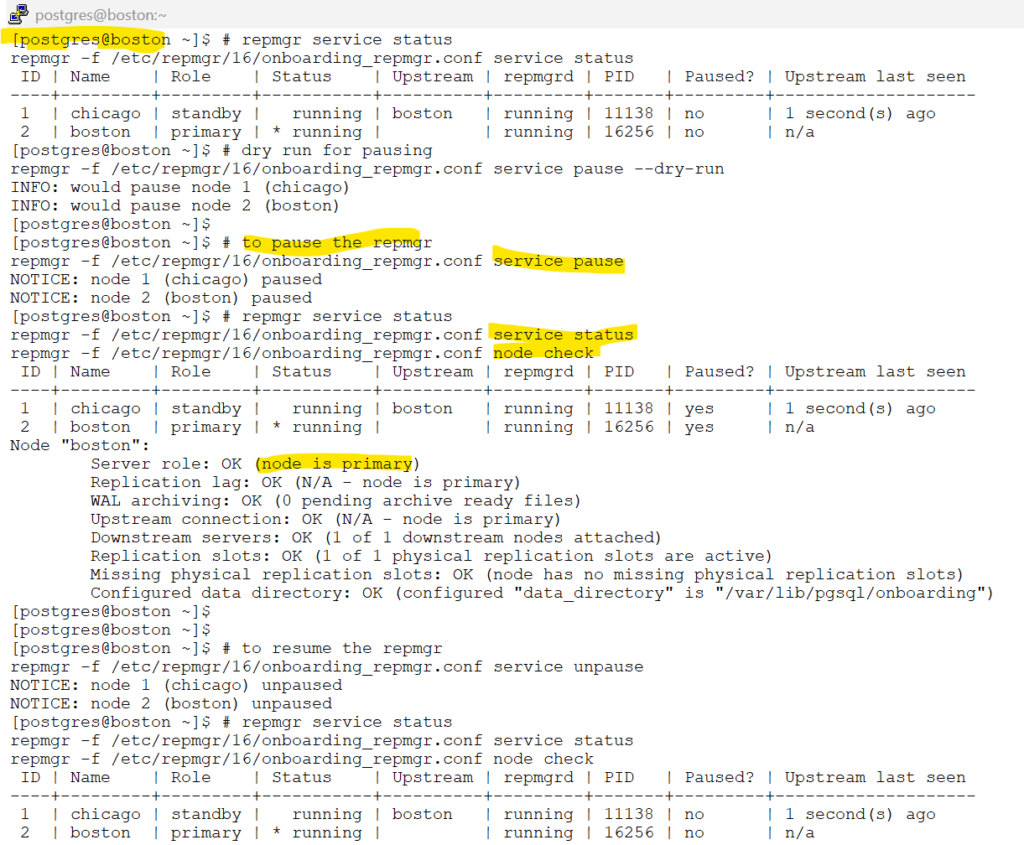
familiarize yourself with below repmgr commands for repmgrd
# repmgr service status
repmgr -f /etc/repmgr/16/onboarding_repmgr.conf service status

# dry run for pausing
repmgr -f /etc/repmgr/16/onboarding_repmgr.conf service pause --dry-run

# to pause the repmgr
repmgr -f /etc/repmgr/16/onboarding_repmgr.conf service pause

# repmgr service status
repmgr -f /etc/repmgr/16/onboarding_repmgr.conf service status
repmgr -f /etc/repmgr/16/onboarding_repmgr.conf node check

# to resume the repmgr
repmgr -f /etc/repmgr/16/onboarding_repmgr.conf service unpause

# repmgr service status
repmgr -f /etc/repmgr/16/onboarding_repmgr.conf service status
repmgr -f /etc/repmgr/16/onboarding_repmgr.conf node checkscreenshot
13.4. repmgrd log rotation
we will follow the steps as documented in 13.4. repmgrd log rotation
Where : as vagrant/root user in both chicago and boston server
sudo bash -c 'cat > /etc/logrotate.d/repmgr <<EOF
/var/log/repmgr/repmgr.log {
    missingok
    compress
    rotate 52
    maxsize 100M
    weekly
    create 0600 postgres postgres
    postrotate
        /usr/bin/systemctl reload repmgrd >/dev/null 2>&1 || true
    endscript
}
EOF'# simulate a dry run
sudo logrotate -d /etc/logrotate.d/repmgrscreenshot
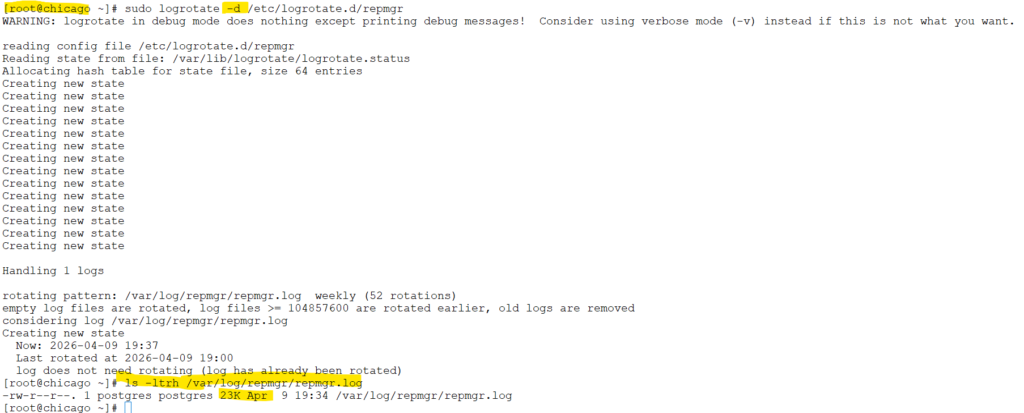
# simulate actual run
sudo logrotate -f /etc/logrotate.d/repmgrscreenshot

Chapter 14. repmgrd operation
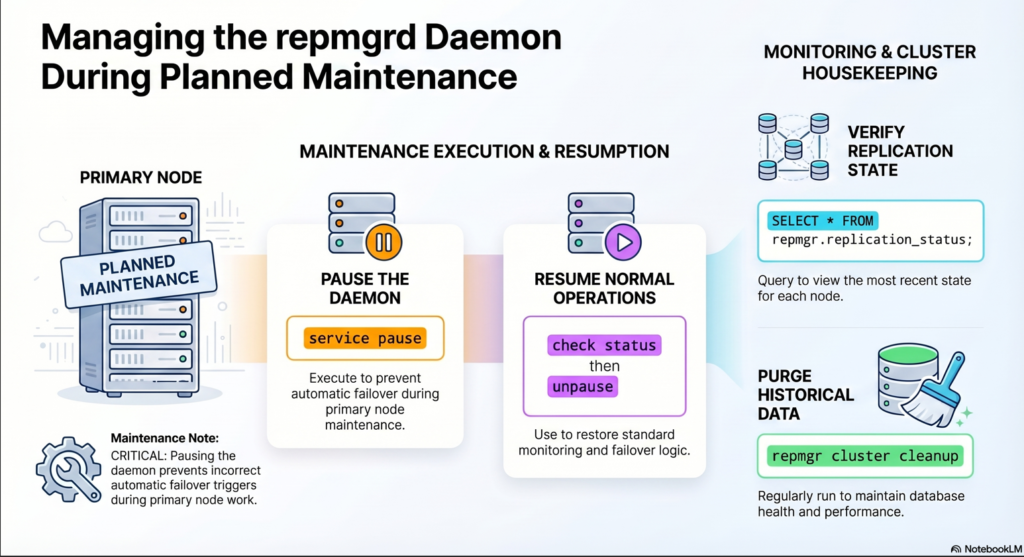
We will follow steps as defined in official documentation Chapter 14. repmgrd operation
repmgrd can now be “paused”, i.e. instructed not to take any action such as performing a failover.
This can be done from any node in the cluster, removing the need to stop/restart each repmgrd individually.
Where : as postgres user in both chicago and boston server
# to pause the repmgrd
repmgr -f /etc/repmgr/16/onboarding_repmgr.conf service pause

# to pause the repmgrd
repmgr -f /etc/repmgr/16/onboarding_repmgr.conf service status

# to start the repmgrd
repmgr -f /etc/repmgr/16/onboarding_repmgr.conf service unpausescreenshot

Storing monitoring data
The view replication_status shows the most recent state for each node, e.g.:
run it on either / both – chicago – boston .
psql -U postgres -d repmgr -c "\x" -c "SELECT * FROM repmgr.replication_status;"The interval in which monitoring history is written is controlled by the configuration parameter monitor_interval_secs; default is 2.
# at primary host
psql -U postgres -d repmgr -c "SELECT pg_size_pretty(pg_total_relation_size('repmgr.monitoring_history'));"As this can generate a large amount of monitoring data in the table repmgr.monitoring_history.
it’s advisable to regularly purge historical data using the repmgr cluster cleanup command;
use the -k/–keep-history option to specify how many day’s worth of data should be retained.
# to clean up keepign the number of days data . example: 1 days
repmgr -f /etc/repmgr/16/onboarding_repmgr.conf cluster cleanup -k 1
on both chicago and boston server
Schedule Cleanup Using Cron or pg_cron
add the cron jobs by crontab -e – it cleans up data older than 30 days
0 0 * * * /usr/bin/repmgr -f /etc/postgresql/16/main/repmgr.conf cluster cleanup -k 30
Chapter 15. repmgrd-demo
Lets see how repmgrd works when the primary database goes down.
fire the below command in our current primary database – boston
Where : as postgres user in boston server
# check the status of repmgrd
repmgr -f /etc/repmgr/16/onboarding_repmgr.conf service status# check the status of primary database - boston
sudo systemctl status postgresql-onboarding
# initiate the shutdown of primary database - boston
sudo systemctl stop postgresql-onboarding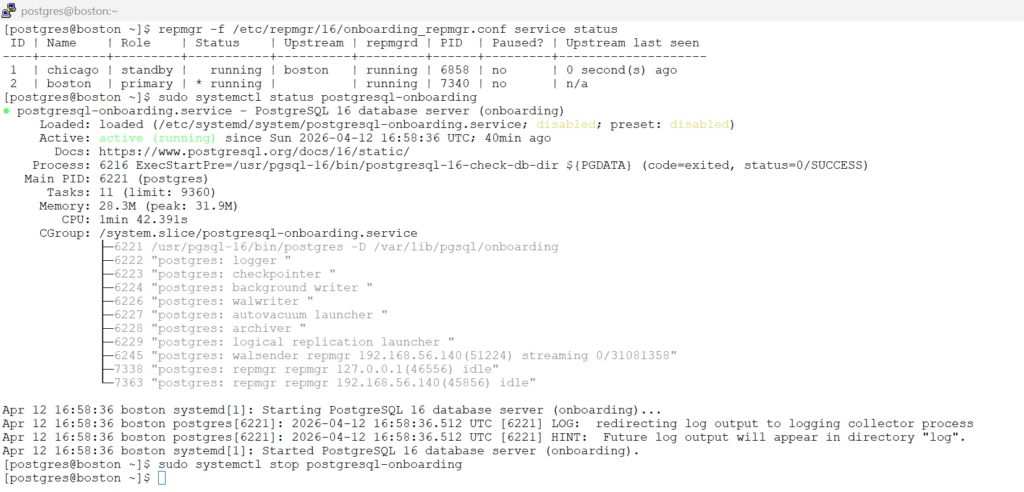
now after shutting down the primary database in boston.
monitor the logfile in chicago
tail -f /var/log/repmgr/repmgr.log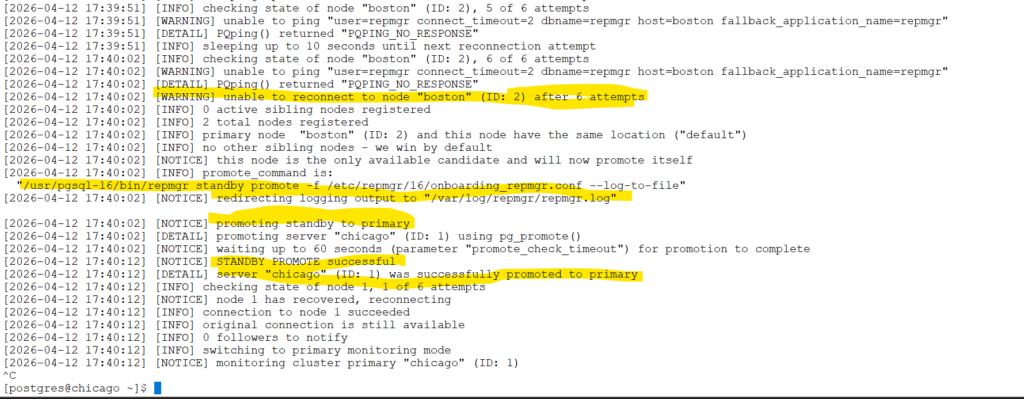
check the status of the database in chicago
# check is database is in recovery mode - expected to be false (f) - since we did failover automatic
 psql -U postgres -c "SELECT pg_is_in_recovery();"
Now that our Boston server has died, we’re running solely on our new primary.
But before you hit the “start” button on Boston, stop! Simply turning it back on will put the server into a “zombie state” (split-brain), where it tries to act as the master alongside our current active node. To fix this properly, we need to rebuild Boston as a standby. Luckily, because we enabled pg_rewind, we don’t have to copy the whole database over again; we can quickly sync the changes and get the cluster healthy again.
on chicago host as postgres user:
we still see boston is as registered as primary database.
repmgr -f /etc/repmgr/16/onboarding_repmgr.conf service status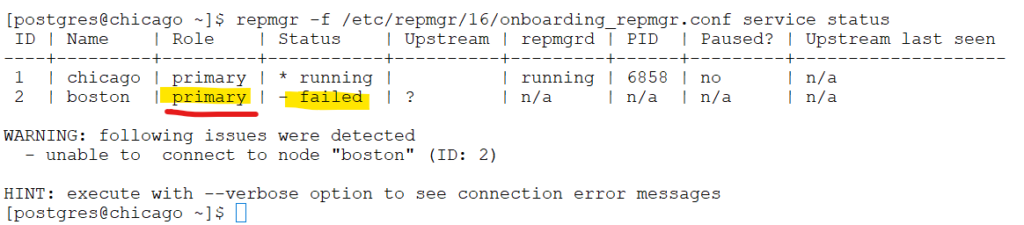
On Boston as postgres user:
repmgr node rejoin -f /etc/repmgr/16/onboarding_repmgr.conf -d 'host=chicago dbname=repmgr user=repmgr' --force-rewind --config-files=postgresql.auto.conf --verbose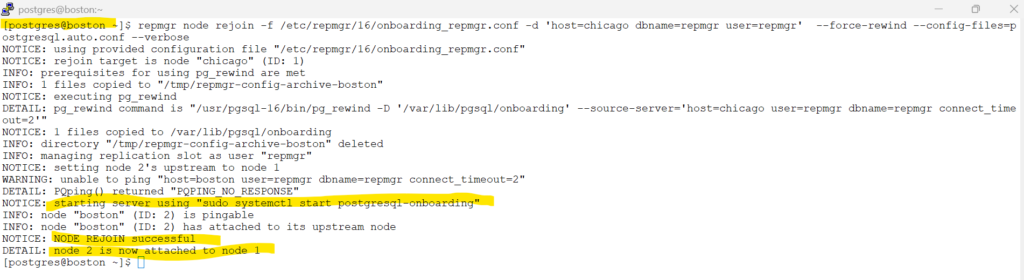
On boson / chicago as postgres user
Check for the repmgrd service.
Now you see the boston is now the standby database and connected to upstream chicago database.
repmgr -f /etc/repmgr/16/onboarding_repmgr.conf service status
Congratulations, You have practiced the failover of repmgrd in this tutorials