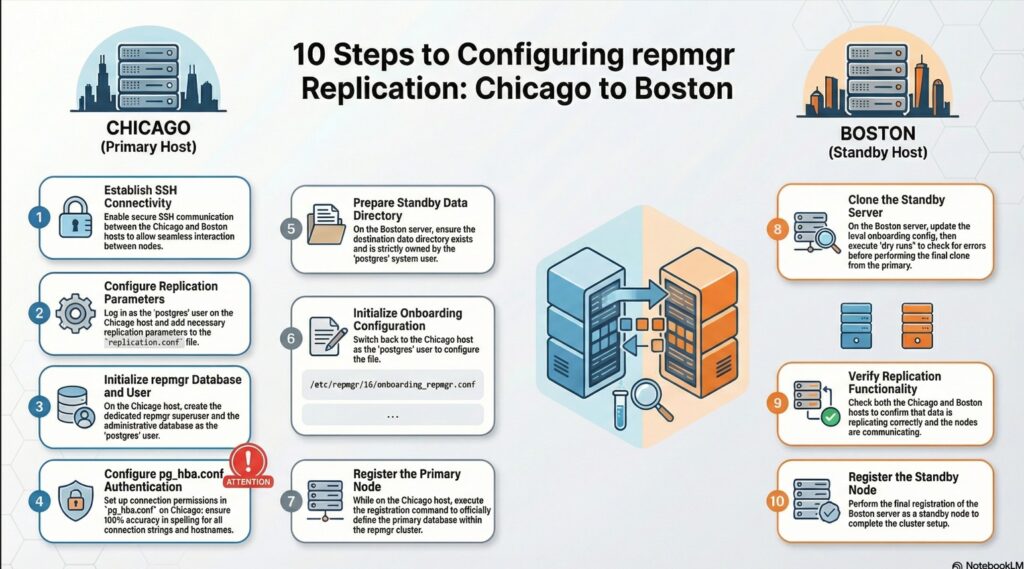
3.1. Prerequisites for setting up a basic replication cluster with repmgr
enabling ssh between chicago and boston
As per 3.1 from official pages: 3.1. Prerequisites for setting up a basic replication cluster with repmgr
we need passwordless SSH connections between both servers, and rsync should be installed.
Note: By default rsync is installed as part of our server provisioning. Hence skipping it.
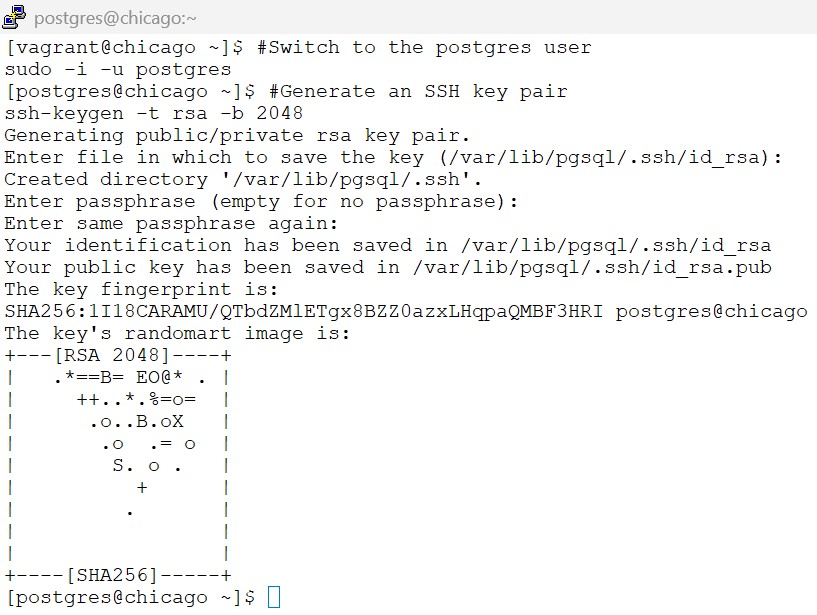
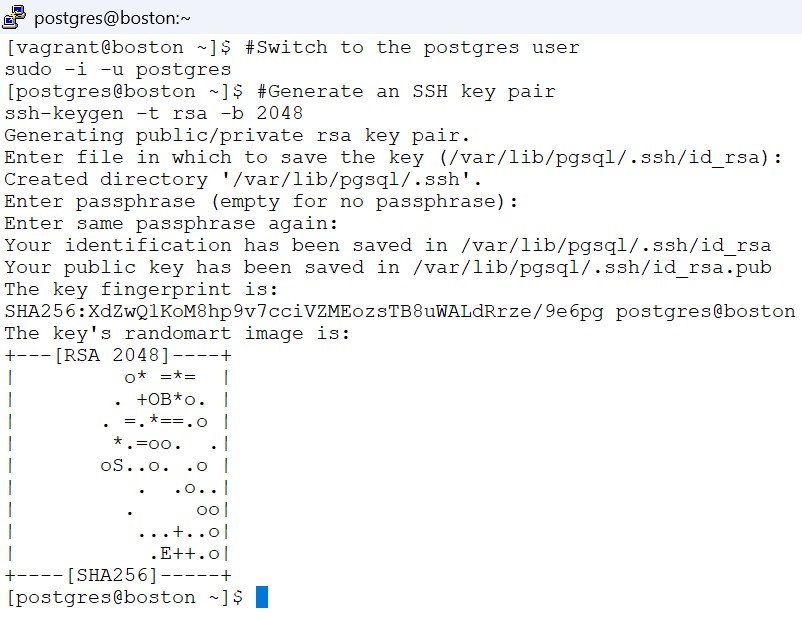
3.1.1 generate the ssh key pair on both chicago and boston as postgres user
On both Chicago and boston servers – we need to switch to postgres user
#Switch to the postgres user
sudo -i -u postgres

#Generate an SSH key pair
ssh-keygen -t rsa -b 2048Note: Hit Enter button – 3 times .
screenshot
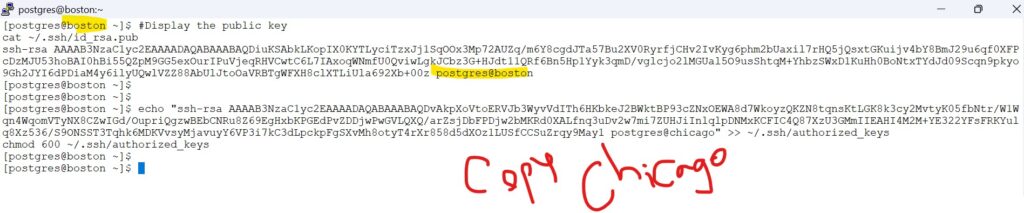
3.1.2 copy public keys of one server to authorized keys of other server
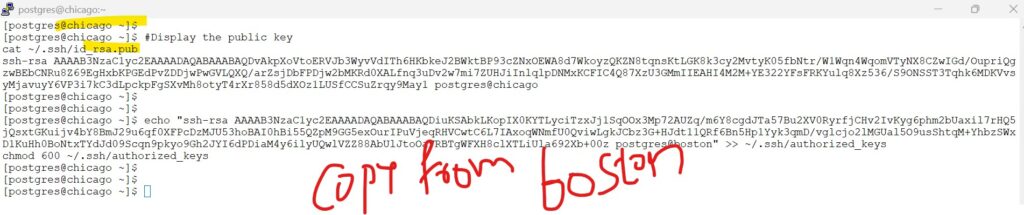
On both Chicago and boston servers as postgres- Display the public key
#Display the public key
cat ~/.ssh/id_rsa.pub
Copy the code you see from boston to chicago,, and the code from chicago to boston .. below is an example format
and chmod 600 for the file
echo "<copied-public-key_of_other_host_/.ssh/id_rsa.pub>" >> ~/.ssh/authorized_keys
chmod 600 ~/.ssh/authorized_keysscreenshot
— the ssh-rsa code placed within double quotes is copied from boston to chicago
echo “ssh-rsa AAAAB3NzaC1yc2EAAAADAQABAAABAQDiuKSAbkLKopIX0KYTLyciTzxJj1SqOOx3Mp72AUZq/m6Y8cgdJTa57Bu2XV0RyrfjCHv2IvKyg6phm2bUaxil7rHQ5jQsxtGKuijv4bY8BmJ29u6qf0XFPcDzMJU53hoBAI0hBi55QZpM9GG5exOurIPuVjeqRHVCwtC6L7IAxoqWNmfU0QviwLgkJCbz3G+HJdt11QRf6Bn5Hp1Yyk3qmD/vglcjo2lMGUal5O9usShtqM+YhbzSWxD1KuHh0BoNtxTYdJd09Scqn9pkyo9Gh2JYI6dPDiaM4y6ilyUQwlVZZ88AbUlJtoOaVRBTgWFXH8clXTLiUla692Xb+00z postgres@boston” >> ~/.ssh/authorized_keys
chmod 600 ~/.ssh/authorized_keys
— the ssh-rsa code placed within double quotes is copied from chicago to boston
echo “ssh-rsa AAAAB3NzaC1yc2EAAAADAQABAAABAQDvAkpXoVtoERVJb3WyvVdITh6HKbkeJ2BWktBP93cZNxOEWA8d7WkoyzQKZN8tqnsKtLGK8k3cy2MvtyK05fbNtr/W1Wqn4WqomVTyNX8CZwIGd/OupriQgzwBEbCNRu8Z69EgHxbKPGEdPvZDDjwPwGVLQXQ/arZsjDbFPDjw2bMKRd0XALfnq3uDv2w7mi7ZUHJiInlqlpDNMxKCFIC4Q87XzU3GMmIIEAHI4M2M+YE322YFsFRKYulq8Xz536/S9ONSST3Tqhk6MDKVvsyMjavuyY6VP3i7kC3dLpckpFgSXvMh8otyT4rXr858d5dXOz1LUSfCCSuZrqy9May1 postgres@chicago” >> ~/.ssh/authorized_keys
chmod 600 ~/.ssh/authorized_keys
3.1.3 check ssh to other server
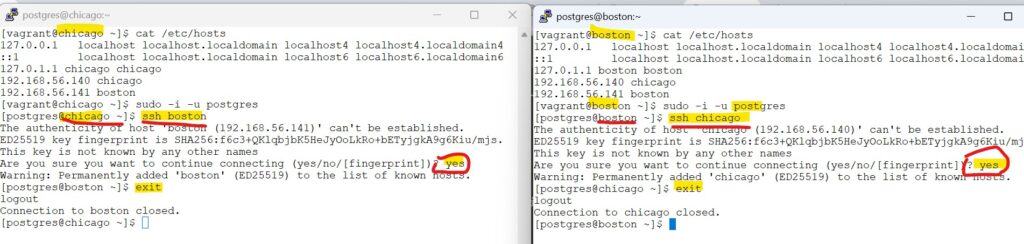
From Boston server: (try ssh to chicago server)
ssh postgres@chicago
# exit back to boston
exitwhen prompted : type : yes and hit enter
From Chicago server: (try ssh to boston server)
ssh postgres@boston
# exit back to chicago
exitwhen prompted : type : yes and hit enter
screenshot
3.2. PostgreSQL configuration
lets follow the steps as per official documentation : 3.2. PostgreSQL configuration
3.2.1 “By using an external onboarding.replication.conf file, we decouple replication settings from the main data directory. This prevents critical configuration from being overwritten or lost during repmgr switchovers.”
On Chicago host as postgres user:
# add below parameters to the replication.conf file
cat << EOF >> /etc/repmgr/16/onboarding_replication.conf
max_wal_senders = 10
max_replication_slots = 10
wal_level = 'replica'
hot_standby = on
archive_mode = on
archive_command = '/bin/true'
EOF
3.2.2 “We add the include line because PostgreSQL only reads postgresql.conf by default; this line tells the database to ‘jump’ over and read the replication settings we’ve stored in our separate, safe file.”
On Chicago host as postgres user:
#include 'onboarding.replication.conf' in the master postgresql.conf
echo "include '/etc/repmgr/16/onboarding_replication.conf'" | tee -a /var/lib/pgsql/onboarding/postgresql.confscreenshot
Verify the contents of both the file .
cat /etc/repmgr/16/onboarding_replication.conf
tail -3 /var/lib/pgsql/onboarding/postgresql.conf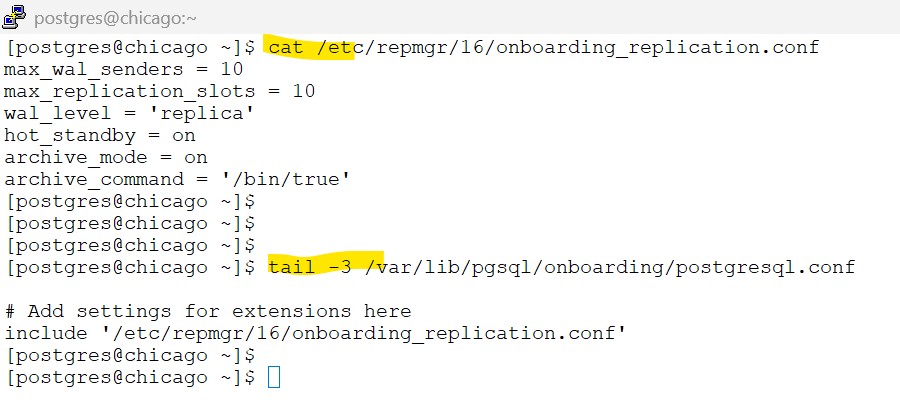
3.3. Create the repmgr user and database
lets follow the steps as per official documentation : 3.3. Create the repmgr user and database
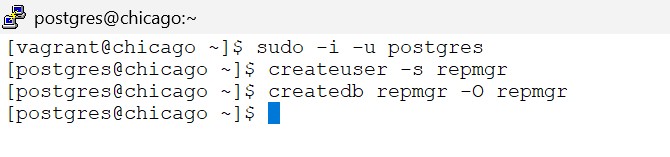
3.3.1 – Create the repmgr super user and the database
On Chicago host as postgres user:
#Create the repmgr user and database
createuser -s repmgr
createdb repmgr -O repmgrscreenshot
3.3.2. set the repmgr user’s search path to include this schema name, e.g.
psql -U postgres -d repmgr -c "ALTER USER repmgr SET search_path TO repmgr, \"$(whoami)\", public;"screenshot

3.4. Configuring authentication in pg_hba.conf
lets follow the steps as per official documentation : 3.4. Configuring authentication in pg_hba.conf
3.4.1 – repmgr user has appropriate permissions in pg_hba.conf and can connect in replication mode
On Chicago host as postgres user:
# Copy the pg_hba file
cp /var/lib/pgsql/onboarding/pg_hba.conf /var/lib/pgsql/onboarding/pg_hba.conf.$(date +'%Y-%m-%d_%H-%M-%S')

# edit the file to add below entries .
vi /var/lib/pgsql/onboarding/pg_hba.confadd below lines to the above file:
Note: as already mentioned – the steps here are just for learning purpose and only applicable to sandbox environment
Note that these are simple settings for testing purposes only
would suggest to replace the contents of sample pg_hba.conf in this tutorial in your sandbox environment
# 1. Allow local system access (postgres user, etc.)
local   all             all                                     peer

# 2. Allow repmgr & replication traffic (The "Fast Track")
# This covers the 'repmgr' database AND the special 'replication' pseudo-db
local   repmgr,replication  repmgr                              trust
host    repmgr,replication  repmgr      127.0.0.1/32            trust
host    repmgr,replication  repmgr      192.168.56.0/24         trust

# 3. Allow general connections
# Place this AFTER the repmgr rules so it doesn't prompt repmgr for a password
host    all                 all         127.0.0.1/32            scram-sha-256
host all all 192.168.56.0/24 scram-sha-256sample – pg_hba.conf
# PostgreSQL Client Authentication Configuration File
# ===================================================
#
# Refer to the "Client Authentication" section in the PostgreSQL
# documentation for a complete description of this file.  A short
# synopsis follows.
#
# ----------------------
# Authentication Records
# ----------------------
#
# This file controls: which hosts are allowed to connect, how clients
# are authenticated, which PostgreSQL user names they can use, which
# databases they can access.  Records take one of these forms:
#
# local         DATABASE  USER  METHOD  [OPTIONS]
# host          DATABASE  USER  ADDRESS  METHOD  [OPTIONS]
# hostssl       DATABASE  USER  ADDRESS  METHOD  [OPTIONS]
# hostnossl     DATABASE  USER  ADDRESS  METHOD  [OPTIONS]
# hostgssenc    DATABASE  USER  ADDRESS  METHOD  [OPTIONS]
# hostnogssenc  DATABASE  USER  ADDRESS  METHOD  [OPTIONS]
#
# (The uppercase items must be replaced by actual values.)
#
# The first field is the connection type:
# - "local" is a Unix-domain socket
# - "host" is a TCP/IP socket (encrypted or not)
# - "hostssl" is a TCP/IP socket that is SSL-encrypted
# - "hostnossl" is a TCP/IP socket that is not SSL-encrypted
# - "hostgssenc" is a TCP/IP socket that is GSSAPI-encrypted
# - "hostnogssenc" is a TCP/IP socket that is not GSSAPI-encrypted
#
# DATABASE can be "all", "sameuser", "samerole", "replication", a
# database name, a regular expression (if it starts with a slash (/))
# or a comma-separated list thereof.  The "all" keyword does not match
# "replication".  Access to replication must be enabled in a separate
# record (see example below).
#
# USER can be "all", a user name, a group name prefixed with "+", a
# regular expression (if it starts with a slash (/)) or a comma-separated
# list thereof.  In both the DATABASE and USER fields you can also write
# a file name prefixed with "@" to include names from a separate file.
#
# ADDRESS specifies the set of hosts the record matches.  It can be a
# host name, or it is made up of an IP address and a CIDR mask that is
# an integer (between 0 and 32 (IPv4) or 128 (IPv6) inclusive) that
# specifies the number of significant bits in the mask.  A host name
# that starts with a dot (.) matches a suffix of the actual host name.
# Alternatively, you can write an IP address and netmask in separate
# columns to specify the set of hosts.  Instead of a CIDR-address, you
# can write "samehost" to match any of the server's own IP addresses,
# or "samenet" to match any address in any subnet that the server is
# directly connected to.
#
# METHOD can be "trust", "reject", "md5", "password", "scram-sha-256",
# "gss", "sspi", "ident", "peer", "pam", "ldap", "radius" or "cert".
# Note that "password" sends passwords in clear text; "md5" or
# "scram-sha-256" are preferred since they send encrypted passwords.
#
# OPTIONS are a set of options for the authentication in the format
# NAME=VALUE.  The available options depend on the different
# authentication methods -- refer to the "Client Authentication"
# section in the documentation for a list of which options are
# available for which authentication methods.
#
# Database and user names containing spaces, commas, quotes and other
# special characters must be quoted.  Quoting one of the keywords
# "all", "sameuser", "samerole" or "replication" makes the name lose
# its special character, and just match a database or username with
# that name.
#
# ---------------
# Include Records
# ---------------
#
# This file allows the inclusion of external files or directories holding
# more records, using the following keywords:
#
# include           FILE
# include_if_exists FILE
# include_dir       DIRECTORY
#
# FILE is the file name to include, and DIR is the directory name containing
# the file(s) to include.  Any file in a directory will be loaded if suffixed
# with ".conf".  The files of a directory are ordered by name.
# include_if_exists ignores missing files.  FILE and DIRECTORY can be
# specified as a relative or an absolute path, and can be double-quoted if
# they contain spaces.
#
# -------------
# Miscellaneous
# -------------
#
# This file is read on server startup and when the server receives a
# SIGHUP signal.  If you edit the file on a running system, you have to
# SIGHUP the server for the changes to take effect, run "pg_ctl reload",
# or execute "SELECT pg_reload_conf()".
#
# ----------------------------------
# Put your actual configuration here
# ----------------------------------
#
# If you want to allow non-local connections, you need to add more
# "host" records.  In that case you will also need to make PostgreSQL
# listen on a non-local interface via the listen_addresses
# configuration parameter, or via the -i or -h command line switches.

# CAUTION: Configuring the system for local "trust" authentication
# allows any local user to connect as any PostgreSQL user, including
# the database superuser.  If you do not trust all your local users,
# use another authentication method.


# TYPE  DATABASE        USER            ADDRESS                 METHOD

# "local" is for Unix domain socket connections only
local   all             all                                     trust
# IPv4 local connections:
host    all             all             127.0.0.1/32            trust
# IPv6 local connections:
host    all             all             ::1/128                 trust
# Allow replication connections from localhost, by a user with the
# replication privilege.
# 1. Allow local system access (postgres user, etc.)
local   all             all                                     peer

# 2. Allow repmgr & replication traffic
# This covers the 'repmgr' database AND the special 'replication' pseudo-db
local   repmgr,replication  repmgr                              trust
host    repmgr,replication  repmgr      127.0.0.1/32            trust
host    repmgr,replication  repmgr      192.168.56.0/24         trust

# 3. Allow general connections
# Place this AFTER the repmgr rules so it doesn't prompt repmgr for a password
host    all                 all         127.0.0.1/32            scram-sha-256
host all all 192.168.56.0/24 scram-sha-2563.4.2. Reload the configuration for the changes to take affect
# Reload the configuration
psql -c "SELECT pg_reload_conf();"3.5. Preparing the standby
lets follow the steps as per official documentation : 3.5. Preparing the standby
3.5.1 – ensure the destination data directory exist and are owned by the postgres system user
On Boston host as postgres user:
# 1. Create the directory structure
mkdir -p /var/lib/pgsql/onboarding

# 2. Set the mandatory permissions (0700)
chmod 700 /var/lib/pgsql/onboarding

# 3. Verify the work
ls -ld /var/lib/pgsql/onboardingscreenshot

3.5.2 Check the primary database is reachable from the standby using psql:
On Boston host as postgres user:
# Check the primary database is reachable from the standby using psql:
psql 'host=chicago user=repmgr dbname=repmgr connect_timeout=2'screenshot

3.5.3 copy below contents to .bash_profile
cat <<EOF > ~/.bash_profile
export PATH=/usr/pgsql-16/bin:\$PATH
export MANPATH=/usr/pgsql-16/share/man:\$MANPATH
export PS1="[\u@\h \W]\$ "
EOF

source ~/.bash_profile
3.6. repmgr configuration file
lets follow the steps as per official documentation : 3.6. Configuring authentication in pg_hba.conf
3.6.1 Update the repmgr.conf file to add below entries .
on Chicago host as postgres user:
cat << 'EOF' >> /etc/repmgr/16/onboarding_repmgr.conf
pg_bindir='/usr/pgsql-16/bin/'
ssh_options='-q -o ConnectTimeout=10'
node_id=1
node_name='chicago'
conninfo='host=chicago user=repmgr dbname=repmgr connect_timeout=2'
data_directory='/var/lib/pgsql/onboarding'
EOF
chmod 600 /etc/repmgr/16/onboarding_repmgr.conf3.6.2 copy below contents to .bash_profile
cat <<EOF > ~/.bash_profile
export PATH=/usr/pgsql-16/bin:\$PATH
export MANPATH=/usr/pgsql-16/share/man:\$MANPATH
export PS1="[\u@\h \W]\$ "
EOF

source ~/.bash_profile
3.7. Register the primary server
lets follow the steps as per 3.7. Register the primary server
3.7.1 register the primary database
on Chicago host as postgres user:
repmgr -f /etc/repmgr/16/onboarding_repmgr.conf primary register
screenshot

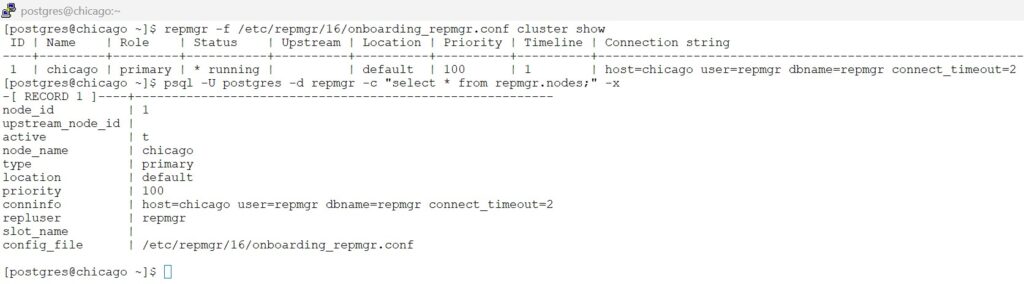
3.7.2 verify the status of the cluster
on Chicago host as postgres user:
# View the cluster show
repmgr -f /etc/repmgr/16/onboarding_repmgr.conf cluster show

# View the record in repmgr metadata
psql -U postgres -d repmgr -c "select * from repmgr.nodes;" -x
screenshot
3.8. Clone the standby server
lets follow the steps as per 3.8. Clone the standby server
3.8.1 Update the config file
on Boston host as postgres user:
# update the entries for the repmgr config file
cat << 'EOF' >> /etc/repmgr/16/onboarding_repmgr.conf
pg_bindir='/usr/pgsql-16/bin/'
ssh_options='-q -o ConnectTimeout=10'
node_id=2
node_name='boston'
conninfo='host=boston user=repmgr dbname=repmgr connect_timeout=2'
data_directory='/var/lib/pgsql/onboarding'
EOF

# change the permission to 600 for the config file
chmod 600 /etc/repmgr/16/onboarding_repmgr.conf3.8.2 Use the --dry-run option to check if the standby can be cloned:
on Boston host as postgres user:
#Dry run to check if primary chicago can be cloned to standby
repmgr -h chicago -U repmgr -d repmgr --copy-external-config-files -f /etc/repmgr/16/onboarding_repmgr.conf standby clone --dry-runscreenshot
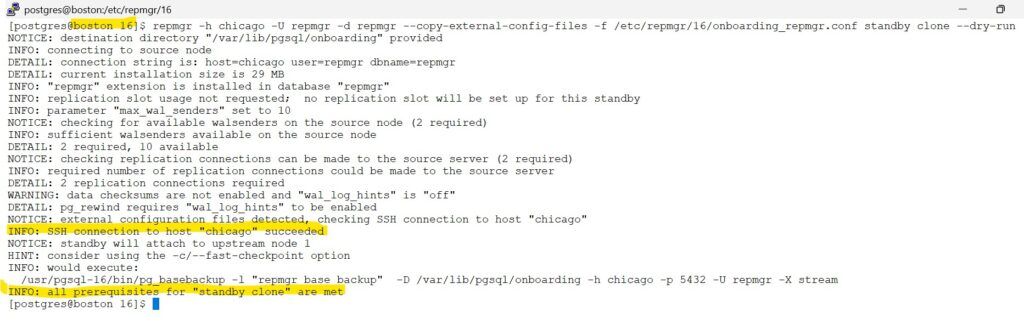
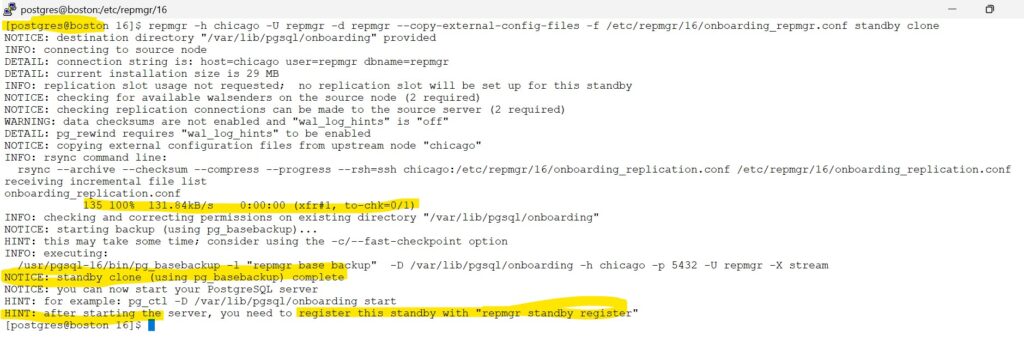
3.8.3 If no problems are reported, the standby can then be cloned with:
on Boston host as postgres user:
#Clone the primary to standby
repmgr -h chicago -U repmgr -d repmgr --copy-external-config-files -f /etc/repmgr/16/onboarding_repmgr.conf standby clonescreenshot
3.8.4 start the standby
on Boston host as postgres user:
# Start the Stanby database
/usr/pgsql-16/bin/pg_ctl -D /var/lib/pgsql/onboarding/ -l logfile startscreenshot

3.9. Verify replication is functioning
lets follow the steps as per : 3.9. Verify replication is functioning
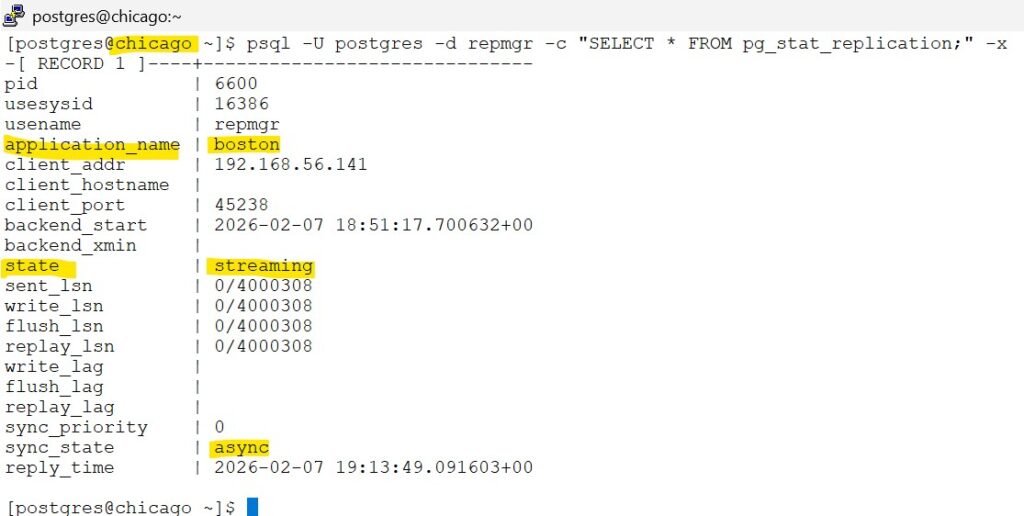
on Chicago host as postgres user –(Connect to the primary server and execute:)
# execute on -- primary server,(chicago)
psql -U postgres -d repmgr -c "SELECT * FROM pg_stat_replication;" -xscreenshot
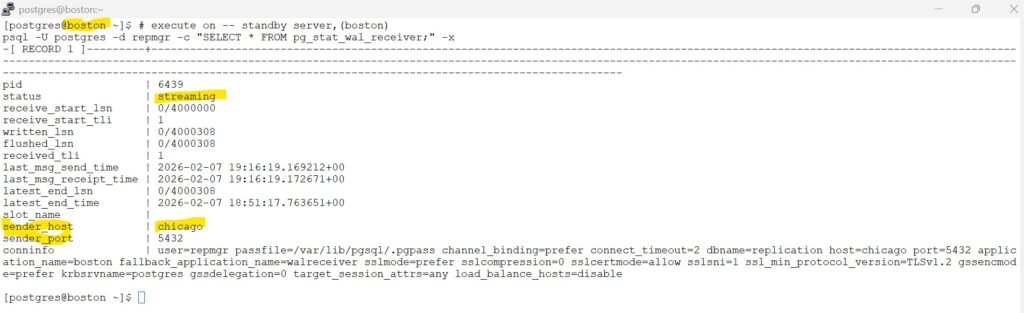
on Boston host as postgres user –(check the replication status from the standby)
# execute on -- standby server,(boston)
psql -U postgres -d repmgr -c "SELECT * FROM pg_stat_wal_receiver;" -xscreenshot
3.10. Register the standby
lets follow the steps as per 3.9. Verify replication is functioning
Register the standby server with:
on Boston host as postgres user:
# Register the standby database
repmgr -f /etc/repmgr/16/onboarding_repmgr.conf standby registerscreenshot

Congratulations, you have successfully cloned the standby database.